启用 Spring Cloud Gateway 的 OAuth2 支持,并将其与 Keycloak 集成
Spring Cloud Gateway 的 OAuth2 支持是微服务安全流程的关键部分。当然,使用 API 网关模式的主要原因是将服务隐藏起来,不对外部客户端可见。然而,在隐藏服务时,并没有对其进行安全保护。本文将带你了解如何使用 Spring Security 和 Keycloak 设置 Spring Cloud Gateway 的 OAuth2 功能。
源码
本文中的源码托管在 Github 上,你可以克隆 sample-spring-security-microservices 仓库,然后按照说明进行安装和部署即可。
在 Spring Cloud Gateway 中启用 OAuth2
要为 Spring Cloud Gateway 应用启用 OAuth2 支持,除了启用网关功能所必需的 spring-cloud-starter-gateway 依赖外,还需要添加 spring-boot-starter-oauth2-client 以启用 Spring Security 对 OAuth 2.0 授权框架和 OpenID Connect Core 1.0 的客户端支持,以及 spring-cloud-starter-security 来激活 TokenRelay Filter。
<dependency>
   <groupId>org.springframework.boot</groupId>
   <artifactId>spring-boot-starter-oauth2-client</artifactId>
</dependency>
<dependency>
   <groupId>org.springframework.cloud</groupId>
   <artifactId>spring-cloud-starter-gateway</artifactId>
</dependency>
<dependency>
   <groupId>org.springframework.cloud</groupId>
   <artifactId>spring-cloud-starter-security</artifactId>
</dependency>
接下来为 OAuth2 客户端提供配置设置。因为要与 Keycloak 集成,所以应将 registrationId 的名称(spring.security.oauth2.client.provider.[registrationId])设置为 keycloak。然后,需要设置 token、authorization 和 userinfo 端点的 uri。另一方面,可以为单个 issuer 端点设置一个值。该部分最后一个重要属性是 user-name-attribute。Keycloak 会将用户登录信息返回到 preferred_username 属性中。
我们要定义两个不同的授权客户端。其中第一个 spring-cloud-gateway 包含测试方法所允许的 scope,而第二个 spring-cloud-gateway-2 则不包含。
spring:
  security:
    oauth2:
      client:
        provider:
          keycloak:
            token-uri: http://localhost:8080/auth/realms/master/protocol/openid-connect/token
            authorization-uri: http://localhost:8080/auth/realms/master/protocol/openid-connect/auth
            userinfo-uri: http://localhost:8080/auth/realms/master/protocol/openid-connect/userinfo
            user-name-attribute: preferred_username
        registration:
          keycloak-with-test-scope:
            provider: keycloak
            client-id: spring-with-test-scope
            client-secret: c6480137-1526-4c3e-aed3-295aabcb7609
            authorization-grant-type: authorization_code
            redirect-uri: "{baseUrl}/login/oauth2/code/keycloak"
          keycloak-without-test-scope:
            provider: keycloak
            client-id: spring-without-test-scope
            client-secret: f6fc369d-49ce-4132-8282-5b5d413eba23
            authorization-grant-type: authorization_code
            redirect-uri: "{baseUrl}/login/oauth2/code/keycloak"
最后一步,需要配置 Spring Security。由于 Spring Cloud Gateway 是在 Spring WebFlux 的基础上构建的,因此需要在 @Configuration Bean 上添加 @EnableWebFluxSecurity 驱动注解。在 springSecurityFilterChain 方法中,启用所有对于 exchange 的授权。还把 OAuth2 设置为默认登录方法,最后禁用 CSRF。
@Configuration
@EnableWebFluxSecurity
public class SecurityConfig {

   @Bean
   public SecurityWebFilterChain springSecurityFilterChain(ServerHttpSecurity http) {
      http.authorizeExchange(exchanges -> exchanges.anyExchange().authenticated())
         .oauth2Login(withDefaults());
      http.csrf().disable();
      return http.build();
   }

}
运行并配置 Keycloak
我们在 Docker 容器上运行 Keycloak。默认情况下,Keycloak 在 8080 端口上公开 API 和 Web 控制台。不过,该端口号必须与 Spring Cloud Gateway 应用端口不同,因此用 8888 来覆盖它。还需要为管理控制台设置用户名和密码。
$ docker run -d --name keycloak -p 8888:8080 \
   -e KEYCLOAK_USER=spring \
   -e KEYCLOAK_PASSWORD=spring123 \
   jboss/keycloak
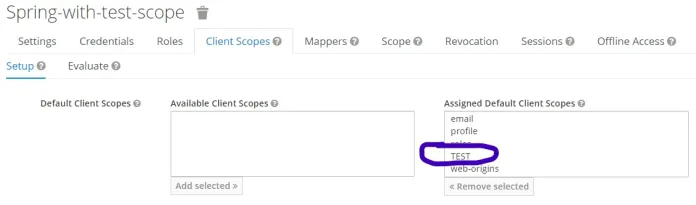
然后,需要创建两个名称与网关配置中定义的名称相同的客户端。这两个客户端的 “Access Type” 部分都必须包含 confidential,并设置有效的重定向 URI。在设置重定向地址时,可以使用简单的通配符,如下图所示。
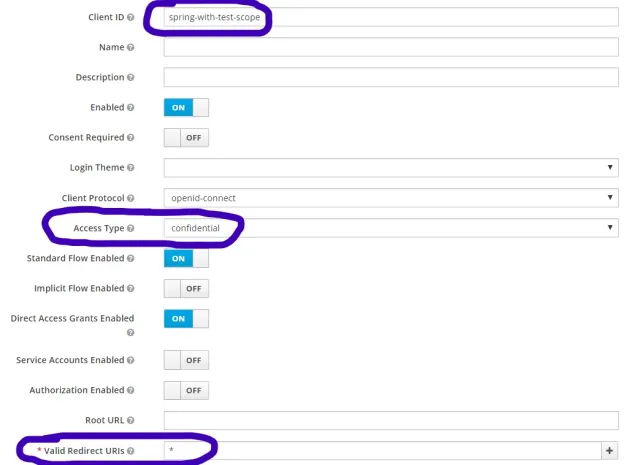
客户端 spring-with-test-scope 分配了 TEST scope。与此相反,第二个客户端 spring-without-test-scope 未分配 TEST scope。
在 Spring Cloud Gateway 中启用 OAuth2 资源
现在,可以开始实现下游应用。要运行它,需要在源代码中切换到 callme 目录。首先,需要包含一些 Maven 依赖。spring-boot-starter-web starter 为 Spring Boot 应用提供了 Web 支持。通过 spring-boot-starter-security,可以为微服务启用 Spring Security。spring-security-oauth2-resource-server 包含 Spring Security 对 OAuth 2.0 资源服务器的支持。它还用于通过 OAuth 2.0 Bearer Token 保护 API。最后,spring-security-oauth2-jose 模块包含 Spring Security 对 JOSE(Javascript Object Signing and Encryption)框架的支持。JOSE 框架提供了一种安全地在各方之间传输 claim 的方法。它支持 JWT 和 JWS(JSON Web Signature)。
<dependencies>
   <dependency>
      <groupId>org.springframework.boot</groupId>
      <artifactId>spring-boot-starter-web</artifactId>
   </dependency>
   <dependency>
      <groupId>org.springframework.boot</groupId>
      <artifactId>spring-boot-starter-security</artifactId>
   </dependency>
   <dependency>
      <groupId>org.springframework.security</groupId>
      <artifactId>spring-security-oauth2-resource-server</artifactId>
   </dependency>
   <dependency>
      <groupId>org.springframework.security</groupId>
      <artifactId>spring-security-oauth2-jose</artifactId>
   </dependency>
</dependencies>
下一步,需要配置与授权服务器的连接。资源服务器使用 spring.security.oauth2.resourceserver.jwt.issuer-uri 属性发现授权服务器公钥(Public Key),然后验证传入的 JWT Token。
spring:
  application:
    name: callme
  security:
    oauth2:
      resourceserver:
        jwt:
          issuer-uri: http://localhost:8080/auth/realms/master
还要提供 Spring Security 配置。首先,需要用 @EnableWebSecurity 对 @Configuration Bean 进行注解。然后,为 Controller 方法启用基于注解的安全配置。它允许使用 @PreAuthorize 和 @PostAuthorize 进行简单的基于角色的访问孔控制。要启用 Method Security 功能,需要使用 @EnableGlobalMethodSecurity 注解。最后,只需配置 Spring Security 以授权所有传入请求并验证 JWT Token。
@Configuration
@EnableWebSecurity
@EnableGlobalMethodSecurity(prePostEnabled = true)
public class SecurityConfig extends WebSecurityConfigurerAdapter {

   protected void configure(HttpSecurity http) throws Exception {
      http.authorizeRequests(authorize -> authorize.anyRequest().authenticated())
            .oauth2ResourceServer(OAuth2ResourceServerConfigurer::jwt);
   }
}
最后,来看看 REST Controller 类的实现。它只有一个 ping 方法。该方法只能由具有 TEST scope 的客户端访问。它从 Authentication Bean 中返回一个分配的 scope 列表。
@RestController
@RequestMapping("/callme")
public class CallmeController {

   @PreAuthorize("hasAuthority('SCOPE_TEST')")
   @GetMapping("/ping")
   public String ping() {
      SecurityContext context = SecurityContextHolder.getContext();
      Authentication authentication = context.getAuthentication();
      return "Scopes: " + authentication.getAuthorities();
   }
}
Spring Cloud Gateway 配置路由
进行测试前的最后一步是在 Spring Cloud Gateway 应用上配置路由。由于下游服务(callme)运行于 8040 端口,我们需要将 uri 设置为 http://127.0.0.1:8040。为了将 Access Token 转发到 callme 服务,必须启用全局过滤器 TokenRelay。为确保一切按预期运行,要删除包含 session ID 的 Cookie。session ID 是在执行 OAuth2Login 后在网关上生成的。
spring:
  application:
    name: gateway
  cloud:
    gateway:
      default-filters:
        - TokenRelay
      routes:
        - id: callme-service
          uri: http://127.0.0.1:8040
          predicates:
            - Path=/callme/**
          filters:
            - RemoveRequestHeader=Cookie
最后,来看看网关 main 类。在这里添加了两个有用的端点。第一个端点 GET / 返回 HTTP session ID。第二个端点 GET /token 返回当前的 JWT Access Token。在 Spring Cloud Gateway OAuth2 登录成功后,你可以看到 index 方法返回的结果。
@SpringBootApplication
@RestController
public class GatewayApplication {

   private static final Logger LOGGER = LoggerFactory.getLogger(GatewayApplication.class);

   public static void main(String[] args) {
      SpringApplication.run(GatewayApplication.class, args);
   }

   @GetMapping(value = "/token")
   public Mono<String> getHome(@RegisteredOAuth2AuthorizedClient OAuth2AuthorizedClient authorizedClient) {
      return Mono.just(authorizedClient.getAccessToken().getTokenValue());
   }

   @GetMapping("/")
   public Mono<String> index(WebSession session) {
      return Mono.just(session.getId());
   }

}
Spring Cloud Gateway OAuth2 测试
我们在网关上调用 POST /login 端点(1)。在接收到登录请求后,Spring Cloud Gateway 尝试从授权服务器获取 Access Token(2)。然后,Keycloak 返回 JWT Access Token。因此,Spring Cloud Gateway 调用 userinfo 端点(3)。在收到响应后,它创建一个 Web Session 和 Authentication Bean。最后,网关将 Session ID 返回给外部客户端(4)。外部客户端使用带有 Session ID 的 Cookie 来进行请求授权。它调用 callme 应用的 GET ping(5)。网关应用将请求转发给下游服务(6)。但是,它会移除 Cookie 并替换为 JWT Access Token。callme 应用验证传入的 Token(7)。最后,如果客户端被允许调用端点,它返回 200 OK 响应(8)。否则,返回 403 Forbidden。
流程图如下:

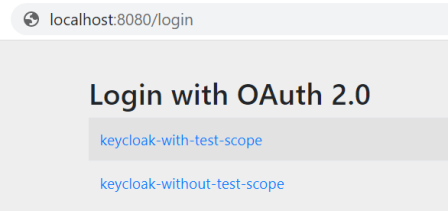
我们可以在 Web 浏览器中进行测试。首先,调用 login 端点。我们需要两个客户端:keycloak-with-test-scope 和 keycloak-without-test-scope。我们将使用keycloak-with-test-scope 客户端。
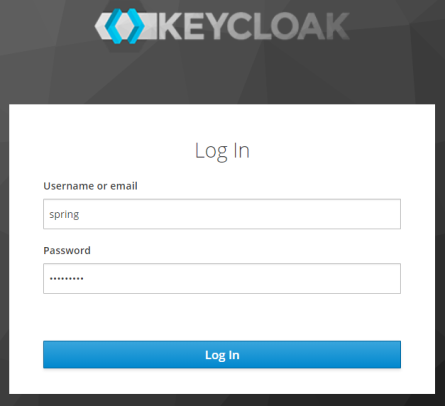
然后,网关会将我们重定向到 Keycloak 登录页面。我们可以使用创建 Keycloak 容器时提供的凭证进行登录。
登录成功后,网关将执行 OAuth2 授权流程。最后,它会将我们重定向到主页。主页只是 Controller 中的一个方法 index,它返回当前 Session ID。
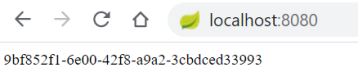
我们还可以使用网关上实现的另一个端点 - GET /token,它返回当前的 JWT Access Token。
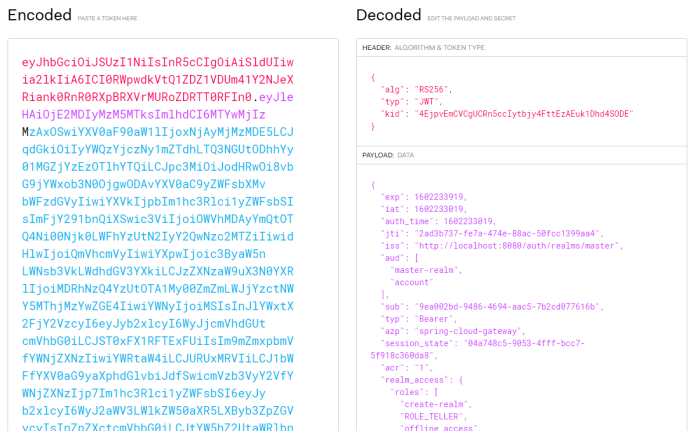
$ curl http://localhost:8080/token -H "Cookie: SESSION=9bf852f1-6e00-42f8-a9a2-3cbdced33993"
eyJhbGciOiJSUzI1NiIsInR5cCIgOiAiSldUIiwia2lkIiA6ICI0RWpwdkVtQ1ZDZ1VDUm41Y2NJeXRiank0RnR0RXpBRXVrMURoZDRTT0RFIn0.eyJleHAiOjE2MDIyMzM5MTksImlhdCI6MTYwMjIz
MzAxOSwiYXV0aF90aW1lIjoxNjAyMjMzMDE5LCJqdGkiOiIyYWQzYjczNy1mZTdhLTQ3NGUtODhhYy01MGZjYzEzOTlhYTQiLCJpc3MiOiJodHRwOi8vbG9jYWxob3N0OjgwODAvYXV0aC9yZWFsbXMv
bWFzdGVyIiwiYXVkIjpbIm1hc3Rlci1yZWFsbSIsImFjY291bnQiXSwic3ViIjoiOWVhMDAyYmQtOTQ4Ni00Njk0LWFhYzUtN2IyY2QwNzc2MTZiIiwidHlwIjoiQmVhcmVyIiwiYXpwIjoic3ByaW5n
LWNsb3VkLWdhdGV3YXkiLCJzZXNzaW9uX3N0YXRlIjoiMDRhNzQ4YzUtOTA1My00ZmZmLWJjYzctNWY5MThjMzYwZGE4IiwiYWNyIjoiMSIsInJlYWxtX2FjY2VzcyI6eyJyb2xlcyI6WyJjcmVhdGUt
cmVhbG0iLCJST0xFX1RFTExFUiIsIm9mZmxpbmVfYWNjZXNzIiwiYWRtaW4iLCJURUxMRVIiLCJ1bWFfYXV0aG9yaXphdGlvbiJdfSwicmVzb3VyY2VfYWNjZXNzIjp7Im1hc3Rlci1yZWFsbSI6eyJy
b2xlcyI6WyJ2aWV3LWlkZW50aXR5LXByb3ZpZGVycyIsInZpZXctcmVhbG0iLCJtYW5hZ2UtaWRlbnRpdHktcHJvdmlkZXJzIiwiaW1wZXJzb25hdGlvbiIsImNyZWF0ZS1jbGllbnQiLCJtYW5hZ2Ut
dXNlcnMiLCJxdWVyeS1yZWFsbXMiLCJ2aWV3LWF1dGhvcml6YXRpb24iLCJxdWVyeS1jbGllbnRzIiwicXVlcnktdXNlcnMiLCJtYW5hZ2UtZXZlbnRzIiwibWFuYWdlLXJlYWxtIiwidmlldy1ldmVu
dHMiLCJ2aWV3LXVzZXJzIiwidmlldy1jbGllbnRzIiwibWFuYWdlLWF1dGhvcml6YXRpb24iLCJtYW5hZ2UtY2xpZW50cyIsInF1ZXJ5LWdyb3VwcyJdfSwiYWNjb3VudCI6eyJyb2xlcyI6WyJtYW5h
Z2UtYWNjb3VudCIsIm1hbmFnZS1hY2NvdW50LWxpbmtzIiwidmlldy1wcm9maWxlIl19fSwic2NvcGUiOiJwcm9maWxlIGVtYWlsIFRFU1QiLCJlbWFpbF92ZXJpZmllZCI6ZmFsc2UsInByZWZlcnJl
ZF91c2VybmFtZSI6InBpb21pbiJ9.X8XfIHiAiR1YMjiJza75aC294qLwi83RrUU2phorM7FP4phq3h-lx80Zu5xqTrMqMC1-RbHBnX-oUTbs4ViS3DziZlDvoRajdkrh6UTiK5oWgoRW-4qsH5L4X1W
bRfoBZgyHFRSnhaCO4CLgjCyEgeLUR5A-JWY-OMYQIOAxxHB2GwE3MNFfLWeqpmS1AWU8fL0giFFXFDfa1_XZEKgnqe1S75Ps_z8B1sfNfvNpz8daJ8omzXrt6I6TSa0FE3iiZ7Qx18mtkbx-iPuFqDD
RT6DGU-Hing9LnGuOt3Yas-WYdN7PKBigvIZv0LyvRFcilRJQBjOdVfEddL3OQ0rmEg
你可以在 https://jwt.io 网站上解码 JWT Token 来进行验证。
最后,调用 callme 应用暴露的端点。在请求头中设置 Session Cookie。端点将返回分配给当前用户的 scope 列表。只有 scope 为 TEST 的用户才能调用该方法。
$ curl http://localhost:8080/callme/ping -H "Cookie: SESSION=9bf852f1-6e00-42f8-a9a2-3cbdced33993"
Scopes: [SCOPE_profile, SCOPE_email, SCOPE_TEST]
总结
本文介绍了如何启用 Spring Cloud Gateway 的 OAuth2 支持,并将其与Keycloak集成。还实现了 OAuth2 登录、令牌中继和 OAuth2 资源服务器等机制。令牌中继机制完全从 Spring Cloud Security 迁移到 Spring Cloud Gateway。
Ref:https://piotrminkowski.com/2020/10/09/spring-cloud-gateway-oauth2-with-keycloak/
