使用 Keycloak 为 Spring Cloud Gateway 和 Spring Boot 微服务启用 OAuth2
本文将带你了解如何使用 Keycloak 为 Spring Cloud Gateway 和 Spring Boot 微服务启用 OAuth2。本文是 上一篇文章 的扩展,并分析了 Spring Security 项目中提供的一些最新功能。
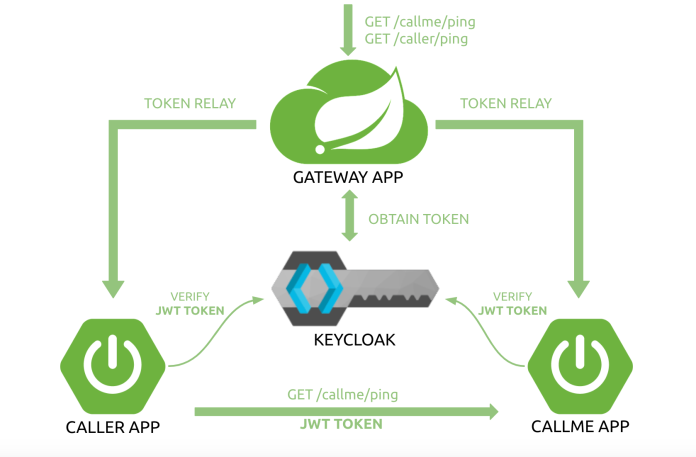
我们的架构由两个 Spring Boot 微服务组成、一个基于 Spring Cloud Gateway 的 API 网关和一个 Keycloak 授权服务器。Spring Cloud Gateway 在此充当 OAuth2 客户端和 OAuth2 资源服务器。对于任何传入请求,它都会在将流量转发到下游服务之前验证 Access Token。对于任何未经验证的请求,它都会使用 Keycloak 初始化一个授权码授权的流程。我们的方案需要包括内部微服务之间的通信。它们都隐藏在 API 网关后面。caller 应用调用 callme 应用暴露的端点。通信中使用的 HTTP 客户端必须使用网关发送的 Access Token。
源码
本文中的代码托管在 Github,你可以克隆这个 Repository,进入到 oauth 目录,其中包含了两个 Spring Boot 微服务:callme 和 caller。当然,还有构建在 Spring Cloud Gateway 之上的 gateway 应用。之后,只需按照说明操作即可。
运行并配置 Keycloak
我们以 Docker 容器的形式运行 Keycloak。默认情况下,Keycloak 在 8080 端口上公开 API 和 Web 控制台。还需要通过环境变量设置管理员用户名和密码。下面是运行 Keycloak 容器的命令:
$ docker run -d --name keycloak -p 8080:8080 \
    -e KEYCLOAK_ADMIN=admin \
    -e KEYCLOAK_ADMIN_PASSWORD=admin \
    quay.io/keycloak/keycloak:23.0.7 start-dev
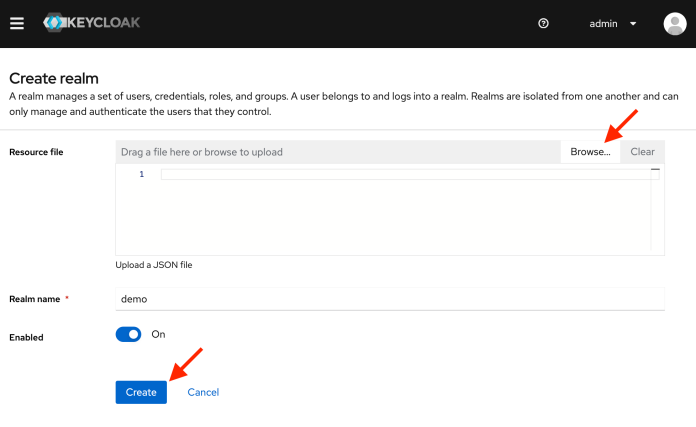
容器启动后,访问 http://localhost:8080/admin 地址下的管理控制台。创建一个新 realm。该 realm 的名称是 demo。与其手动创建所需内容,不如导入包含整个 realm 配置的 JSON 资源文件。你可以在 GitHub 仓库中找到这样的资源文件:oauth/gateway/src/test/resources/realm-export.json。不过,接下来,我将使用 Keycloak 面板逐步创建对象。如果你从 JSON 资源文件导入了配置,可以直接跳到下一章节。
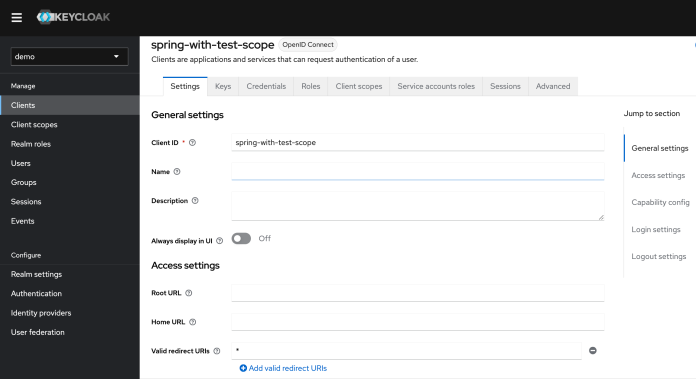
然后,在 demo realm 中添加一个 OpenID Connect 客户端。客户端的名称是 spring-with-test-scope。启用客户端身份认证,并在 “Valid redirect URIs” 字段中输入正确的地址(为测试目的,可以使用通配符)。
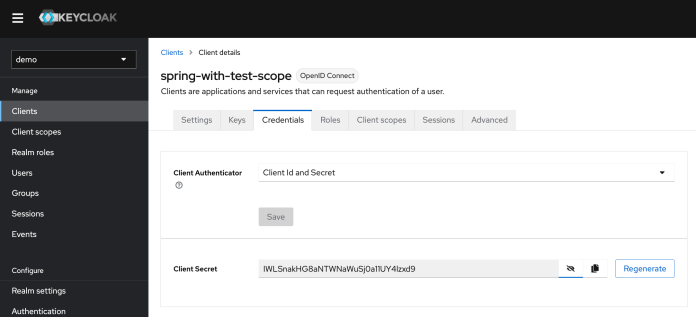
我们需要保存客户端的名称及其 secret。这两项设置必须在应用端设置。
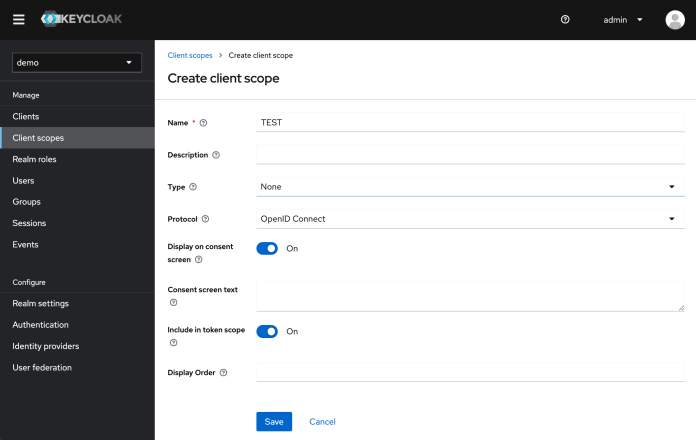
然后,创建一个名称为 TEST 的新 Client Scope。
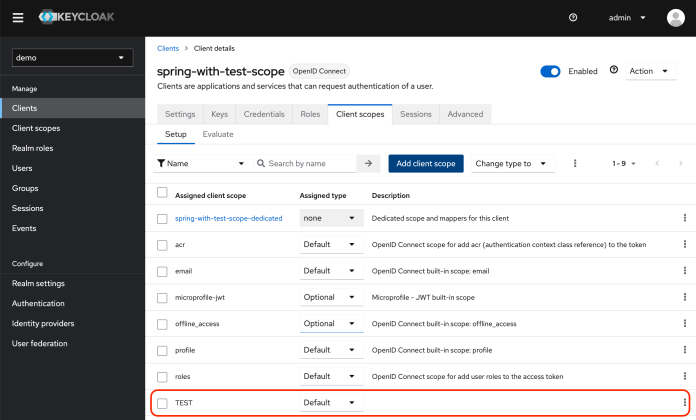
接着,将 TEST 添加到 spring-with-test-scope Client Scope 中。
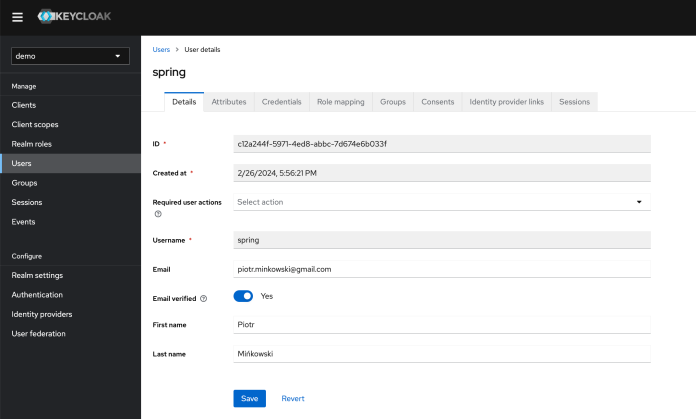
还需要创建一个用户来验证 Keycloak。用户名为 spring。为了设置密码,需要切换到 “Credentials” 选项卡,设置密码为 Spring_123。
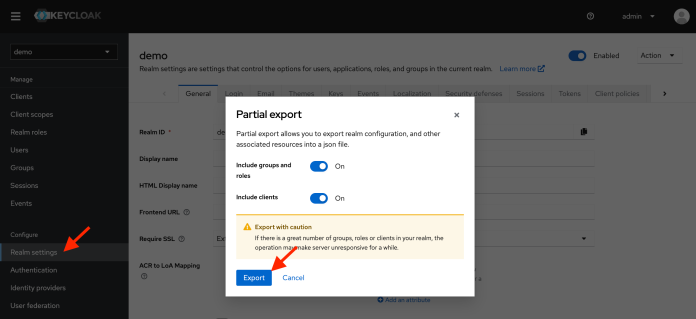
完成配置后,可以将其导出为 JSON 文件(与创建新 realm 时使用的文件相同)。这样的文件对以后使用 Testcontainers 构建自动化测试很有用。
但是,Keycloak 不会将真实用户导出到文件中。因此,需要在导出文件的 users 部分添加以下 JSON。
{
  "username": "spring",
  "email": "piotr.minkowski@gmail.com",
  "firstName": "Piotr",
  "lastName": "Minkowski",
  "enabled": true,
  "credentials": [
    {
      "type": "password",
      "value": "Spring_123"
    }
  ],
  "realmRoles": [
    "default-roles-demo",
    "USER"
  ]
}
创建 Spring Cloud Gateway 网关应用
如前所述,gateway 应用充当 OAuth2 客户端和 OAuth2 资源服务器,包含的依赖如下:
<dependency>
  <groupId>org.springframework.boot</groupId>
  <artifactId>spring-boot-starter-oauth2-client</artifactId>
</dependency>
<dependency>
  <groupId>org.springframework.security</groupId>
  <artifactId>spring-security-oauth2-resource-server</artifactId>
</dependency>
<!-- 自动解码 JWT Token -->
<dependency>
  <groupId>org.springframework.security</groupId>
  <artifactId>spring-security-oauth2-jose</artifactId>
</dependency>
<!-- 网关 -->
<dependency>
  <groupId>org.springframework.cloud</groupId>
  <artifactId>spring-cloud-starter-gateway</artifactId>
</dependency>
<dependency>
  <groupId>org.springframework.boot</groupId>
  <artifactId>spring-boot-starter-test</artifactId>
  <scope>test</scope>
</dependency>
<!-- 使用 Testcontainers 在 JUnit 测试期间运行 Keycloak 容器 -->
<dependency>
  <groupId>com.github.dasniko</groupId>
  <artifactId>testcontainers-keycloak</artifactId>
  <version>3.2.0</version>
 <scope>test</scope>
</dependency>
<dependency>
  <groupId>org.testcontainers</groupId>
  <artifactId>junit-jupiter</artifactId>
  <version>1.19.6</version>
  <scope>test</scope>
</dependency>
从 Spring Security 配置开始。首先,需要用 @EnableWebFluxSecurity 对 Configuration Bean 进行注解。这是因为 Spring Cloud Gateway 使用的是 Spring Web 模块的响应式版本。oauth2Login() 方法负责将未经验证的请求重定向到 Keycloak 登录页面。oauth2ResourceServer() 方法会在将流量转发到下游服务之前验 Access Token。
@Configuration
@EnableWebFluxSecurity
public class SecurityConfig {

    @Bean
    public SecurityWebFilterChain springSecurityFilterChain(ServerHttpSecurity http) {
        http.authorizeExchange(auth -> auth.anyExchange().authenticated())
                .oauth2Login(withDefaults())
                .oauth2ResourceServer((oauth2) -> oauth2.jwt(Customizer.withDefaults()));
        http.csrf(ServerHttpSecurity.CsrfSpec::disable);
        return http.build();
    }

}
除此以外,还需要设置几个 spring.security.oauth2 前缀开头的配置。Spring OAuth2 资源服务器模块使用 Keycloak JWK 端点来验证传入的 JWT Token。在 Spring OAuth2 客户端部分,我们需要提供 Keycloak issuer realm 的地址。
当然,还需要提供 Keycloak 客户端凭证,选择授权类型和 scope。
spring.security.oauth2:
  resourceserver:
    jwt:
      jwk-set-uri: http://localhost:8080/realms/demo/protocol/openid-connect/certs
  client:
    provider:
      keycloak:
        issuer-uri: http://localhost:8080/realms/demo
    registration:
      spring-with-test-scope:
        provider: keycloak
        client-id: spring-with-test-scope
        client-secret: IWLSnakHG8aNTWNaWuSj0a11UY4lzxd9
        authorization-grant-type: authorization_code
        scope: openid
网关本身只公开一个 HTTP 端点。它使用 OAuth2AuthorizedClient Bean 返回当前的 JWT Access Token。
@SpringBootApplication
@RestController
public class GatewayApplication {

   private static final Logger LOGGER = LoggerFactory
      .getLogger(GatewayApplication.class);

   public static void main(String[] args) {
      SpringApplication.run(GatewayApplication.class, args);
   }

   @GetMapping(value = "/token")
   public Mono<String> getHome(@RegisteredOAuth2AuthorizedClient OAuth2AuthorizedClient authorizedClient) {
      return Mono.just(authorizedClient.getAccessToken().getTokenValue());
   }

}
如上就是该部分关于 OAuth2 配置的全部内容。还需要在 Spring application.yml 文件中配置网关的路由。Spring Cloud Gateway 可使用 TokenRelay GatewayFilter 将 OAuth2 Access Token 转发到其代理的下游服务。可以将其设置为所有传入请求的默认 Filter。网关会将流量转发给 callme 和 caller 服务。本例中,没有使用服务发现功能。默认情况下,callme 应用监听 8040 端口,而 caller 应用监听 8020 端口。
spring:
  application:
    name: gateway
  cloud:
    gateway:
      default-filters:
        - TokenRelay=
      routes:
        - id: callme-service
          uri: http://localhost:8040
          predicates:
            - Path=/callme/**
        - id: caller-service
          uri: http://localhost:8020
          predicates:
            - Path=/caller/**
使用 OAuth2 资源服务器验证微服务中的 Token
callme 和 caller 的依赖非常相似。它们都使用 Spring Web 模块公开 HTTP 端点。由于 caller 应用使用 WebClient Bean,因此还需要加入 Spring WebFlux 依赖。同样,还需要加入 Spring OAuth2 Resource Server 模块和 spring-security-oauth2-jose 依赖项,以解码 JWT Token。
<dependency>
  <groupId>org.springframework.boot</groupId>
  <artifactId>spring-boot-starter-web</artifactId>
</dependency>
<dependency>
  <groupId>org.springframework.boot</groupId>
  <artifactId>spring-boot-starter-security</artifactId>
</dependency>
<dependency>
  <groupId>org.springframework.security</groupId>
  <artifactId>spring-security-oauth2-resource-server</artifactId>
</dependency>
<dependency>
  <groupId>org.springframework.security</groupId>
  <artifactId>spring-security-oauth2-jose</artifactId>
</dependency>
<dependency>
  <groupId>org.springframework</groupId>
  <artifactId>spring-webflux</artifactId>
</dependency>
下面是应用 Security 的配置。这次需要使用 @EnableWebSecurity 注解,因为我们有一个 Spring Web 模块。oauth2ResourceServer() 方法通过 Keyclock JWK 端点验证 Access Token。
@Configuration
@EnableWebSecurity
public class SecurityConfig {

    @Bean
    public SecurityFilterChain filterChain(HttpSecurity http) throws Exception {
        http.authorizeHttpRequests(authorize -> authorize.anyRequest().authenticated())
                .oauth2ResourceServer((oauth2) -> oauth2.jwt(Customizer.withDefaults()));
        return http.build();
    }
}
下面是 Spring application.yml 文件中 Keycloak 的 OAuth2 资源服务器配置:
spring:
  security:
    oauth2:
      resourceserver:
        jwt:
          jwk-set-uri: http://localhost:8080/realms/demo/protocol/openid-connect/certs
来看看 REST Controller 类的实现。它只有一个 ping 方法。该方法只能由具有 TEST scope 的客户端访问。它会返回一个从 Authentication Bean 获取的已分配 scope 列表。
@RestController
@RequestMapping("/callme")
public class CallmeController {

    @PreAuthorize("hasAuthority('SCOPE_TEST')")
    @GetMapping("/ping")
    public String ping() {
        SecurityContext context = SecurityContextHolder.getContext();
        Authentication authentication = context.getAuthentication();
        return "Scopes: " + authentication.getAuthorities();
    }
}
外部客户端可以通过 API 网关直接调用该方法。不过,caller 应用也可以在自己的 ping 端点实现中调用该端点。
@RestController
@RequestMapping("/caller")
public class CallerController {

    private WebClient webClient;

    public CallerController(WebClient webClient) {
        this.webClient = webClient;
    }

    @PreAuthorize("hasAuthority('SCOPE_TEST')")
    @GetMapping("/ping")
    public String ping() {
        SecurityContext context = SecurityContextHolder.getContext();
        Authentication authentication = context.getAuthentication();

        String scopes = webClient
                .get()
                .uri("http://localhost:8040/callme/ping")
                .retrieve()
                .bodyToMono(String.class)
                .block();
        return "Callme scopes: " + scopes;
    }
}
如果 WebClient 调用第二个微服务暴露的端点,它还必须传播 Bearer Token。我们可以使用 ServletBearerExchangeFilterFunction 轻松实现这一功能,如下所示。有了这个 Function,Spring Security 将查找当前的 Authentication 并提取 AbstractOAuth2Token 凭证。然后,它会自动在 Authorization Header 中传播该 Token。
@SpringBootApplication
public class CallerApplication {

    public static void main(String[] args) {
        SpringApplication.run(CallerApplication.class, args);
    }

    @Bean
    public WebClient webClient() {
        return WebClient.builder()
                .filter(new ServletBearerExchangeFilterFunction())
                .build();
    }

}
运行应并进行测试
使用相同的 Maven 命令运行所有三个 Spring Boot 应用。从 gateway 应用开始:
$ cd oauth/gateway
$ mvn spring-boot:run
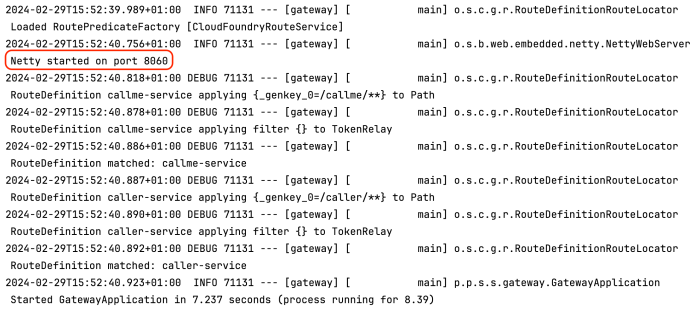
运行第一个应用后,可以通过日志检查一切是否正常。下面是 gateway 应用生成的日志。如你所见,它监听 8060 端口。
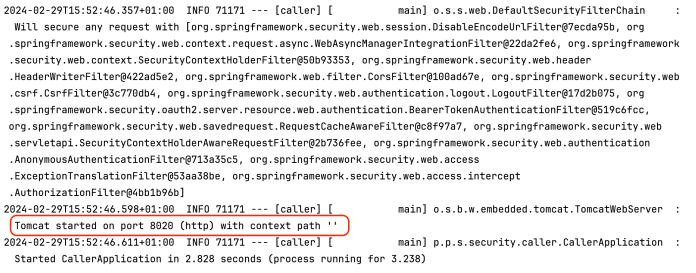
之后,运行 caller 应用。
$ cd oauth/caller
$ mvn spring-boot:run
它监听 8020 端口。
当然,应用的启动顺序并不重要。最后,来运行 callme 应用。
$ cd oauth/callme
$ mvn spring-boot:run
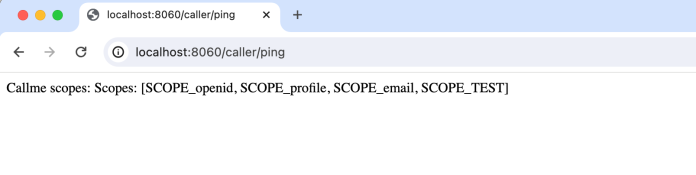
现在,通过网关调用 caller 应用端点。在这种情况下,我们需要访问 http://localhost:8060/caller/ping URL。网关应用会将我们重定向到 Keycloak 登录页面。我们需要使用 spring 和 Spring_123 登录。

登录后,一切都会自动发生。Spring Cloud Gateway 从 Keycloak 获取 Access Token,然后将其发送到下游服务。caller 应用收到请求后,会使用 WebClient 实例调用 callme 应用。结果如下
我们可以使用 gateway 应用提供的端点 GET /token 轻松获取 Access Token。

现在,可以使用 curl 命令执行与之前类似的调用。我们需要复制 Token 字符串,并将其作为 Bearer Token 放入 Authorization Header 中。
$ curl http://localhost:8060/callme/ping \
    -H "Authorization: Bearer <TOKEN>" -v
结果如下:

接下来,我们用 JUnit 和 Testcontainers 以完全自动化的方式来进行类似的操作。
Spring OAuth2 和 Keycloak Testcontainers
再次切换到 gateway 模块。执行运行 API gateway 应用的测试,将其连接到 Keycloak 实例,并将授权流量路由到目标端点。下面是 src/test/java 目录中模拟 callme 应用端点的 @RestController:
pl.piomin.samples.security.gateway.CallmeController
@RestController
@RequestMapping("/callme")
public class CallmeController {

    @PreAuthorize("hasAuthority('SCOPE_TEST')")
    @GetMapping("/ping")
    public String ping() {
        return "Hello!";
    }
}
下面是运行测试所需的配置。我们在 8060 端口上启动 gateway 应用,并使用 WebTestClient 实例来调用它。为了自动配置 Keycloak,导入存储在 realm-export.json 中的 demo realm 配置。由于 Testcontainers 使用随机端口号,我们需要覆盖一些 Spring OAuth2 配置设置。我们还将覆盖 Spring Cloud Gateway 路由,将流量转发到 callme 应用 Controller 的测试实现,而不是真实服务。
现在,就可以开始测试了。
@SpringBootTest(webEnvironment = SpringBootTest.WebEnvironment.DEFINED_PORT)
@Testcontainers
@TestMethodOrder(MethodOrderer.OrderAnnotation.class)
public class GatewayApplicationTests {

   static String accessToken;

   @Autowired
   WebTestClient webTestClient;

   @Container
   static KeycloakContainer keycloak = new KeycloakContainer()
            .withRealmImportFile("realm-export.json")
            .withExposedPorts(8080);

   @DynamicPropertySource
   static void registerResourceServerIssuerProperty(DynamicPropertyRegistry registry) {
      registry.add("spring.security.oauth2.client.provider.keycloak.issuer-uri",
                () -> keycloak.getAuthServerUrl() + "/realms/demo");
      registry.add("spring.security.oauth2.resourceserver.jwt.jwk-set-uri",
                () -> keycloak.getAuthServerUrl() + "/realms/demo/protocol/openid-connect/certs");
      registry.add("spring.cloud.gateway.routes[0].uri",
                () -> "http://localhost:8060");
      registry.add("spring.cloud.gateway.routes[0].id", () -> "callme-service");
      registry.add("spring.cloud.gateway.routes[0].predicates[0]", () -> "Path=/callme/**");
   }

   // 测试 。。。

}
这是第一个测试。由于它不包含任何 Token,因此会被应重定向到 Keycloak 的授权机制中。
@Test
@Order(1)
void shouldBeRedirectedToLoginPage() {
   webTestClient.get().uri("/callme/ping")
             .exchange()
             .expectStatus().is3xxRedirection();
}
在第二个测试中,使用 WebClient 实例与 Keycloak 容器交互。需要使用 spring 用户和 spring-with-test-scope 客户端对 Kecloak 进行身份认证。Keycloak 将生成并返回 Access Token。为下一次测试保存其值。
@Test
@Order(2)
void shouldObtainAccessToken() throws URISyntaxException {
   URI authorizationURI = new URIBuilder(keycloak.getAuthServerUrl() + "/realms/demo/protocol/openid-connect/token").build();
   WebClient webclient = WebClient.builder().build();
   MultiValueMap<String, String> formData = new LinkedMultiValueMap<>();
   formData.put("grant_type", Collections.singletonList("password"));
   formData.put("client_id", Collections.singletonList("spring-with-test-scope"));
   formData.put("username", Collections.singletonList("spring"));
   formData.put("password", Collections.singletonList("Spring_123"));

   String result = webclient.post()
                .uri(authorizationURI)
                .contentType(MediaType.APPLICATION_FORM_URLENCODED)
                .body(BodyInserters.fromFormData(formData))
                .retrieve()
                .bodyToMono(String.class)
                .block();
   JacksonJsonParser jsonParser = new JacksonJsonParser();
   accessToken = jsonParser.parseMap(result)
                .get("access_token")
                .toString();
   assertNotNull(accessToken);
}
最后,运行与第一步类似的测试。不过,这次我们在 Authorization Header 中提供了一个 Access Token。预期响应是 200 OK 状态码和 "Hello!" 响应体,由 CallmeController Bean 的测试实例返回。
@Test
@Order(3)
void shouldReturnToken() {
   webTestClient.get().uri("/callme/ping")
                .header("Authorization", "Bearer " + accessToken)
                .exchange()
                .expectStatus().is2xxSuccessful()
                .expectBody(String.class).isEqualTo("Hello!");
}
在本地运行所有测试,结果如下。
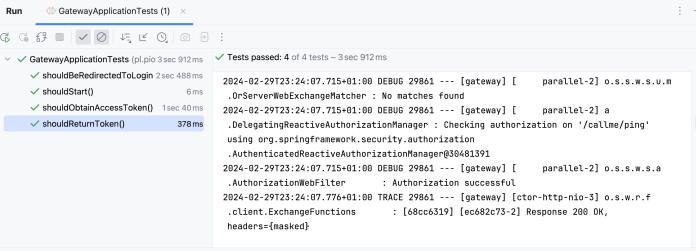
如你所见,全部通过。
最后
相比于 上一篇文章,本文更关注自动化和服务间通信,而不仅仅是 Spring Cloud Gateway 中的 OAuth2 支持。我们考虑了网关同时充当 OAuth2 客户端和资源服务器的情况。最后,使用 Testcontainers 验证了 Spring Cloud Gateway 和 Keycloak 的应用场景。
Ref:https://piotrminkowski.com/2024/03/01/microservices-with-spring-cloud-gateway-oauth2-and-keycloak/
