Feign 客户端设置 Oauth2 Token
1、概览
OpenFeign 是一个可以在 Spring Boot 中使用的声明式 REST 客户端。
假如想通过 OpenFeign 来调用使用 OAuth2 的 REST API,那么就需要给 OpenFeign 设置 Access Token。
本文将会带你了解如何为 OpenFeign 客户端添加 OAuth2 支持。
2、服务之间的认证
服务之间的认证 API 安全中的一个热门话题。我们可以使用 mTLS 或 JWT 为 REST API 提供认证机制。不过,OAuth2 协议是保护 API 的事实解决方案。假设我们想使用另一个服务(客户端)调用一个受保护的服务(服务器)。在这种情况下,使用 “客户端凭证(client credential)” 授权方式。这种授权方式通常用于在两个没有终端用户的 API 或系统之间进行身份认证。
下图显示了这种授权模式中的的主要角色关系:
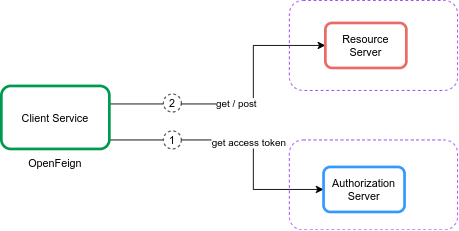
在客户端凭证模式中,客户端通过 Token Endpoint 从授权服务器(Authorization Server)获取 Access Token。然后,客户端使用 Access Token 访问源服务器(Resource Server)上受资保护的资源。资源服务器会验证 Access Token,如果有效,则为请求提供服务。
2.1、授权服务器
创建一个授权服务器来发放 Access Token。为了方便,我们在 Spring Boot 中使用嵌入式 Keycloak。假设我们使用 GitHub 上的 授权服务器 项目。
首先,在嵌入式 Keycloak 服务器的 realm 管理中定义 Payment-app 客户端:
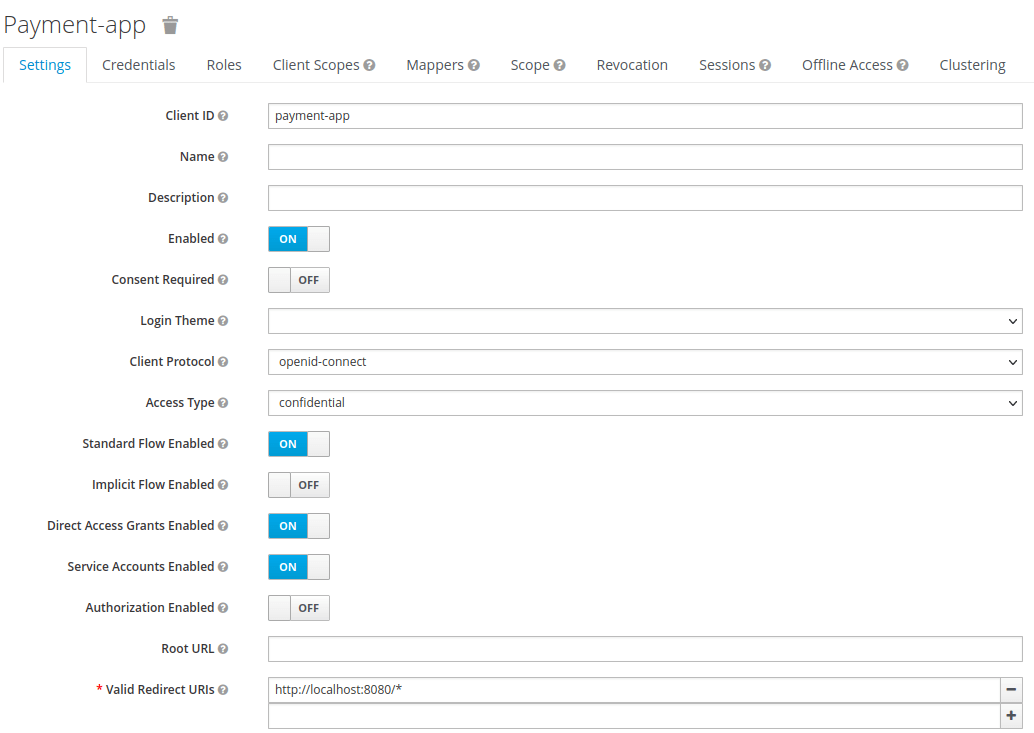
将 “Access Type” 设置为 “credential”,并启用 “Service Accounts Enabled” 选项。然后,以 feign-realm.json 的形式导出 realm 详细信息,并在 application-feign.yml 中设置 realm 文件:
keycloak:
  server:
    contextPath: /auth
    adminUser:
      username: bael-admin
      password: pass
    realmImportFile: feign-realm.json
现在,授权服务器已经准备就绪。可以使用 -spring.profiles.active=feign 选项运行应用。本文重点在于介绍 OpenFeign OAuth2 支持,因此这里不需要深入了解。
2.2、资源服务器
现在我们已经配置了授权服务器,下面来设置资源服务器。
使用 GitHub 上的 资源服务器 项目。首先,添加 Payment 类资源:
public class Payment {

    private String id;
    private double amount;

   // get / set 方法省略
}
然后,声明一个 PaymentController API。
@RestController
public class PaymentController {

    @GetMapping("/payments")
    public List<Payment> getPayments() {
        List<Payment> payments = new ArrayList<>();
        for(int i = 1; i < 6; i++){
            Payment payment = new Payment();
            payment.setId(String.valueOf(i));
            payment.setAmount(2);
            payments.add(payment);
        }
        return payments;
    }

}
getPayments() API 会返回 payments 列表。此外,还在 application-feign.yml 文件中配置了资源服务器:
spring:
  security:
    oauth2:
      resourceserver:
        jwt:
          issuer-uri: http://localhost:8083/auth/realms/master
现在,getPayments() API 使用 OAuth2 授权服务器保证安全,我们必须提供有效的 Access Token 才能调用该 API:
curl --location --request POST 'http://localhost:8083/auth/realms/master/protocol/openid-connect/token' \
  --header 'Content-Type: application/x-www-form-urlencoded' \
  --data-urlencode 'client_id=payment-app' \
  --data-urlencode 'client_secret=863e9de4-33d4-4471-b35e-f8d2434385bb' \
  --data-urlencode 'grant_type=client_credentials'
获取 Access Token 后,将其设置在请求的 Authorization Header 中:
curl --location --request GET 'http://localhost:8081/resource-server-jwt/payments' \
  --header 'Authorization: Bearer Access_Token'
现在,我们要使用 OpenFeign 而不是 cURL 或 Postman 调用受保护 API。
3、OpenFeign 客户端
3.1、依赖
在 pom.xml 中添加 spring-cloud-starter-openfeign 依赖。
<dependency>
    <groupId>org.springframework.cloud</groupId>
    <artifactId>spring-cloud-starter-openfeign</artifactId>
    <version>3.1.0</version>
</dependency>
此外,还需要在 pom.xml 中添加 spring-cloud-dependencies :
<dependency>
    <groupId>org.springframework.cloud</groupId>
    <artifactId>spring-cloud-dependencies</artifactId>
    <version>2021.0.0</version>
    <type>pom</type>
</dependency>
3.2、配置
首先,需要在 main 类中添加 @EnableFeignClients 注解:
@SpringBootApplication
@EnableFeignClients
public class ExampleApplication {
    public static void main(String[] args) {
        SpringApplication.run(ExampleApplication.class, args);
    }
}
然后,定义 PaymentClient 接口,用于调用 getPayments() API。此外,还需要在 PaymentClient 接口中添加 @FeignClient 注解:
@FeignClient(
  name = "payment-client",
  url = "http://localhost:8081/resource-server-jwt",
  configuration = OAuthFeignConfig.class)
public interface PaymentClient {

    @RequestMapping(value = "/payments", method = RequestMethod.GET)
    List<Payment> getPayments();
}
根据资源服务器的地址设置 url。在本例中,@FeignClient 的主要参数是支持 OpenFeign OAuth2 的 configuration 属性。
然后,定义一个 PaymentController 类,并将 PaymentClient 注入其中:
@RestController
public class PaymentController {

    private final PaymentClient paymentClient;

    public PaymentController(PaymentClient paymentClient) {
        this.paymentClient = paymentClient;
    }

    @GetMapping("/payments")
    public List<Payment> getPayments() {
        List<Payment> payments = paymentClient.getPayments();
        return payments;
    }
}
4、OAuth2 的支持
4.1、依赖
在 pom.xml 文件中添加 spring-security-oauth2-client 和 spring-boot-starter-security 依赖,为 Spring Cloud OpenFeign 添加 OAuth2 支持:
<dependency>
    <groupId>org.springframework.boot</groupId>
    <artifactId>spring-boot-starter-security</artifactId>
    <version>2.6.1</version>
</dependency>
<dependency>
    <groupId>org.springframework.security</groupId>
    <artifactId>spring-security-oauth2-client</artifactId>
    <version>5.6.0</version>
</dependency>
4.2、配置
现在,创建一个配置。我们的想法是获取 Access Token 并将其添加到 OpenFeign 请求中。Feign 提供了一项实用功能 - 拦截器(Interceptor),可以为每个 HTTP 请求/响应执行此任务。
使用 RequestInterceptor,通过 Authorization Bearer Header 将 OAuth2 Access Token 注入 OpenFeign 客户端的请求中。
定义 OAuthFeignConfig 配置类并定义 requestInterceptor() Bean:
@Configuration
public class OAuthFeignConfig {

    public static final String CLIENT_REGISTRATION_ID = "keycloak";

    private final OAuth2AuthorizedClientService oAuth2AuthorizedClientService;
    private final ClientRegistrationRepository clientRegistrationRepository;

    public OAuthFeignConfig(OAuth2AuthorizedClientService oAuth2AuthorizedClientService,
      ClientRegistrationRepository clientRegistrationRepository) {
        this.oAuth2AuthorizedClientService = oAuth2AuthorizedClientService;
        this.clientRegistrationRepository = clientRegistrationRepository;
    }

    @Bean
    public RequestInterceptor requestInterceptor() {
        ClientRegistration clientRegistration = clientRegistrationRepository.findByRegistrationId(CLIENT_REGISTRATION_ID);
        OAuthClientCredentialsFeignManager clientCredentialsFeignManager =
          new OAuthClientCredentialsFeignManager(authorizedClientManager(), clientRegistration);
        return requestTemplate -> {
            requestTemplate.header("Authorization", "Bearer " + clientCredentialsFeignManager.getAccessToken());
        };
    }
}
在 requestInterceptor() Bean 中,使用 ClientRegistration 和 OAuthClientCredentialsFeignManager 类来注册 oauth2 客户端,并从授权服务器获取 Access Token。为此,需要在 application.properties 文件中定义 oauth2 客户端属性:
spring.security.oauth2.client.registration.keycloak.authorization-grant-type=client_credentials
spring.security.oauth2.client.registration.keycloak.client-id=payment-app
spring.security.oauth2.client.registration.keycloak.client-secret=863e9de4-33d4-4471-b35e-f8d2434385bb
spring.security.oauth2.client.provider.keycloak.token-uri=http://localhost:8083/auth/realms/master/protocol/openid-connect/token
创建 OAuthClientCredentialsFeignManager 类并定义 getAccessToken() 方法:
public String getAccessToken() {
    try {
        OAuth2AuthorizeRequest oAuth2AuthorizeRequest = OAuth2AuthorizeRequest
          .withClientRegistrationId(clientRegistration.getRegistrationId())
          .principal(principal)
          .build();
        OAuth2AuthorizedClient client = manager.authorize(oAuth2AuthorizeRequest);
        if (isNull(client)) {
            throw new IllegalStateException("client credentials flow on " + clientRegistration.getRegistrationId() + " failed, client is null");
        }
        return client.getAccessToken().getTokenValue();
    } catch (Exception exp) {
        logger.error("client credentials error " + exp.getMessage());
    }
    return null;
}
使用 OAuth2AuthorizeRequest 和 OAuth2AuthorizedClient 类从授权服务器获取 Access Token。现在,对于每个请求,OpenFeign 拦截器都会管理 oauth2 客户端,并将访 Access Token 添加到请求中。
5、测试
创建 PaymentClientUnitTest 类,测试 OpenFeign 客户端:
@RunWith(SpringRunner.class)
@SpringBootTest
public class PaymentClientUnitTest {

    @Autowired
    private PaymentClient paymentClient;

    @Test
    public void whenGetPayment_thenListPayments() {
        List<Payment> payments = paymentClient.getPayments();
        assertFalse(payments.isEmpty());
    }
}
如上,调用了 getPayments() API。PaymentClient 会连接到 OAuth2 客户端,并使用拦截器获取 Access Token。
6、总结
本文介绍了如何在 OpenFeign 中配置 RequestInterceptor 为请求添加 Access Token 以访问 Oauth2 服务。
参考:https://www.baeldung.com/spring-cloud-feign-oauth-token
