在 Spring Boot 应用中使用 Grpc 进行通信
在本文中,你将学习如何在 Spring Boot 应用程序中实现使用 gRPC 进行通信。gRPC 是一个现代的开源远程过程调用(RPC)框架,可以在任何环境中运行。默认情况下,它使用 Google 的 Protocol Buffer 来对结构化数据进行序列化和反序列化。当然,我们也可以切换到其他数据格式,比如 JSON。为了简化我们在 gRPC 和 Spring Boot 中的使用体验,我们将使用一个专门的 starter。由于没有官方支持的 gRPC 和 Spring Boot 集成的 starter,我们将选择较流行的第三方项目 - grpc-spring-boot-starter。该项目在 GitHub 上有大约 3.1k 个星星。你可以在 这里 找到关于其功能的详细文档。
源码
如果你想亲自尝试,你可以克隆我的 GitHub 仓库。它包含四个应用程序。其中 account-service 和 customer-service 与我之前的文章相关,介绍了 Java 中的 Protocol Buffers。对于这篇文章,请参考另外两个应用 account-service-grpc 和 customer-service-grpc。它们与对应的前2个应用非常相似,但使用了我们的第三方 Spring Boot 和 gRPC 通信,而不是 REST。此外,它们需要使用 Spring Boot 2,因为我们的第三方 starter 还不支持 Spring Boot 3。无论如何,克隆了仓库后,只需按照我的说明进行操作即可。
生成 gRPC 的 Model 类和 service
第一步,我们将使用 .proto 文件生成 model 类和 gRPC service。我们需要加入一些额外的 Protobuf schema,以便使用 google.protobuf.* 包 (1)。我们的 gRPC service 将提供使用各种条件搜索账户的方法和添加新账户的方法 (2)。这些方法将使用 google.protobuf.* 包中的基本类型和 .proto 文件中定义的 model 类作为消息。我们定义了两个消息。Account 信息代表一个 model 类。它包含三个字段:id、number 和 customer_id (3)。Accounts 消息包含一个 Account 对象列表 (4)。
syntax = "proto3";

package model;

option java_package = "pl.piomin.services.grpc.account.model";
option java_outer_classname = "AccountProto";

// (1)
import "empty.proto";
import "wrappers.proto";

// (2)
service AccountsService {
  rpc FindByNumber(google.protobuf.StringValue) returns (Account) {}
  rpc FindByCustomer(google.protobuf.Int32Value) returns (Accounts) {}
  rpc FindAll(google.protobuf.Empty) returns (Accounts) {}
  rpc AddAccount(Account) returns (Account) {}
}

// (3)
message Account {
  int32 id = 1;
  string number = 2;
  int32 customer_id = 3;
}

// (4)
message Accounts {
  repeated Account account = 1;
}
让我们先来看一下第二个应用程序 customer-service-grpc 的 .proto schema。它比之前的定义要复杂一些。我们的 gRPC 服务还将提供几种搜索对象的方法,以及一个用于添加新 customer 的方法 (1)。customer-service-grpc 与 account-service-grpc 应用程序进行通信,因此我们需要生成 Account 和 Accounts 消息 (2)。当然,你可以创建一个额外的接口模块,其中包含生成的 Protobuf 类,并在我们的两个示例应用程序之间共享它。最后,我们需要定义我们的 model 类。Customer 类包含三个基本字段 id、pesel、name,一个 enum type 和分配给特定 customer 的 account 列表 (3)。还有一个包含 Customer 对象列表的 Customers 消息 (4)。
syntax = "proto3";

package model;

option java_package = "pl.piomin.services.grpc.customer.model";
option java_outer_classname = "CustomerProto";

import "empty.proto";
import "wrappers.proto";

// (1)
service CustomersService {
  rpc FindByPesel(google.protobuf.StringValue) returns (Customer) {}
  rpc FindById(google.protobuf.Int32Value) returns (Customer) {}
  rpc FindAll(google.protobuf.Empty) returns (Customers) {}
  rpc AddCustomer(Customer) returns (Customer) {}
}

// (2)
message Account {
  int32 id = 1;
  string number = 2;
  int32 customer_id = 3;
}

message Accounts {
  repeated Account account = 1;
}

// (3)
message Customer {
  int32 id = 1;
  string pesel = 2;
  string name = 3;
  CustomerType type = 4;
  repeated Account accounts = 5;
  enum CustomerType {
    INDIVIDUAL = 0;
    COMPANY = 1;
  }
}

// (4)
message Customers {
  repeated Customer customers = 1;
}
为了从 .proto schema 生成 Java 类,我们将使用 Maven 插件。为此,你可以选择一些可用的插件。我选择的是 protoc-jar-maven-plugin 插件。在配置中,我们需要将 .proto schema 的默认位置覆写为 src/main/proto。我们还需要使用 includeDirectories 标签,在 .proto manifest 中加入其他 Protobuf schema。这些 manifest 位于 src/main/proto-imports 目录中。输出的 target 目录是 src/main/generated。默认情况下,插件不会生成 gRPC service。为了启用它,我们需要在 outputTarget 中包含 grpc-java 类型。为了生成类,我们将使用 protoc-gen-grpc-java 库。
<plugin>
  <groupId>com.github.os72</groupId>
  <artifactId>protoc-jar-maven-plugin</artifactId>
  <version>3.11.4</version>
  <executions>
    <execution>
      <phase>generate-sources</phase>
      <goals>
        <goal>run</goal>
      </goals>
      <configuration>
        <addProtoSources>all</addProtoSources>
        <includeMavenTypes>direct</includeMavenTypes>
        <outputDirectory>src/main/generated</outputDirectory>
        <inputDirectories>
          <include>src/main/proto</include>
        </inputDirectories>
        <includeDirectories>
          <include>src/main/proto-imports</include>
        </includeDirectories>
        <outputTargets>
           <outputTarget>
             <type>java</type>
             <outputDirectory>src/main/generated</outputDirectory>
           </outputTarget>
           <outputTarget>
             <type>grpc-java</type>
             <pluginArtifact>io.grpc:protoc-gen-grpc-java:1.57.2</pluginArtifact>
             <outputDirectory>src/main/generated</outputDirectory>
          </outputTarget>
        </outputTargets>
      </configuration>
    </execution>
  </executions>
</plugin>
我们还将使用 build-helper-maven-plugin Maven 插件将生成的 Java 代码作为源代码附加到 src/main/generated 目录下。
<plugin>
  <groupId>org.codehaus.mojo</groupId>
  <artifactId>build-helper-maven-plugin</artifactId>
  <executions>
    <execution>
      <id>add-source</id>
      <phase>generate-sources</phase>
      <goals>
        <goal>add-source</goal>
      </goals>
      <configuration>
        <sources>
          <source>src/main/generated</source>
        </sources>
      </configuration>
    </execution>
  </executions>
</plugin>
执行 mvn clean package 命令后,Maven 将生成所需的 Java 类。下面是生成 Java 类后 account-service-grpc 应用程序中目录的最终结构。
$ tree
.
├── pom.xml
└── src
    ├── main
    │   ├── generated
    │   │   └── pl
    │   │       └── piomin
    │   │           └── services
    │   │               └── grpc
    │   │                   └── account
    │   │                       └── model
    │   │                           ├── AccountProto.java
    │   │                           └── AccountsServiceGrpc.java
    │   ├── java
    │   │   └── pl
    │   │       └── piomin
    │   │           └── services
    │   │               └── grpc
    │   │                   └── account
    │   │                       ├── AccountApplication.java
    │   │                       ├── repository
    │   │                       │   └── AccountRepository.java
    │   │                       └── service
    │   │                           └── AccountsService.java
    │   ├── proto
    │   │   └── account.proto
    │   ├── proto-imports
    │   │   ├── empty.proto
    │   │   └── wrappers.proto
    │   └── resources
    └── test
        └── java
            └── pl
                └── piomin
                    └── services
                        └── grpc
                            └── account
                                └── AccountServicesTests.java
使用 gRPC Spring Boot Starter
生成所需的 Protobuf model 类和 gRPC stub 后,我们就可以开始实现了。第一步,我们需要包含以下 Spring Boot starter:
<dependency>
  <groupId>net.devh</groupId>
  <artifactId>grpc-server-spring-boot-starter</artifactId>
  <version>2.14.0.RELEASE</version>
</dependency>
然后,我们必须创建 gRPC service 实现类。它需要继承根据 .proto 声明生成的 AccountsServiceImplBase。我们还需要用 @GrpcService (1) 对整个类进行注解。之后,我们将覆写所有通过 gRPC 暴露的方法。我们的 service 使用一个简单的内存 repository (2)。每个方法都提供一个参数对象和用于以响应方式返回响应的 io.grpc.stub.StreamObserver 类 (3) (4)。
@GrpcService // (1)
public class AccountsService extends AccountsServiceGrpc.AccountsServiceImplBase {

    @Autowired
    AccountRepository repository; // (2)

    @Override
    public void findByNumber(StringValue request, StreamObserver<AccountProto.Account> responseObserver) { // (3)
        AccountProto.Account a = repository.findByNumber(request.getValue());
        responseObserver.onNext(a); # (4)
        responseObserver.onCompleted();
    }

    @Override
    public void findByCustomer(Int32Value request, StreamObserver<AccountProto.Accounts> responseObserver) {
        List<AccountProto.Account> accounts = repository.findByCustomer(request.getValue());
        AccountProto.Accounts a = AccountProto.Accounts.newBuilder().addAllAccount(accounts).build();
        responseObserver.onNext(a);
        responseObserver.onCompleted();
    }

    @Override
    public void findAll(Empty request, StreamObserver<AccountProto.Accounts> responseObserver) {
        List<AccountProto.Account> accounts = repository.findAll();
        AccountProto.Accounts a = AccountProto.Accounts.newBuilder().addAllAccount(accounts).build();
        responseObserver.onNext(a);
        responseObserver.onCompleted();
    }

    @Override
    public void addAccount(AccountProto.Account request, StreamObserver<AccountProto.Account> responseObserver) {
        AccountProto.Account a = repository.add(request.getCustomerId(), request.getNumber());
        responseObserver.onNext(a);
        responseObserver.onCompleted();
    }
}
以下是 AccountRepository 的实现:
public class AccountRepository {

    List<AccountProto.Account> accounts;
    AtomicInteger id;

    public AccountRepository(List<AccountProto.Account> accounts) {
        this.accounts = accounts;
        this.id = new AtomicInteger();
        this.id.set(accounts.size());
    }

    public List<AccountProto.Account> findAll() {
        return accounts;
    }

    public List<AccountProto.Account> findByCustomer(int customerId) {
        return accounts.stream().filter(it -> it.getCustomerId() == customerId).toList();
    }

    public AccountProto.Account findByNumber(String number) {
        return accounts.stream()
                .filter(it -> it.getNumber().equals(number))
                .findFirst()
                .orElseThrow();
    }

    public AccountProto.Account add(int customerId, String number) {
        AccountProto.Account a = AccountProto.Account.newBuilder()
                .setId(id.incrementAndGet())
                .setCustomerId(customerId)
                .setNumber(number)
                .build();
        return a;
    }

}
我们将在启动时添加一些测试数据。下面是我们的应用程序启类:
@SpringBootApplication
public class AccountApplication {

    public static void main(String[] args) {
        SpringApplication.run(AccountApplication.class, args);
    }

    @Bean
    AccountRepository repository() {
        List<AccountProto.Account> accounts = new ArrayList<>();
        accounts.add(AccountProto.Account.newBuilder().setId(1).setCustomerId(1).setNumber("111111").build());
        accounts.add(AccountProto.Account.newBuilder().setId(2).setCustomerId(2).setNumber("222222").build());
        accounts.add(AccountProto.Account.newBuilder().setId(3).setCustomerId(3).setNumber("333333").build());
        accounts.add(AccountProto.Account.newBuilder().setId(4).setCustomerId(4).setNumber("444444").build());
        accounts.add(AccountProto.Account.newBuilder().setId(5).setCustomerId(1).setNumber("555555").build());
        accounts.add(AccountProto.Account.newBuilder().setId(6).setCustomerId(2).setNumber("666666").build());
        accounts.add(AccountProto.Account.newBuilder().setId(7).setCustomerId(2).setNumber("777777").build());
        return new AccountRepository(accounts);
    }
}
在启动应用程序之前,我们还将包含 Spring Boot Actuator,以公开与 gRPC 相关的一些指标。我们将在不同于 gRPC 服务的端口下公开,因此还需要包含 Spring Boot Web starter:
<dependency>
  <groupId>org.springframework.boot</groupId>
  <artifactId>spring-boot-starter-web</artifactId>
</dependency>
<dependency>
  <groupId>org.springframework.boot</groupId>
  <artifactId>spring-boot-starter-actuator</artifactId>
</dependency>
在 application.yml 文件中,我们应该启用 metrics 端点:
spring.application.name: account-service-grpc

management.endpoints.web.exposure.include: metrics
management.endpoint.metrics.enabled: true
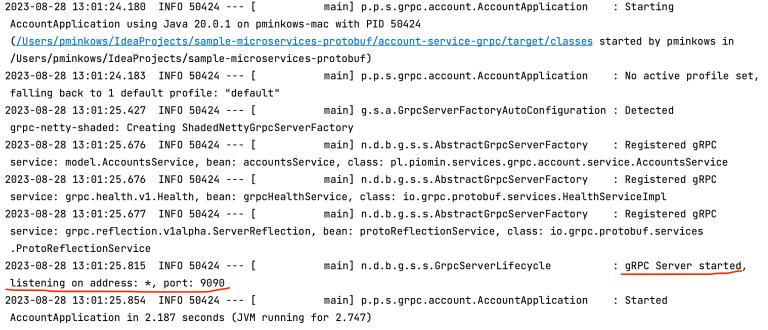
默认情况下,gRPC service 的端口为 9090。我们可以使用 grpc.server.port 属性覆盖该端口号。将端口设置为 0 以使用一个空闲的随机端口。让我们启动示例应用程序:
调用 gRPC Service
我们可以使用 grpcurl CLI 工具来调用示例应用程序提供的 gRPC service。默认情况下,gRPC 服务器将使用 PLAINTEXT 模式在 9090 端口启动。我们需要执行以下命令来打印可用的 service。默认情况下,gRPC 列表。
$ grpcurl --plaintext localhost:9090 list
grpc.health.v1.Health
grpc.reflection.v1alpha.ServerReflection
model.AccountsService
然后,打印 model.AccountService 公开的方法列表:
$ grpcurl --plaintext localhost:9090 list model.AccountsService
model.AccountsService.AddAccount
model.AccountsService.FindAll
model.AccountsService.FindByCustomer
model.AccountsService.FindByNumber
我们还可以在命令中使用 describe 关键字来打印每个方法的详细信息:
$ grpcurl --plaintext localhost:9090 describe model.AccountsService.FindByNumber
model.AccountsService.FindByNumber is a method:
rpc FindByNumber ( .google.protobuf.StringValue ) returns ( .model.Account );
现在,让我们调用上面描述中的端点。我们的方法名称是 model.AccountsService.FindByNumber,我们还将入参字符串设置为 111111。
$ grpcurl --plaintext -d '"111111"' localhost:9090 model.AccountsService.FindByNumber
{
  "id": 1,
  "number": "111111",
  "customer_id": 1
}
之后,我们可以看看 model.AccountsService.FindByNumber gRPC 方法。该方法使用 integer 作为入参,并返回一个对象列表。
$ grpcurl --plaintext -d '1' localhost:9090 model.AccountsService.FindByCustomer
{
  "account": [
    {
      "id": 1,
      "number": "111111",
      "customer_id": 1
    },
    {
      "id": 5,
      "number": "555555",
      "customer_id": 1
    }
  ]
}
最后,我们可以调用添加新 account 的方法。该方法将 JSON 对象作为入参。然后,它将返回一个新创建的 Account 对象,并带有递增的 id 字段。
$ grpcurl --plaintext -d '{"customer_id": 6, "number": "888888"}' localhost:9090 model.AccountsService.AddAccount
{
  "id": 8,
  "number": "888888",
  "customer_id": 6
}
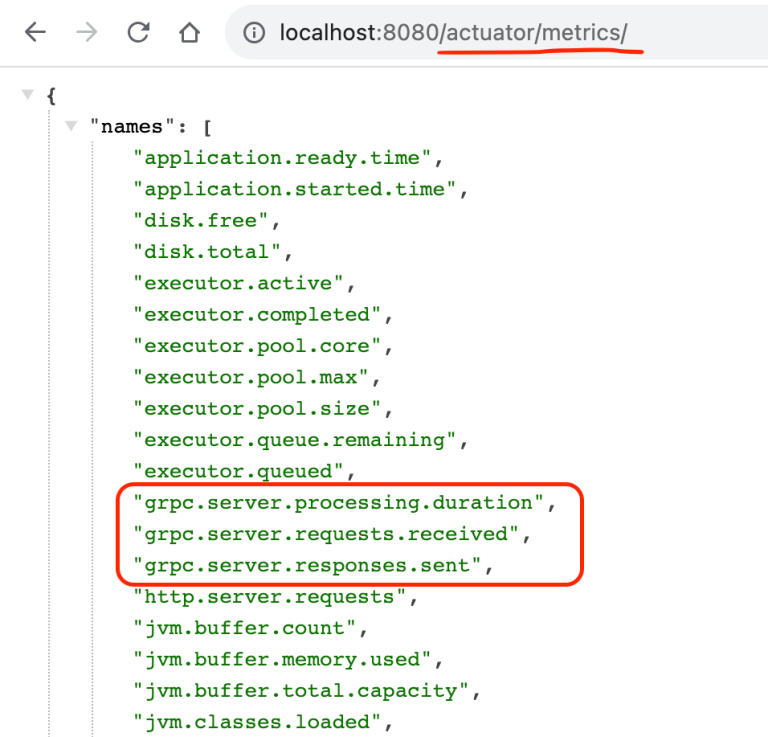
gRPC Spring Boot starter 为 Actuator 增加了三个额外指标。
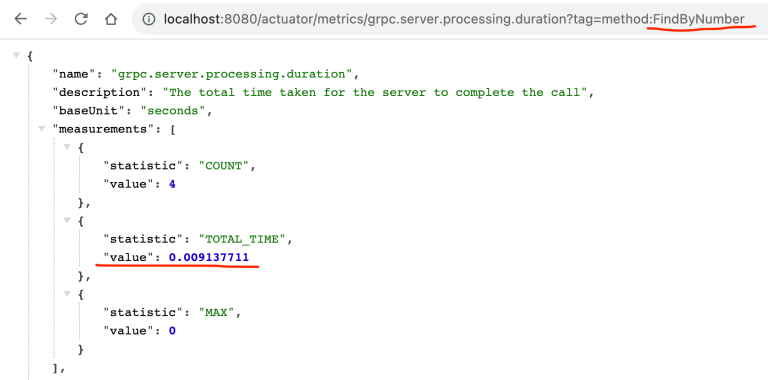
我们可以显示每个 gRPC 方法的请求数。下面是 FindByNumber 方法的请求和响应。

我们还可以显示每个方法的平均处理时间,如下所示。
测试 gRPC Service
在上一节中,我们使用 grpcurl CLI 工具手动运行了应用程序并测试了 gRPC 服务。不过,我们也可以基于 Spring Boot 测试模块实现单元测试或集成测试。我们将创建应用程序与 gRPC 客户端的集成测试。为此,我们需要在 Maven pom.xml 中包含以下三个依赖:
<dependency>
  <groupId>io.grpc</groupId>
  <artifactId>grpc-testing</artifactId>
  <version>1.51.0</version>
  <scope>test</scope>
</dependency>
<dependency>
  <groupId>org.springframework.boot</groupId>
  <artifactId>spring-boot-starter-test</artifactId>
  <scope>test</scope>
</dependency>
<dependency>
  <groupId>net.devh</groupId>
  <artifactId>grpc-client-spring-boot-starter</artifactId>
  <version>2.14.0.RELEASE</version>
  <scope>test</scope>
</dependency>
在下面的测试实现中,我们需要启用 “进程内” 服务器 (1),禁用外部服务器 (2)。然后,我们需要配置客户端以连接到 “进程内” 服务器 (3)。我们将使用在 Maven 构建过程中已经生成的 gRPC 客户端。它可以作为 AccountsServiceBlockingStub 类使用。我们只需正确注入并注解 @GrpcClient (4)。之后,我们就可以使用客户端 stub 来调用 gRPC service (5)。
@SpringBootTest(properties = {
        "grpc.server.inProcessName=test", // (1)
        "grpc.server.port=-1", // (2)
        "grpc.client.inProcess.address=in-process:test" // (3)
})
@DirtiesContext
public class AccountServicesTests {

    @GrpcClient("inProcess") // (4)
    AccountsServiceGrpc.AccountsServiceBlockingStub service;

    @Test
    void shouldFindAll() {
        AccountProto.Accounts a = service.findAll(Empty.newBuilder().build()); // (5)
        assertNotNull(a);
        assertFalse(a.getAccountList().isEmpty());
    }

    @Test
    void shouldFindByCustomer() {
        AccountProto.Accounts a = service.findByCustomer(Int32Value.newBuilder().setValue(1).build());
        assertNotNull(a);
        assertFalse(a.getAccountList().isEmpty());
    }

    @Test
    void shouldFindByNumber() {
        AccountProto.Account a = service.findByNumber(StringValue.newBuilder().setValue("111111").build());
        assertNotNull(a);
        assertNotEquals(0, a.getId());
    }

    @Test
    void shouldAddAccount() {
        AccountProto.Account a = AccountProto.Account.newBuilder()
                .setNumber("123456")
                .setCustomerId(10)
                .build();

        a = service.addAccount(a);
        assertNotNull(a);
        assertNotEquals(0, a.getId());
    }

}
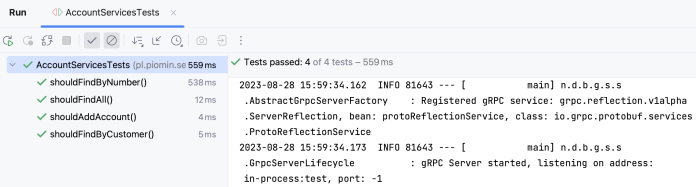
以下是我们的测试结果:
gRPC 微服务之间的通信
在本节中,我们将切换到 customer-service-grpc 应用程序。与前一个应用程序相同,我们需要使用 Maven 命令 mvn clean package 生成类和 gRPC service stub。服务的实现也与 account-service-grpc 类似。不过,这次我们使用客户端来调用外部 gRPC 方法。下面是 @GrpcService 的实现。如你所见,我们注入了 AccountClient Bean,然后用它来调用 account-service-grpc 应用程序 (1) 公开的 gRPC 方法。然后,我们使用 client bean 查找分配给特定 customer 的 account (2)。
@GrpcService
public class CustomersService extends CustomersServiceGrpc.CustomersServiceImplBase {

    @Autowired
    CustomerRepository repository;
    @Autowired
    AccountClient accountClient; // (1)

    @Override
    public void findById(Int32Value request, StreamObserver<CustomerProto.Customer> responseObserver) {
        CustomerProto.Customer c = repository.findById(request.getValue());
        CustomerProto.Accounts a = accountClient.getAccountsByCustomerId(c.getId()); // (2)
        List<CustomerProto.Account> l = a.getAccountList();
        c = CustomerProto.Customer.newBuilder(c).addAllAccounts(l).build();
        responseObserver.onNext(c);
        responseObserver.onCompleted();
    }

    @Override
    public void findByPesel(StringValue request, StreamObserver<CustomerProto.Customer> responseObserver) {
        CustomerProto.Customer c = repository.findByPesel(request.getValue());
        responseObserver.onNext(c);
        responseObserver.onCompleted();
    }

    @Override
    public void findAll(Empty request, StreamObserver<CustomerProto.Customers> responseObserver) {
        List<CustomerProto.Customer> customerList = repository.findAll();
        CustomerProto.Customers c = CustomerProto.Customers.newBuilder().addAllCustomers(customerList).build();
        responseObserver.onNext(c);
        responseObserver.onCompleted();
    }

    @Override
    public void addCustomer(CustomerProto.Customer request, StreamObserver<CustomerProto.Customer> responseObserver) {
        CustomerProto.Customer c = repository.add(request.getType(), request.getName(), request.getPesel());
        responseObserver.onNext(c);
        responseObserver.onCompleted();
    }
}
现在,让我们来看看 AccountClient 类的实现。我们使用生成的 client stub 来调用外部 gRPC 方法 (1)。请注意注解中的值。它就是我们的客户端名称。
@Service
public class AccountClient {

    private static final Logger LOG = LoggerFactory.getLogger(AccountClient.class);

    @GrpcClient("account-service-grpc") // (1)
    AccountsServiceGrpc.AccountsServiceBlockingStub stub;

    public CustomerProto.Accounts getAccountsByCustomerId(int customerId) {
        try {
            return stub.findByCustomer(Int32Value.newBuilder().setValue(customerId).build());
        } catch (final StatusRuntimeException e) {
            LOG.error("Error in communication", e);
            return null;
        }
    }
}
最后,我们需要提供目标 service 的地址。幸运的是,gRPC Spring Boot 支持使用 Spring Cloud 发现服务。我们将使用 Eureka 作为 discovery server。因此,我们的两个示例应用程序都需要包含 Spring Cloud Eureka 客户端。
<dependency>
  <groupId>org.springframework.cloud</groupId>
  <artifactId>spring-cloud-starter-netflix-eureka-client</artifactId>
</dependency>
我们还需要在 pom.xml 中添加 dependencyManagement 节点,其中包含我们使用的 Spring Cloud 版本。
<dependencyManagement>
  <dependencies>
    <dependency>
     <groupId>org.springframework.cloud</groupId>
       <artifactId>spring-cloud-dependencies</artifactId>
       <version>2021.0.8</version>
       <type>pom</type>
       <scope>import</scope>
    </dependency>
  </dependencies>
</dependencyManagement>
为了避免与 account-service-grpc 发生端口冲突,我们将覆盖默认的 gRPC 和 HTTP(Actuator)端口。我们还需要为 @GrpcClient 提供一些配置设置。首先,我们应该使用与 AccountClient 类中 @GrpcClient 注解中设置的相同名称。客户端通过明文协议进行通信,并根据 discovery:/// 字段中设置的名称从 discovery server 读取目标服务的地址。
server.port: 8081
grpc.server.port: 9091

grpc:
  client:
    account-service-grpc:
      address: 'discovery:///account-service-grpc'
      enableKeepAlive: true
      keepAliveWithoutCalls: true
      negotiationType: plaintext
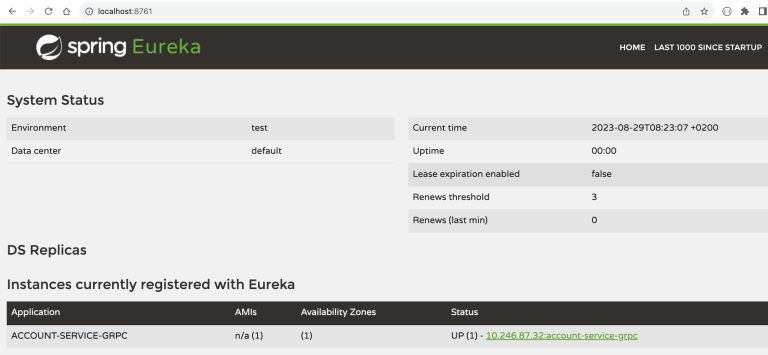
最后,我们可以运行 discovery server 和两个示例微服务。Eureka server 可在我们仓库中的 discovery-server 目录下找到。运行后,你可以访问 http://localhost:8761 查看仪表板。
然后运行我们的两个示例 Spring Boot gRPC 微服务。你可以使用以下 Maven 命令运行所有应用程序:
$ mvn spring-boot:run
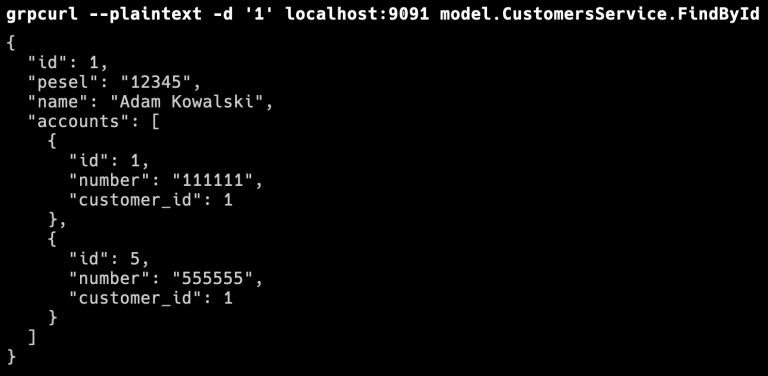
最后,让我们调用与 account-service-grpc 通信的 customer-service-grpc 方法。我们再次使用 grpcurl 工具。如你所见,它返回的是 Customer 对象中的 accounts 列表:
结语
gRPC Spring Boot Starter 提供了一些有用的功能,简化了开发人员的工作。我们可以使用 @GrpcService 轻松创建服务,使用 @GrpcClient 创建客户端,或将 gRPC 与 Spring Boot Actuator 指标和 Spring Cloud Discovery 整合。不过,也有一些缺点。该库的开发并不积极。每年大约发布 2-3 个版本,而且仍不支持 Spring Boot 3。如果你正在寻找一个更积极开发的 starter 库(但不太流行),可以试试 这个(我是在发布文章后通过 Reddit 上的讨论了解到这个库的)。
参考:https://piotrminkowski.com/2023/08/29/introduction-to-grpc-with-spring-boot/
