Spring Boot 整合 MyBatis
MyBatis 是一个流行的 Java 持久层框架,它简化了与关系型数据库的交互。通过将 SQL 语句与 Java 代码进行映射,MyBatis 提供了一种方便、灵活的方式来执行数据库操作。它支持动态SQL、缓存机制和插件扩展,使得开发人员能够更高效地编写和管理数据库访问代码。作为一种轻量级框架,MyBatis 在 Java 开发中被广泛应用于构建可靠的持久化解决方案。
本文将会指导你如何在 Spring Boot 中整合 MyBatis。
框架版本:
- Spring Boot:
3.1.3 - MyBatis:
3.5.13
创建 Spring Boot 项目
通过 start.springboot.io 创建工程(你可以直接点击 这个链接 快速创建)。
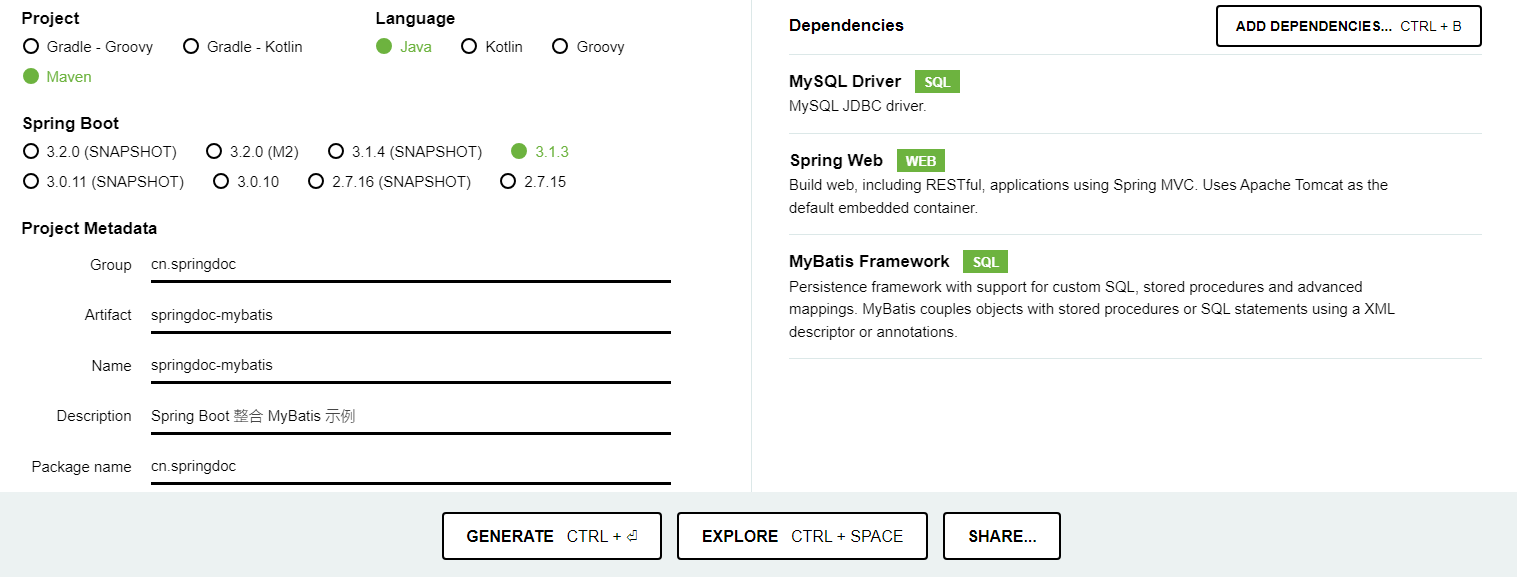
选择 MySQL Driver、Spring Web、MyBatis Framework 基本依赖,点击 “GENERATE” 下载到本地后,导入到IDEA中。
本文将在示例中使用 MySQL 数据库,如果你使用其他类型的数据库,需要把
MySQL Driver替换为对应的依赖。
配置项目
定义 mapper 接口
创建专门存放 mapper 接口的包: cn.springdoc.mapper,并在其中定义一个 FooMapper,如下:
package cn.springdoc.mapper;

import java.time.LocalDateTime;

import org.apache.ibatis.annotations.Mapper;

@Mapper // 使用 Mapper 注解
public interface FooMapper {

    /**
    * 获取数据库的当前时间
    * @return
    */
    LocalDateTime now();
}
该 Mapper 简单定义了一个 now 用于从数据库获取到当前时间。
创建 mapper 映射文件
在 src/main/resources 目录下创建 mapper 目录,专门用于存放 mapper 映射文件。我们在该目录创建 FooMapper 接口的映射文件 FooMapper.xml。
src/main/resources/mapper/FooMapper.xml
<?xml version="1.0" encoding="UTF-8" ?>
    <!DOCTYPE mapper PUBLIC "-//mybatis.org//DTD Mapper 3.0//EN"
        "http://mybatis.org/dtd/mybatis-3-mapper.dtd">
<mapper namespace="cn.springdoc.mapper.FooMapper">

    <select id="now" resultType="java.time.LocalDateTime">
        SELECT NOW();
    </select>
</mapper>
我们在这个 mapper 映射文件中定义了 id 为 now 查询节点,它执行 SELECT NOW(); SQL 语句,会返回数据库中的当前时间,它对应了 FooMapper 接口中的 now() 方法。
创建 MyBatis 配置文件(可选)
Mybatis 本身有一个 xml 配置文件,用于配置插件,缓存等等。同样,我们在 src/main/resources 目录下创建 mybatis 目录,用于存放 mybatis 的配置文件 mybatis-config.xml。
src/main/resources/mybatis/mybatis-config.xml
<?xml version="1.0" encoding="UTF-8" ?>
    <!DOCTYPE configuration PUBLIC "-//mybatis.org//DTD Config 3.0//EN"
        "http://mybatis.org/dtd/mybatis-3-config.dtd">
<configuration>

</configuration>
本文仅作为演示,所以这个配置文件中并未配置任何东西,
配置 application.properties
数据源配置
我们使用 Hikari 作为数据源实现。你可以把 properties 换成 yaml,看个人喜好。
# 数据源实现
spring.datasource.type=com.zaxxer.hikari.HikariDataSource
# JDBC 驱动
spring.datasource.driver-class-name=com.mysql.cj.jdbc.Driver
# JDBC URL
spring.datasource.url=jdbc:mysql://127.0.0.1:3306/demo?useUnicode=true&characterEncoding=UTF-8&serverTimezone=GMT%2b8&allowMultiQueries=true
# 用户名
spring.datasource.username=root
# 密码
spring.datasource.password=root
必须先在 application.properties 中正确地配置数据源信息,否则启动项目你会看到如下异常信息:
***************************
APPLICATION FAILED TO START
***************************

Description:

Failed to configure a DataSource: 'url' attribute is not specified and no embedded datasource could be configured.

Reason: Failed to determine a suitable driver class


Action:

Consider the following:
    If you want an embedded database (H2, HSQL or Derby), please put it on the classpath.
    If you have database settings to be loaded from a particular profile you may need to activate it (no profiles are currently active).
MyBatis 配置
# MyBatis 配置文件的路径。
mybatis.config-location=classpath:mybatis/mybatis-config.xml

# Mapper 文件的扫描路径,可以有多个,支持使用通配符。
mybatis.mapper-locations[0]=classpath*:mapper/**/*.xml
最基本的配置就是这2个,指定 mybatis 配置文件的路径以及 mapper.xml 文件的扫描路径。
在启动类添加 @MapperScan 注解
import org.apache.ibatis.annotations.Mapper;
import org.mybatis.spring.annotation.MapperScan;
import org.springframework.boot.SpringApplication;
import org.springframework.boot.autoconfigure.SpringBootApplication;


@SpringBootApplication
// 指定 mapper 接口所在的包,以及 mapper 接口使用的注解。
@MapperScan(basePackages = "cn.springdoc.mapper", annotationClass = Mapper.class)
public class SpringdocMybatisApplication {

    public static void main(String[] args) {
        SpringApplication.run(SpringdocMybatisApplication.class, args);
    }
}
basePackages 属性是一个 String[] 可以指定多个要扫描的包。
测试
在 src/test/java 下创建测试类 SpringdocMybatisApplicationTests。
我们在测试类中注入了 FooMapper,并且在测试方法中调用了它的 now() 方法,如果一切正常,那么就会返回数据库中的当前时间。
package cn.springdoc;

import java.time.LocalDateTime;
import java.time.format.DateTimeFormatter;

import org.junit.jupiter.api.Test;
import org.slf4j.Logger;
import org.slf4j.LoggerFactory;
import org.springframework.beans.factory.annotation.Autowired;
import org.springframework.boot.test.context.SpringBootTest;
import org.springframework.boot.test.context.SpringBootTest.WebEnvironment;

import cn.springdoc.mapper.FooMapper;

@SpringBootTest(classes = SpringdocMybatisApplication.class, webEnvironment = WebEnvironment.RANDOM_PORT)
class SpringdocMybatisApplicationTests {

    static final Logger logger = LoggerFactory.getLogger(SpringdocMybatisApplicationTests.class);

    @Autowired
    FooMapper fooMapper;

    @Test
    void contextLoads() {

        LocalDateTime now = fooMapper.now();

        logger.info("NOW={}", now.format(DateTimeFormatter.ofPattern("yyyy-MM-dd HH:mm:ss.SSS")));
    }
}
运行测试,控制台输出如下:
2023-08-31T10:08:14.412+08:00 INFO 9064 --- [ main] c.s.SpringdocMybatisApplicationTests : NOW=2023-08-31 10:08:14.000
成功获取到了数据库的当前时间,一切OK。
你可以在
application.properties中把日志输出级别改为DEBUG, 就可以看到 MyBatis 详细的SQL日志了。
logging.level.ROOT=DEBUG
总结
在 Spring Boot 中整合 MyBabtis 只需要遵循如下几个关键的步骤。
- 添加适当的依赖。
- 定义 mapper 接口。
- 定义 mapper 映射文件。
- 定义 mybatis 配置文件(可选)。
- 在
application.properties中配置数据源、配置 mybatis 配置文件的位置、指定 mapper 映射文件的扫描路径。 - 在启动类上定义
@MapperScan注解,通过basePackages属性指定 mapper 接口所在的包、通过annotationClass属性指定 mapper 接口使用的注解。
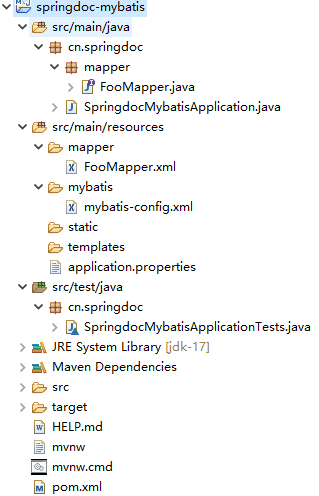
最后附上完整的工程结构: