在运行时更改 Spring Boot 属性的几种方式
1、概览
动态管理应用程序配置是许多实际应用场景中的关键要求。在微服务架构中,由于扩展操作或负载条件的变化,不同的服务可能需要即时更改配置。在其他情况下,应用程序可能需要根据用户偏好、来自外部 API 的数据调整其行为,或满足动态变化的要求。
application.properties 文件是静态的,在不重启应用的情况下无法更改。不过,Spring Boot 提供了几种强大的方法,可在运行时调整配置而无需停机。无论是在实时应用程序中切换功能、更新数据库连接以实现负载均衡,还是在不重新部署应用的情况下更改第三方集成的 API Key,Spring Boot 的动态配置功能都能为这些复杂的环境提供所需的灵活性。
本文将带你了解几种无需直接修改 application.properties 文件即可动态更新 Spring Boot 应用程序中属性的策略。这些方法可满足不同的需求,从非持久性内存更新到使用外部文件进行持久性更改。
本文中的示例使用 Spring Boot 3.2.4、JDK17 以及 Spring Cloud 4.1.3。不同版本的 Spring Boot 可能需要对代码进行轻微调整。
2、使用 Prototype Scope Bean
当我们需要动态调整特定 Bean 的属性,而不影响已创建的 Bean 实例或更改全局应用程序状态时,一个简单的使用 @Value 直接注入的 @Service 类是不够的,因为这些属性在 Application Context 的生命周期内是静态的。
相反,可以使用 @Configuration 类中的 @Bean 方法创建具有可修改属性的 Bean。这种方法允许在应用程序执行过程中动态更改属性:
@Configuration
public class CustomConfig {

    @Bean
    @Scope("prototype")  // Scope 为 prototype
    public MyService myService(@Value("${custom.property:default}") String property) {
        return new MyService(property);
    }
}
通过使用 @Scope("prototype") 注解,我们可以确保每次调用 myService(...) 时都会创建 MyService 的新实例,从而允许在运行时进行不同的配置。在本例中,MyService 是一个简单的 POJO:
public class MyService {
    private final String property;

    public MyService(String property) {
        this.property = property;
    }

    public String getProperty() {
        return property;
    }
}
要验证动态行为,可以使用如下测试:
@Autowired
private ApplicationContext context;

@Test
void whenPropertyInjected_thenServiceUsesCustomProperty() {
    MyService service = context.getBean(MyService.class);
    assertEquals("default", service.getProperty());
}

@Test
void whenPropertyChanged_thenServiceUsesUpdatedProperty() {
    System.setProperty("custom.property", "updated");
    MyService service = context.getBean(MyService.class);
    assertEquals("updated", service.getProperty());
}
这种方法使我们能够在不重启应用程序的情况下灵活地更改配置。更改是临时的,仅影响由 CustomConfig 实例化的 Bean。
3、使用 Environment、MutablePropertySources 和 @RefreshScope
与前面情况不同,我们要更新已实例化 Bean 的属性。为此,我们要使用 Spring Cloud 的 @RefreshScope 注解和 /actuator/refresh 端点。该 Actuator 会刷新所有 @RefreshScope Bean,用反映最新配置的新实例替换旧实例,从而在不重启应用程序的情况下实时更新属性。再次强调,这种更改不是持久化的。
3.1、基础配置
先在 pom.xml 中添加依赖:
<dependency>
    <groupId>org.springframework.cloud</groupId>
    <artifactId>spring-cloud-starter</artifactId>
    <version>4.1.3</version>
</dependency>
<dependency>
    <groupId>org.springframework.cloud</groupId>
    <artifactId>spring-cloud-starter-config</artifactId>
    <version>4.1.3</version>
</dependency>
<dependency>
    <groupId>org.springframework.boot</groupId>
    <artifactId>spring-boot-starter-actuator</artifactId>
    <version>3.2.4</version>
</dependency>
<dependency>
    <groupId>org.awaitility</groupId>
    <artifactId>awaitility</artifactId>
    <scope>test</scope>
    <version>4.2.0</version>
</dependency>
spring-cloud-starter 和 spring-cloud-starter-config 依赖是 Spring Cloud 框架的一部分,而 spring-boot-starter-actuator 依赖则是暴露 /actuator/refresh 端点所必需的。最后,awaitility 依赖是一个测试工具,用于处理异步操作,后文中的 JUnit5 测试会用到。
现在来看看 application.properties。在本示例中,由于我们只需要在单个 Spring Boot 应用中更新属性,所以,我们没有使用 Spring Cloud Config Server 集中管理多个服务的配置,因此应该禁用尝试连接到外部配置服务器的默认行为:
# 不连接到外部配置服务器
spring.cloud.config.enabled=false
我们仍在使用 Spring Cloud 的功能,只是使用的环境与分布式下的 客户端/服务器 架构不同。如果我们忘记了设置 spring.cloud.config.enabled=false,应用将无法启动,并导致 java.lang.IllegalStateException 异常。
然后,我们需要启用 Spring Boot Actuator,以暴露 /actuator/refresh 端点:
management.endpoint.refresh.enabled=true
management.endpoints.web.exposure.include=refresh
此外,如果我们想在每次调用 actuator 时都记录日志,那么可以把如下 logger 的日志级别设置为 DEBUG:
logging.level.org.springframework.boot.actuate=DEBUG
最后,为测试添加一个示例属性:
my.custom.property=defaultValue
至此,我们的基本配置就已经完成了。
3.2、示例 Bean
当我们对 Bean 应用 @RefreshScope 注解时,Spring Boot 不会像通常那样直接实例化 bean。相反,它会创建一个代理对象,作为实际 Bean 的占位符或委托(Delegate)。
@Value 注解将 application.properties 文件中 my.custom.property 的值注入 customProperty 字段:
@RefreshScope
@Component
public class ExampleBean {
    @Value("${my.custom.property}")
    private String customProperty;

    public String getCustomProperty() {
        return customProperty;
    }
}
代理对象会拦截对该 Bean 的方法调用。当 /actuator/refresh 端点触发刷新(refresh)事件时,代理会使用更新的配置属性重新初始化 Bean。
3.3、PropertyUpdaterService
为了在运行中的 Spring Boot 应用程序中动态更新属性,我们可以创建 PropertyUpdaterService 类,通过编程方式添加或更新属性。基本上,它允许我们通过在 Spring(Environment)中管理自定义属性源来在运行时注入或修改应用程序属性。
在继续深入之前,让我们先声明一些关键概念:
- Environment:提供访问属性源、Profile 和系统环境变量的接口。
- ConfigurableEnvironment:Environment 的子接口,允许动态更新应用程序的属性。
- MutablePropertySources:由
ConfigurableEnvironment持有的PropertySource对象集合,提供了添加、移除或重新排列属性源(如系统属性、环境变量或自定义属性源)的方法。
通过下面各组件之间关系的 UML 图,可以帮助我们了解动态属性更新是如何在应用程序中传播的:
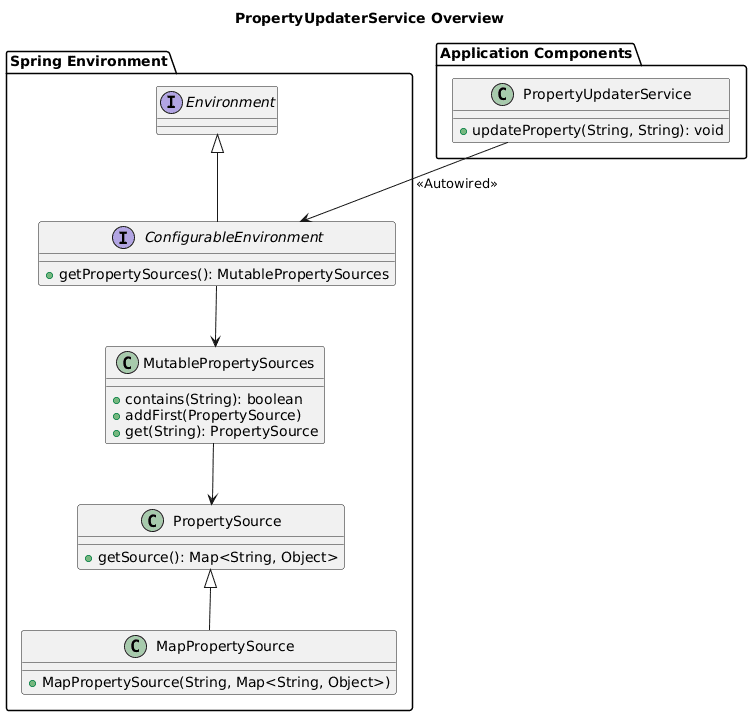
下面是我们的 PropertyUpdaterService,它使用这些组件来动态更新属性:
@Service
public class PropertyUpdaterService {
    private static final String DYNAMIC_PROPERTIES_SOURCE_NAME = "dynamicProperties";

    @Autowired
    private ConfigurableEnvironment environment;

    public void updateProperty(String key, String value) {
        MutablePropertySources propertySources = environment.getPropertySources();
        if (!propertySources.contains(DYNAMIC_PROPERTIES_SOURCE_NAME)) {
            Map<String, Object> dynamicProperties = new HashMap<>();
            dynamicProperties.put(key, value);
            propertySources.addFirst(new MapPropertySource(DYNAMIC_PROPERTIES_SOURCE_NAME, dynamicProperties));
        } else {
            MapPropertySource propertySource = (MapPropertySource) propertySources.get(DYNAMIC_PROPERTIES_SOURCE_NAME);
            propertySource.getSource().put(key, value);
        }
    }
}
上述代码的逻辑如下:
updateProperty(...)方法会检查MutablePropertySources集合中是否存在名为dynamicProperties的自定义属性源- 如果没有,则会创建一个带有给定属性的新
MapPropertySource对象,并将其添加为第一个属性源 propertySources.addFirst(...)可确保我们的动态属性优先于环境(Environment)中的其他属性- 如果
dynamicProperties源已经存在,该方法会用新值更新现有属性;如果 Key 不存在,则添加新值
通过使用这个 service,我们可以在运行时以编程方式更新应用程序中的任何属性。
3.4、使用 PropertyUpdaterService 的方式
直接通过 Controller 公开属性更新功能虽然方便测试,但在生产环境中通常并不安全。在使用 Controller 进行测试时,应确保它受到充分保护,防止未经授权的访问。
在生产环境中,有几种替代策略可以安全有效地使用 PropertyUpdaterService:
- 定时任务调度:属性可能会根据时间敏感条件或外部来源的数据发生变化。
- 基于条件的逻辑:对特定应用事件(Application Event)或触发器(如负载变化、用户活动或外部 API 响应)做出响应
- 限制对管理工具的访问:仅授权人员可访问的安全管理工具
- 自定义 Actuator 端点:自定义 Actuator 可对暴露的功能提供更多控制,包括额外的安全设置
- Application Event Listener:在云环境中非常有用,在这种环境中,实例可能需要根据应用中的基础架构变化或其他重大事件调整设置
关于内置的 /actuator/refresh 端点,虽然它可以刷新注解为 @RefreshScope 的 Bean,但并不能直接更新属性。我们可以使用 PropertyUpdaterService 以编程的方式添加或修改属性,然后触发 /actuator/refresh 端点,在整个应用程序中应用这些更改。但是,如果不使用 PropertyUpdaterService,仅靠这个 Actuator 是无法更新或添加新属性的。
总之,我们选择的方法应与我们应用的特定要求、配置数据的敏感性以及整体的安全态势保持一致。
3.5、使用 Controller 进行手动测试
接下来使用一个简单的 Controller 来测试 PropertyUpdaterService 的功能:
@RestController
@RequestMapping("/properties")
public class PropertyController {
    @Autowired
    private PropertyUpdaterService propertyUpdaterService;

    @Autowired
    private ExampleBean exampleBean;

    @PostMapping("/update")
    public String updateProperty(@RequestParam String key, @RequestParam String value) {
        propertyUpdaterService.updateProperty(key, value);
        return "Property updated. Remember to call the actuator /actuator/refresh";
    }

    @GetMapping("/customProperty")
    public String getCustomProperty() {
        return exampleBean.getCustomProperty();
    }
}
使用 curl 进行手动测试,可以验证我们的实现是否正确:
$ curl "http://localhost:8080/properties/customProperty"
defaultValue

$ curl -X POST "http://localhost:8080/properties/update?key=my.custom.property&value=baeldungValue"
Property updated. Remember to call the actuator /actuator/refresh

$ curl -X POST http://localhost:8080/actuator/refresh -H "Content-Type: application/json"
[]

$ curl "http://localhost:8080/properties/customProperty"
baeldungValue
上述测试 Ok。
如果第一次尝试没有成功,而且应用非常复杂的话,应该再次尝试几次,让 Spring Cloud 有时间更新 Bean。
3.6、JUnit5 测试
由于属性更新操作是异步的,而且没有 API 来确定更新何时完成,因此我们需要使用超时来避免阻塞 JUnit5。之所以说它是异步的,是因为对 /actuator/refresh 的调用会立即返回,而不会等到所有 Bean 都被重新创建。
await 语句使我们不必使用复杂的逻辑来测试我们感兴趣的 Bean 的刷新。它让我们避免了轮询等不那么优雅的设计。
最后,要使用 RestTemplate 的话,我们需要启动 Web 环境。
如下 在 @SpringBootTest(...) 注解中设置 webEnvironment 属性:
@SpringBootTest(webEnvironment = SpringBootTest.WebEnvironment.RANDOM_PORT)
public class PropertyUpdaterServiceUnitTest {
    @Autowired
    private PropertyUpdaterService propertyUpdaterService;

    @Autowired
    private ExampleBean exampleBean;

    @LocalServerPort
    private int port;

    @Test
    @Timeout(5)
    public void whenUpdatingProperty_thenPropertyIsUpdatedAndRefreshed() throws InterruptedException {
        // 在测试上下文中注入新属性
        propertyUpdaterService.updateProperty("my.custom.property", "newValue");

        // 通过调用 actuator  端点触发刷新
        HttpHeaders headers = new HttpHeaders();
        headers.setContentType(MediaType.APPLICATION_JSON);
        HttpEntity<String> entity = new HttpEntity<>(null, headers);
        RestTemplate restTemplate = new RestTemplate();
        restTemplate.postForEntity("http://localhost:" + port + "/actuator/refresh", entity, String.class);

        // 等待属性更新
        await().atMost(5, TimeUnit.SECONDS).until(() -> "newValue".equals(exampleBean.getCustomProperty()));
    }
}
当然,我们需要用感兴趣的所有属性和 Bean 来自定义测试。
4、使用外部配置文件
在某些情况下,有必要在 应用之外 管理配置更新,以确保对属性进行持久化更改。这也允许我们将更改分发给多个应用。
在本例中,我们使用与之前相同的 Spring Cloud 设置来启用 @RefreshScope 和 /actuator/refresh 支持,以及相同的示例 Controller 和 Bean。
我们的目标是使用外部文件 external-config.properties,测试 ExampleBean 上的动态变化。
保存为如下内容:
my.custom.property=externalValue
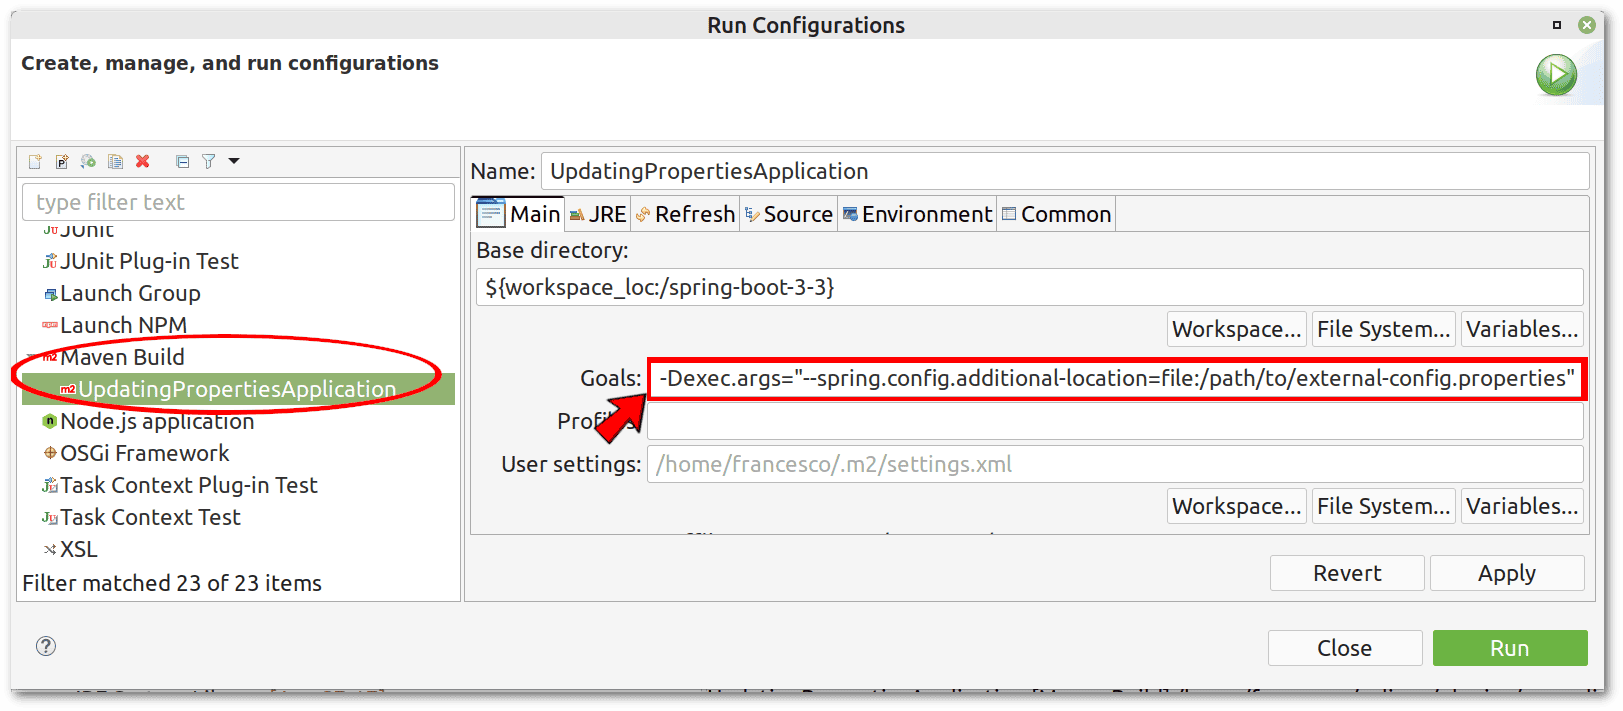
我们可以使用 -spring.config.additional-location 参数告诉 Spring Boot external-config.properties 的位置,如下 Eclipse 截图所示。
注意,要将示例中的 /path/to/ 替换为实际路径:
使用 curl 验证 Spring Boot 是否正确加载了该外部文件,其属性是否覆盖了 application.properties 中的属性:
$ curl "http://localhost:8080/properties/customProperty"
externalValue
由于 external-config.properties 文件中的 externalValue 替换了 application.properties 文件中的 defaultValue,因此它能按预期运行。现在,尝试通过编辑 external-config.properties 文件来更改该属性的值:
my.custom.property=external-Baeldung-Value
像以前一样,需要调用 Actuator:
$ curl -X POST http://localhost:8080/actuator/refresh -H "Content-Type: application/json"
["my.custom.property"]
最后,结果不出所料,这次的修改是持久化的:
$ curl "http://localhost:8080/properties/customProperty"
external-Baeldung-Value
这种方法的一个优点是,每次修改 external-config.properties 文件时,我们都可以轻松地自动调用 Actuator。为此,我们可以使用 Linux 和 macOS 上的跨平台 fswatch 工具,只需记住将 /path/to/ 替换为实际路径即可:
$ fswatch -o /path/to/external-config.properties | while read f; do
    curl -X POST http://localhost:8080/actuator/refresh -H "Content-Type: application/json";
done
Windows 用户可能会觉得基于 PowerShell 的替代解决方案更方便,这里就不再展开。
5、总结
本文介绍了在 Spring Boot 中动态更新属性而无需直接修改 application.properties 文件的各种方法。
首先介绍了在 Bean 中通过自定义配置,使用 @Configuration、@Bean 和 @Scope("prototype") 注解允许在运行时更改 Bean 属性,而无需重新启动应用。这种方法可确保灵活性,并将更改隔离到 Bean 的特定实例。
然后,介绍了如何使用 Spring Cloud 的 @RefreshScope 和 /actuator/refresh 端点,对已实例化的 Bean 进行实时更新,以及如何使用外部配置文件进行持久化属性管理。这些方法为动态和集中式的配置管理提供了强大的选择,增强了 Spring Boot 应用的可维护性和适应性。
Ref:https://www.baeldung.com/spring-boot-properties-dynamic-update
