Spring Boot + jOOQ 教程 - 1:入门
jOOQ 是一个 Java 持久库,提供用于编写类型安全 SQL 查询的 SQL DSL。它支持大多数流行的数据库,如 MySQL、PostgreSQL、Oracle、SQL Server 等。
本文将带你了解如何在 Spring Boot 中使用 jOOQ 实现持久层。JOOQ 也可以在 Kotlin、Scala 等其他基于 JVM 的语言中使用。
本系列教程中,将带你学习如何在 Spring Boot 中使用 JOOQ 实现:
- 基本的 CRUD 操作
- 一对一关系检索
- 一对多关系检索
- 多对多关系检索
你可以在 Github 获取完整的源码。
前提条件
- 安装 JDK 17 或更高版本
- 安装任何容器运行时,如 Docker Desktop、OrbStack 等。
注意:jOOQ 不需要 Docker。只是使用 Testcontainers 进行 jOOQ 代码生成和测试需要一个容器运行时。
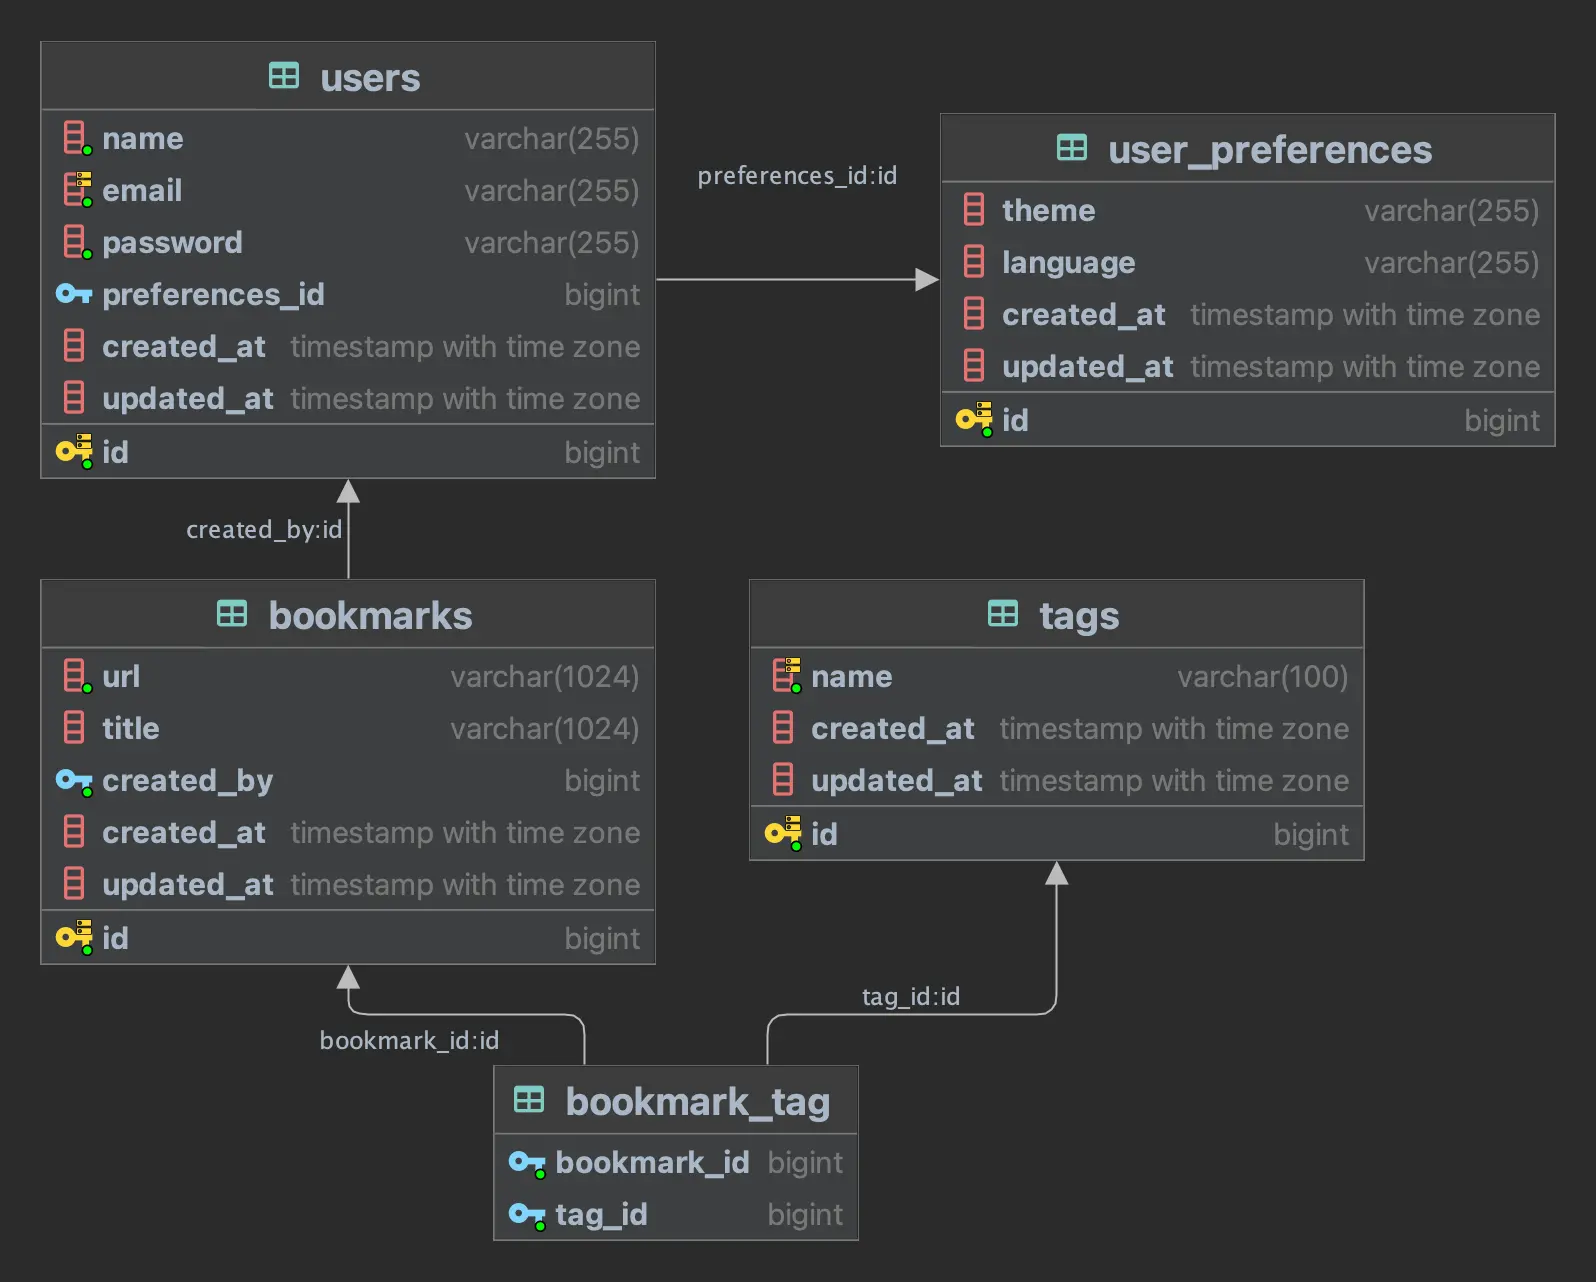
示例数据库
本教程使用下列示例数据库。
创建 Spring Boot 应用
使用 Spring Initializr 创建一个 Spring Boot 项目。选择 JOOQ Access Layer、Flyway Migration、PostgreSQL Driver 和 Testcontainers。
你可以点击该 链接,快速创建此项目。
添加 Flyway 迁移脚本
使用 Flyway 进行数据库 schema 迁移。
在 src/main/resources/db/migration 目录下添加以下 SQL 脚本。
V1__create_tables.sql
CREATE TABLE user_preferences
(
    id         bigserial primary key,
    theme      varchar(255),
    language   varchar(255),
    created_at timestamp with time zone default CURRENT_TIMESTAMP,
    updated_at timestamp with time zone
);

CREATE TABLE users
(
    id             bigserial primary key,
    name           varchar(255) not null,
    email          varchar(255) not null,
    password       varchar(255) not null,
    preferences_id bigint REFERENCES user_preferences (id),
    created_at     timestamp with time zone default CURRENT_TIMESTAMP,
    updated_at     timestamp with time zone,
    CONSTRAINT user_email_unique UNIQUE (email)
);

CREATE TABLE bookmarks
(
    id         bigserial primary key,
    url        varchar(1024) not null,
    title      varchar(1024),
    created_by bigint        not null REFERENCES users (id),
    created_at timestamp with time zone default CURRENT_TIMESTAMP,
    updated_at timestamp with time zone
);

CREATE TABLE tags
(
    id         bigserial primary key,
    name       varchar(100) not null,
    created_at timestamp with time zone default CURRENT_TIMESTAMP,
    updated_at timestamp with time zone,
    CONSTRAINT tag_name_unique UNIQUE (name)
);

CREATE TABLE bookmark_tag
(
    bookmark_id bigint not null REFERENCES bookmarks (id),
    tag_id      bigint not null REFERENCES tags (id)
);

ALTER SEQUENCE user_preferences_id_seq RESTART WITH 101;
ALTER SEQUENCE users_id_seq RESTART WITH 101;
ALTER SEQUENCE bookmarks_id_seq RESTART WITH 101;
ALTER SEQUENCE tags_id_seq RESTART WITH 101;
SQL 脚本中更改了序列,使其从 101 开始,这样就可以插入一些 ID 为 1、2、3 等的测试数据。
使用 jOOQ 执行本地 SQL 查询
添加 jOOQ Starter 依赖后,Spring Boot 会将 jOOQ 的 DSLContext 自动配置为一个 Bean。
可以使用 DSLContext Bean 执行本地 SQL 查询。
创建 UserRepository 类,如下:
package com.sivalabs.bookmarks.repositories;

import org.jooq.DSLContext;
import org.jooq.Record;
import org.springframework.stereotype.Repository;

@Repository
class UserRepository {
    private final DSLContext dsl;

    UserRepository(DSLContext dsl) {
        this.dsl = dsl;
    }

    public String findUserNameById(Long id) {
        Record record =
                dsl.resultQuery("select * from users where id = ?", id)
                   .fetchOptional().orElseThrow();
        System.out.println(record);
        Object name = record.get("name");
        return (String) name;
    }
}
在编写测试之前,创建一个 SQL 脚本,将一些测试数据添加到数据库中。
src/test/resources/test-data.sql
DELETE FROM bookmark_tag;
DELETE FROM bookmarks;
DELETE FROM tags;
DELETE FROM users;
DELETE FROM user_preferences;

INSERT INTO user_preferences (id, theme, language) VALUES
(1, 'Light', 'EN'),
(2, 'Dark', 'EN')
;

INSERT INTO users (id, email, password, name, preferences_id) VALUES
(1, 'admin@gmail.com', 'admin', 'Admin', 2),
(2, 'siva@gmail.com', 'siva', 'Siva', 1)
;

INSERT INTO tags(id, name)
VALUES (1, 'java'),
       (2, 'spring-boot'),
       (3, 'spring-cloud'),
       (4, 'devops'),
       (5, 'security')
;

INSERT INTO bookmarks(id, title, url, created_by, created_at)
VALUES (1, 'SivaLabs', 'https://sivalabs.in', 1, CURRENT_TIMESTAMP),
       (2, 'Spring Initializr', 'https://start.spring.io', 2, CURRENT_TIMESTAMP),
       (3, 'Spring Blog', 'https://spring.io/blog', 2, CURRENT_TIMESTAMP)
;

insert into bookmark_tag(bookmark_id, tag_id)
VALUES (1, 1),
       (1, 2),
       (1, 3),
       (2, 2)
;
创建一个简单的测试用例来验证上述代码。
package com.sivalabs.bookmarks.repositories;

import org.junit.jupiter.api.Test;
import org.springframework.beans.factory.annotation.Autowired;
import org.springframework.boot.test.autoconfigure.jooq.JooqTest;
import org.springframework.boot.testcontainers.service.connection.ServiceConnection;
import org.springframework.context.annotation.Import;
import org.springframework.test.context.jdbc.Sql;
import org.testcontainers.containers.PostgreSQLContainer;
import org.testcontainers.junit.jupiter.Container;
import org.testcontainers.junit.jupiter.Testcontainers;

import static org.assertj.core.api.Assertions.assertThat;

@JooqTest
@Import({UserRepository.class})
@Testcontainers
@Sql("classpath:/test-data.sql")
class UserRepositoryTest {

    @Container
    @ServiceConnection
    static final PostgreSQLContainer<?> postgres =
            new PostgreSQLContainer<>("postgres:16-alpine");

    @Autowired
    UserRepository userRepository;

    @Test
    void findUserNameById() {
        String username = userRepository.findUserNameById(1L);
        assertThat(username).isEqualTo("Admin");
    }
}
使用 @JooqTest 测试注解来测试 Repository 类。使用 @Testcontainers 和 @Container 注解启动 PostgreSQL 数据库,并使用 @ServiceConnection 注册 DataSource properties。此外,还使用 @Sql 注解执行 test-data.sql 脚本。
在测试方法中,调用 userRepository.findUserNameById(1L) 并验证结果。
开启 JOOQ 的 SQL 日志
在
application.properties文件中添加以下属性,即可开启 JOOQ 的 SQL 日志:logging.level.org.jooq.tools.LoggerListener=DEBUG开启了 JOOQ 的 SQL 日志后,可以在控制台中看到格式化后的输出:
+----+-----+---------------+--------+--------------+--------------------------------+----------+
|  id|name |email          |password|preferences_id|created_at                      |updated_at|
+----+-----+---------------+--------+--------------> +--------------------------------+----------+
|   1|Admin|admin@gmail.com|admin   |             1|2023-10-12T11:01:58.471277+05:30|{null}    |
+----+-----+---------------+--------+--------------+--------------------------------+----------+
如上,测试 OK。
在当前的实现中,如果将某个字符串作为 id 值传递,也不会有任何编译错误。而且,以 Object 类型获取 name 值后,需要将其强制转换为所需的 String 类型。
为此,可以使用 jOOQ 的 Typesafe DSL (类型安全的 DSL)。这首先需要从数据库 schema 生成 jOOQ 类。
jOOQ 代码生成
使用 jOOQ 代码生成工具,根据数据库 schema 生成 jOOQ 类。
要使用 jOOQ 代码生成工具,需要有一个已运行的数据库。
可以使用 Testcontainers 启动 PostgreSQL 数据库容器,然后使用 jOOQ 代码生成工具生成 jOOQ 类。
有一个 testcontainers-jooq-codegen-maven-plugin Maven 插件可以启动数据库容器,运行 Flyway 迁移,然后生成 jOOQ 代码。
在 pom.xml 文件中配置 testcontainers-jooq-codegen-maven-plugin,如下:
<properties>
    <testcontainers.version>1.19.1</testcontainers.version>
    <tc-jooq-codegen-plugin.version>0.0.3</tc-jooq-codegen-plugin.version>
</properties>

<build>
    <plugins>
        <plugin>
            <groupId>org.testcontainers</groupId>
            <artifactId>testcontainers-jooq-codegen-maven-plugin</artifactId>
            <version>${tc-jooq-codegen-plugin.version}</version>
            <dependencies>
                <dependency>
                    <groupId>org.testcontainers</groupId>
                    <artifactId>postgresql</artifactId>
                    <version>${testcontainers.version}</version>
                </dependency>
                <dependency>
                    <groupId>org.postgresql</groupId>
                    <artifactId>postgresql</artifactId>
                    <version>${postgresql.version}</version>
                </dependency>
            </dependencies>
            <executions>
                <execution>
                    <id>generate-jooq-sources</id>
                    <goals>
                        <goal>generate</goal>
                    </goals>
                    <phase>generate-sources</phase>
                    <configuration>
                        <database>
                            <type>POSTGRES</type>
                            <containerImage>postgres:16-alpine</containerImage>
                        </database>
                        <flyway>
                            <locations>
                                filesystem:${project.basedir}/src/main/resources/db/migration
                            </locations>
                        </flyway>
                        <jooq>
                            <generator>
                                <generate>
                                    <javaTimeTypes>true</javaTimeTypes>
                                </generate>
                                <database>
                                    <inputSchema>public</inputSchema>
                                    <includes>.*</includes>
                                    <excludes>
                                        flyway_schema_history
                                    </excludes>
                                </database>
                                <target>
                                    <clean>true</clean>
                                    <packageName>com.sivalabs.bookmarks.jooq</packageName>
                                    <directory>src/main/jooq</directory>
                                </target>
                            </generator>
                        </jooq>
                    </configuration>
                </execution>
            </executions>
        </plugin>

        <plugin>
            <groupId>org.codehaus.mojo</groupId>
            <artifactId>build-helper-maven-plugin</artifactId>
            <executions>
                <execution>
                    <phase>generate-sources</phase>
                    <goals>
                        <goal>add-source</goal>
                    </goals>
                    <configuration>
                        <sources>
                            <source>src/main/jooq</source>
                        </sources>
                    </configuration>
                </execution>
            </executions>
        </plugin>
    </plugins>
</build>
上述代码配置了 testcontainers-jooq-codegen-maven-plugin 在 src/main/jooq 目录中生成 jOOQ 代码。然后,使用 build-helper-maven-plugin 将 src/main/jooq 目录添加为源码目录。
将生成的 jOOQ 代码添加到源码?
你也可以在
target/generated-sources/jooq目录中生成代码,Maven 会自动将其添加为源码。这样就不需要使用build-helper-maven-plugin了。不过,我个人更喜欢在
src/main/jooq目录中生成代码,并将生成的代码纳入源码目录。
现在,运行以下命令来生成 jOOQ 代码。
$ ./mvnw clean generate-sources
使用 JOOQ DSL
现在,重写 UserRepository 类,使用 jOOQ DSL。
package com.sivalabs.bookmarks.repositories;

import com.sivalabs.bookmarks.jooq.tables.records.UsersRecord;
import org.jooq.DSLContext;
import org.springframework.stereotype.Repository;

import static com.sivalabs.bookmarks.jooq.tables.Users.USERS;

@Repository
class UserRepository {
    private final DSLContext dsl;

    UserRepository(DSLContext dsl) {
        this.dsl = dsl;
    }

    public String findUserNameById(Long id) {
        UsersRecord usersRecord = dsl.selectFrom(USERS)
                .where(USERS.ID.eq(id))
                .fetchOptional().orElseThrow();
        return usersRecord.getName();
    }
}
如你所见,使用的是 jOOQ 代码生成工具生成的 UsersRecord 类。现在,如果为 id 参数传递除 Long 以外的其他类型,就会出现编译错误。此外,获取的 name 值是就是 String 类型。
因此,jOOQ Typesafe DSL 对于编写类型安全的 SQL 查询非常有用。
总结
本文介绍了如何在 Spring Boot 中整合 jOOQ 以及如何配置其代码生成器。
Ref:https://www.sivalabs.in/spring-boot-jooq-tutorial-getting-started/
