Spring Boot 整合 QueryDSL 及常见用法
QueryDSL 是一个用于构建类型安全查询的开源 Java ORM 框架。它提供了一种 Fluent 风格的 API 来构建和执行数据库查询,并提供了编译时类型检查,以避免常见的查询错误。QueryDSL 支持多种数据库,包括关系型数据库和 NoSQL 数据库,可以与多个持久化框架(如 JPA、Hibernate 等)整合使用。它简化了查询的编写过程,使得查询代码更易于理解、维护和重用。
QueryDSL 在 Spring Boot 中通常配合 Spring Data JPA 使用,它会根据定义的 JPA Entity 类自动生成对应的查询类。通过查询类,除了可以快速地进行基本的 CRUD 操作外还支持 JOIN、GROUP、子查询等复杂的检索。而这一切都无需编写任何 SQL 语句,代码即 SQL。
本文将会带你了解如何在 Spring Boot 中整合 QueryDSL + Spring Data JPA,以及 QueryDSL 的常见用法。
示例项目
本文使用到的软件版本:
- Java:21
- Spring Boot:3.2.0
- MySQL:8.0.26
添加依赖
创建 Spring Boot 应用,完整的 pom.xml 如下:
<?xml version="1.0" encoding="UTF-8"?>
<project xmlns="http://maven.apache.org/POM/4.0.0"
 xmlns:xsi="http://www.w3.org/2001/XMLSchema-instance"
 xsi:schemaLocation="http://maven.apache.org/POM/4.0.0 https://maven.apache.org/xsd/maven-4.0.0.xsd">

 <modelVersion>4.0.0</modelVersion>
 <parent>
  <groupId>org.springframework.boot</groupId>
  <artifactId>spring-boot-starter-parent</artifactId>
  <version>3.2.0</version>
  <relativePath /> <!-- lookup parent from repository -->
 </parent>

 <groupId>springdoc</groupId>
 <artifactId>springdoc-demo</artifactId>
 <version>0.0.1-SNAPSHOT</version>

 <name>springdoc-demo</name>

 <description>Demo project for Spring Boot</description>

 <properties>
  <java.version>21</java.version>
 </properties>

 <repositories>
  <repository>
   <id>huaweicloud</id>
   <url>https://mirrors.huaweicloud.com/repository/maven/</url>
   <releases>
    <enabled>true</enabled>
   </releases>
   <snapshots>
    <enabled>true</enabled>
   </snapshots>
  </repository>
 </repositories>

 <dependencies>

  <dependency>
   <groupId>org.springframework.boot</groupId>
   <artifactId>spring-boot-starter-test</artifactId>
   <scope>test</scope>
  </dependency>
  <dependency>
   <groupId>org.springframework.boot</groupId>
   <artifactId>spring-boot-starter-web</artifactId>
  </dependency>

  <!-- MYSQL 驱动 -->
  <dependency>
   <groupId>com.mysql</groupId>
   <artifactId>mysql-connector-j</artifactId>
  </dependency>

  <!-- JPA -->
  <dependency>
    <groupId>org.springframework.boot</groupId>
    <artifactId>spring-boot-starter-data-jpa</artifactId>
  </dependency>

  <!-- QueryDSL JPA  -->
  <dependency>
   <groupId>com.querydsl</groupId>
   <artifactId>querydsl-jpa</artifactId>
   <version>${querydsl.version}</version>
   <classifier>jakarta</classifier>
  </dependency>

  <!-- QueryDSL APT  -->
  <dependency>
   <groupId>com.querydsl</groupId>
   <artifactId>querydsl-apt</artifactId>
   <version>${querydsl.version}</version>
   <classifier>jakarta</classifier>
   <scope>provided</scope>
  </dependency>
 </dependencies>

 <build>
  <plugins>
   <plugin>
    <groupId>org.springframework.boot</groupId>
    <artifactId>spring-boot-maven-plugin</artifactId>
   </plugin>
   <plugin>
    <groupId>com.mysema.maven</groupId>
    <artifactId>apt-maven-plugin</artifactId>
    <version>1.1.3</version>
    <executions>
     <execution>
      <goals>
       <goal>process</goal>
      </goals>
      <configuration>
       <outputDirectory>target/generated-sources/java</outputDirectory>
       <processor>com.querydsl.apt.jpa.JPAAnnotationProcessor</processor>
      </configuration>
     </execution>
    </executions>
   </plugin>
  </plugins>
 </build>
</project>
QueryDSL 的版本也受到 Spring Boot 的管理,因此在这里只需要将其版本号声明为 ${querydsl.version} 即可。
apt-maven-plugin Maven 插件的作用是根据 JPA Entity 生成查询类,其中 <outputDirectory> 节点指定了存放查询类的目录,而 <processor> 节点的配置则表示根据 JPA 注解生成查询类。
配置文件
在 application.yaml 中定义数据源和 JPA 等配置信息:
logging:
  level:
    "ROOT": INFO
    # 输出 SQL 绑定参数
    "org.hibernate.orm.jdbc.bind": TRACE

spring:
  # 数据源
  datasource:
    type: com.zaxxer.hikari.HikariDataSource
    driver-class-name: com.mysql.cj.jdbc.Driver
    url: jdbc:mysql://127.0.0.1:3306/demo?useUnicode=true&characterEncoding=UTF-8&serverTimezone=GMT%2b8&allowMultiQueries=true
    username: root
    password: root

  jpa:
    # 输出 SQL
    show-sql: true
    properties:
      # 格式化输出的 SQL
      "hibernate.format_sql": true
如上,除了基本的数据源配置外。还配置了 org.hibernate.orm.jdbc.bind Logger 的日志级别为 TRACE,用于在日志中输出 SQL 绑定的参数。
Entity
定义一个 User 类,表示用户:
package cn.springdoc.demo.entity;

import java.time.LocalDateTime;

import jakarta.persistence.Column;
import jakarta.persistence.Entity;
import jakarta.persistence.GeneratedValue;
import jakarta.persistence.GenerationType;
import jakarta.persistence.Id;
import jakarta.persistence.Table;

@Entity
@Table(name = "t_user")
public class User {

 // ID
 @Id
 @Column
 @GeneratedValue(strategy = GenerationType.IDENTITY)
 private Integer id;

 // 名称
 @Column
 private String name;

 // 是否启用
 @Column
 private Boolean enabled;

 // 创建时间
 @Column
 private LocalDateTime createAt;

 // get、set、toString 方法省略
}
创建 Car 类,表示用户所拥有的汽车:
package cn.springdoc.demo.entity;

import jakarta.persistence.Column;
import jakarta.persistence.Entity;
import jakarta.persistence.GeneratedValue;
import jakarta.persistence.GenerationType;
import jakarta.persistence.Id;
import jakarta.persistence.Table;

@Entity
@Table(name = "t_car")
public class Car {

 // ID
 @Id
 @Column
 @GeneratedValue(strategy = GenerationType.IDENTITY)
 private Integer id;

 // 汽车名称
 @Column
 private String name;

 // 用户 ID
 @Column
 private Integer userId;

 // get、set、toString 方法省略
}
如上,使用 @Entity 注解表示该类是一个 JPA 实体类。该注解很重要,因为 QueryDSL 会根据此生成对应的查询类。
通过 @Table 注解指定表名称,通过 @Id 注解指定 ID 列,通过 @GeneratedValue 注解指定 ID 生成策略,这里使用的是 GenerationType.IDENTITY 即,使用数据库自增。通过 @Column 指定普通列。这都是很常见的 JPA 注解用法,这里不多解释。
一个 User 可以有多个 Car,这两个实体表示了一个一对多的关系。
对应的表结构如下:
-- User
CREATE TABLE `t_user` (
  `id` int unsigned NOT NULL AUTO_INCREMENT COMMENT 'ID',
  `create_at` timestamp NOT NULL DEFAULT CURRENT_TIMESTAMP COMMENT '创建时间',
  `enabled` tinyint unsigned NOT NULL COMMENT '是否启用。0:禁用,1:启用',
  `name` varchar(50) COLLATE utf8mb4_general_ci NOT NULL COMMENT '名字',
  PRIMARY KEY (`id`),
  UNIQUE KEY `name` (`name`)
) ENGINE=InnoDB DEFAULT CHARSET=utf8mb4 COLLATE=utf8mb4_general_ci COMMENT='用户';

-- Car
CREATE TABLE `t_car` (
  `id` int unsigned NOT NULL AUTO_INCREMENT COMMENT 'ID',
  `name` varchar(50) CHARACTER SET utf8mb4 COLLATE utf8mb4_general_ci NOT NULL COMMENT '汽车名称',
  `user_id` int NOT NULL COMMENT '用户ID',
  PRIMARY KEY (`id`)
) ENGINE=InnoDB DEFAULT CHARSET=utf8mb4 COLLATE=utf8mb4_general_ci COMMENT='汽车';
Repository
定义实体对应的 Repository 接口。
UserRepository:
package cn.springdoc.demo.repository;

import org.springframework.data.jpa.repository.JpaRepository;
import org.springframework.data.jpa.repository.JpaSpecificationExecutor;
import org.springframework.data.querydsl.QuerydslPredicateExecutor;

import cn.springdoc.demo.entity.User;

public interface UserRepository extends JpaRepository<User, Integer>, JpaSpecificationExecutor <User>, QuerydslPredicateExecutor<User> {

}
CarRepository:
package cn.springdoc.demo.repository;

import org.springframework.data.jpa.repository.JpaRepository;
import org.springframework.data.jpa.repository.JpaSpecificationExecutor;
import org.springframework.data.querydsl.QuerydslPredicateExecutor;

import cn.springdoc.demo.entity.Car;

public interface CarRepository extends JpaRepository<Car, Integer>, JpaSpecificationExecutor <Car>, QuerydslPredicateExecutor<Car> {

}
除了基本的 JpaRepository 和 JpaSpecificationExecutor 接口外,Spring Data 还为 QueryDSL 提供了 QuerydslPredicateExecutor 接口,预定义了一些快捷的 CRUD 方法。
Application
最后,在 Application 类上添加 @EntityScan 和 @EnableJpaRepositories 注解,指定实体类和 Repository 接口所在的包。
package cn.springdoc.demo;

import org.springframework.boot.SpringApplication;
import org.springframework.boot.autoconfigure.SpringBootApplication;
import org.springframework.boot.autoconfigure.domain.EntityScan;
import org.springframework.data.jpa.repository.config.EnableJpaRepositories;

@SpringBootApplication
@EntityScan("cn.springdoc.demo.entity")
@EnableJpaRepositories("cn.springdoc.demo.repository")
public class DemoApplication {

 public static void main(String[] args) {
  SpringApplication.run(DemoApplication.class, args);
 }
}
至此,Spring Data JPA 和 QueryDSL 就整合完毕了。
你如果想了解整合 Spring Data JPA 的更多细节,你可以参考 这篇文章。
使用 QueryDSL
当你在项目中定义了实体类后,QueryDSL 其实已经偷偷为你生成了对应的查询类。
根据 pom.xml 中 apt-maven-plugin 插件的 <outputDirectory> 配置,查询类存放在 target/generated-sources/java 目录下。
本例中生成的查询类如下:
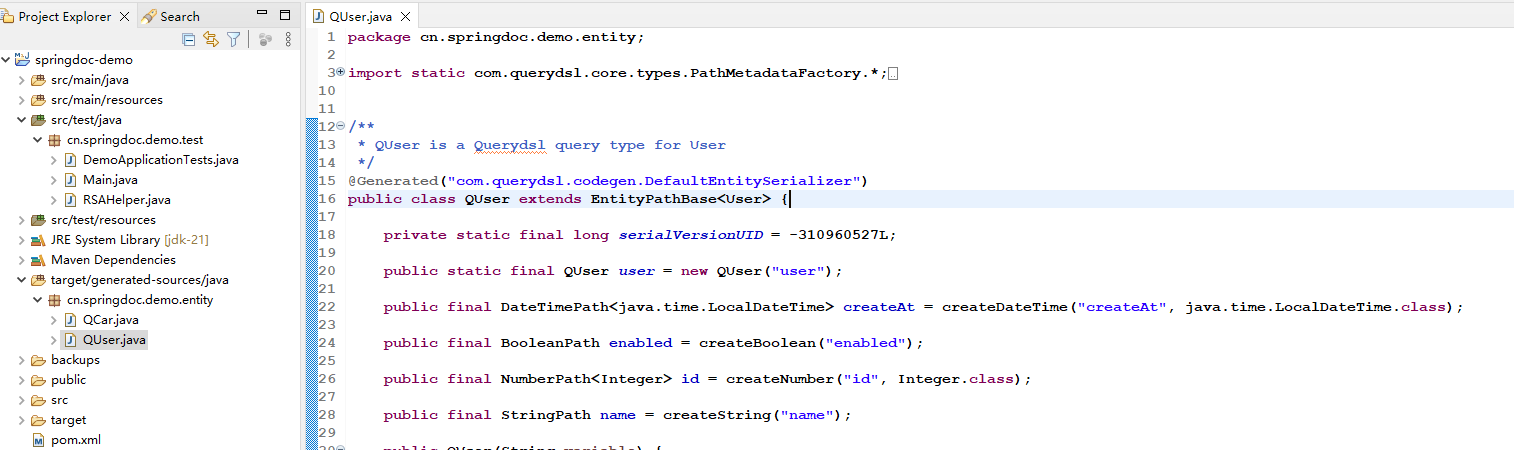
你可以看到,查询类以 Q 开头,名称对应实体类的名称。且包名和实体类所在包一样。最后打包的时候,这些查询类都会被打包到实体所在的包中。
在实际开发中,不建议修改自动生成的这些查询类。也不建议纳入版本控制,只要 Maven 配置正确,它们会自动生成。
自动生成的查询类,你不需要去研究太多。你只需要理解查询类中的每个字段,都对应了实体类以及数据表中的字段即可。
创建初始数据
QueyDSL 并未提供 INSERT 操作,我们需要依赖 Repository 的 save() 方法来保存实体。
插入测试数据:
package cn.springdoc.demo.test;

import java.time.LocalDateTime;

import org.junit.jupiter.api.Test;
import org.slf4j.Logger;
import org.slf4j.LoggerFactory;
import org.springframework.beans.factory.annotation.Autowired;
import org.springframework.boot.test.context.SpringBootTest;
import org.springframework.boot.test.context.SpringBootTest.WebEnvironment;
import org.springframework.test.annotation.Rollback;
import org.springframework.transaction.annotation.Transactional;

import cn.springdoc.demo.entity.Car;
import cn.springdoc.demo.entity.User;
import cn.springdoc.demo.repository.CarRepository;
import cn.springdoc.demo.repository.UserRepository;

@SpringBootTest(webEnvironment = WebEnvironment.RANDOM_PORT)
public class DemoApplicationTests {

 static final Logger log = LoggerFactory.getLogger(DemoApplicationTests.class);

 @Autowired
 UserRepository userRepository;

 @Autowired
 CarRepository carRepository;

 @Test
 @Transactional
 @Rollback(false)
 public void test() throws Exception {

  // 初始化 3 个用户

  User u1 = new User(null, "刘备", Boolean.TRUE, LocalDateTime.now());
  User u2 = new User(null, "张飞", Boolean.TRUE, LocalDateTime.now());
  User u3 = new User(null, "关羽", Boolean.TRUE, LocalDateTime.now());

  this.userRepository.save(u1);
  this.userRepository.save(u2);
  this.userRepository.save(u3);

  // 给每个用户初始化 2 个 Car
  this.carRepository.save(new Car(null, "宝马", u1.getId()));
  this.carRepository.save(new Car(null, "奔驰", u1.getId()));
  this.carRepository.save(new Car(null, "五菱", u2.getId()));
  this.carRepository.save(new Car(null, "宝马", u2.getId()));
  this.carRepository.save(new Car(null, "五菱", u3.getId()));
  this.carRepository.save(new Car(null, "宝马", u3.getId()));
 }
}
如上,创建了 3 个 User 对象,并给每个 User 创建了 2 个关联的 Car 对象。
执行测试。最终,数据表中的数据如下:
t_user:
| id | create_at | enabled | name |
|---|---|---|---|
| 1 | 2023-12-10 16:01:55 | 1 | 刘备 |
| 2 | 2023-12-10 16:01:55 | 1 | 张飞 |
| 3 | 2023-12-10 16:01:55 | 1 | 关羽 |
t_cat:
| id | name | user_id |
|---|---|---|
| 1 | 宝马 | 1 |
| 2 | 奔驰 | 1 |
| 3 | 五菱 | 2 |
| 4 | 宝马 | 2 |
| 5 | 五菱 | 3 |
| 6 | 宝马 | 4 |
基本的检索
检索单条记录和检索记录列表:
 // 注入 EntityManager
 @PersistenceContext
 EntityManager entityManager;

 @Test
 @Transactional
 @Rollback(false)
 public void test() throws Exception {

  // 通过 EntityManager 创建 JPAQueryFactory 实例
  var query = new JPAQueryFactory(entityManager);

  QUser USER = QUser.user;

  // 根据 id 和 enabled 检索单条记录
  User user = query.selectFrom(USER).where(USER.id.eq(1).and(USER.enabled.eq(true))).fetchOne();
  log.info("user={}", user);

  // 检索集合
  List<User> users = query.selectFrom(USER).where(USER.enabled.eq(true)).fetch();
  log.info("users={}", users);
 }
输出日志如下:
Hibernate:
    select
        u1_0.id,
        u1_0.create_at,
        u1_0.enabled,
        u1_0.name
    from
        t_user u1_0
    where
        u1_0.id=?
        and u1_0.enabled=?
TRACE 7028 --- [           main] org.hibernate.orm.jdbc.bind              : binding parameter (1:INTEGER) <- [1]
TRACE 7028 --- [           main] org.hibernate.orm.jdbc.bind              : binding parameter (2:BOOLEAN) <- [true]
 INFO 7028 --- [           main] c.s.demo.test.DemoApplicationTests       : user=User [id=1, name=刘备, enabled=true, createAt=2023-12-10T16:01:55]
Hibernate:
    select
        u1_0.id,
        u1_0.create_at,
        u1_0.enabled,
        u1_0.name
    from
        t_user u1_0
    where
        u1_0.enabled=?
TRACE 7028 --- [           main] org.hibernate.orm.jdbc.bind              : binding parameter (1:BOOLEAN) <- [true]
 INFO 7028 --- [           main] c.s.demo.test.DemoApplicationTests       : users=[User [id=1, name=刘备, enabled=true, createAt=2023-12-10T16:01:55], User [id=2, name=张飞, enabled=true, createAt=2023-12-10T16:01:55], User [id=3, name=关羽, enabled=true, createAt=2023-12-10T16:01:55]]
分页和排序
 // 注入 EntityManager
 @PersistenceContext
 EntityManager entityManager;

 @Test
 @Transactional
 @Rollback(false)
 public void test() throws Exception {

  // 通过 EntityManager 创建 JPAQueryFactory 实例
  var query = new JPAQueryFactory(entityManager);

  QUser USER = QUser.user;

  // 总记录数量
  Long count = query.select(USER.id.count()).from(USER).fetchOne();
  log.info("count={}", count);

  // 分页 & 排序
  List<User> users = query.selectFrom(USER).offset(0).limit(2).orderBy(USER.createAt.desc(), USER.id.asc()).fetch();
  log.info("users={}", users);
 }
执行日志如下:
Hibernate:
    select
        count(u1_0.id)
    from
        t_user u1_0
 INFO 13836 --- [           main] c.s.demo.test.DemoApplicationTests       : count=3
Hibernate:
    select
        u1_0.id,
        u1_0.create_at,
        u1_0.enabled,
        u1_0.name
    from
        t_user u1_0
    order by
        u1_0.create_at desc,
        u1_0.id
    limit
        ?, ?
TRACE 13836 --- [           main] org.hibernate.orm.jdbc.bind              : binding parameter (1:INTEGER) <- [0]
TRACE 13836 --- [           main] org.hibernate.orm.jdbc.bind              : binding parameter (2:INTEGER) <- [2]
 INFO 13836 --- [           main] c.s.demo.test.DemoApplicationTests       : users=[User [id=1, name=刘备, enabled=true, createAt=2023-12-10T16:01:55], User [id=2, name=张飞, enabled=true, createAt=2023-12-10T16:01:55]]
投影查询
仅检索指定的列。
 // 注入 EntityManager
 @PersistenceContext
 EntityManager entityManager;

 @Test
 @Transactional
 @Rollback(false)
 public void test() throws Exception {

  // 通过 EntityManager 创建 JPAQueryFactory 实例
  var query = new JPAQueryFactory(entityManager);

  QUser USER = QUser.user;

  // 检索单列,单行
  String name = query.select(USER.name).from(USER).where(USER.id.eq(1)).fetchOne();
  log.info("name={}", name);

  // 检索 id 和 name 列,封装结果为 Tuple
  List<Tuple> tuples = query.select(USER.id, USER.name).from(USER).fetch();

  tuples.stream().forEach(tuple -> {
   log.info("id={}, name={}", tuple.get(USER.id), tuple.get(USER.name));
  });

  // 检索 id 和 enabled 列,通过 Setter 方法封装为实体
  List<User> users = query.select(Projections.bean(User.class, USER.id, USER.enabled)).from(USER).fetch();
  log.info("users={}", users);
 }
执行测试,输出日志如下:
Hibernate:
    select
        u1_0.name
    from
        t_user u1_0
    where
        u1_0.id=?
TRACE 576 --- [           main] org.hibernate.orm.jdbc.bind              : binding parameter (1:INTEGER) <- [1]
 INFO 576 --- [           main] c.s.demo.test.DemoApplicationTests       : name=刘备
Hibernate:
    select
        u1_0.id,
        u1_0.name
    from
        t_user u1_0
 INFO 576 --- [           main] c.s.demo.test.DemoApplicationTests       : id=3, name=关羽
 INFO 576 --- [           main] c.s.demo.test.DemoApplicationTests       : id=1, name=刘备
 INFO 576 --- [           main] c.s.demo.test.DemoApplicationTests       : id=2, name=张飞
Hibernate:
    select
        u1_0.id,
        u1_0.enabled
    from
        t_user u1_0
 INFO 576 --- [           main] c.s.demo.test.DemoApplicationTests       : users=[User [id=1, name=null, enabled=true, createAt=null], User [id=2, name=null, enabled=true, createAt=null], User [id=3, name=null, enabled=true, createAt=null]]
JOIN 查询
JOIN 检索关联记录。
 // 注入 EntityManager
 @PersistenceContext
 EntityManager entityManager;

 @Test
 @Transactional
 @Rollback(false)
 public void test() throws Exception {

  // 通过 EntityManager 创建 JPAQueryFactory 实例
  var query = new JPAQueryFactory(entityManager);

  QUser USER = QUser.user;
  QCar CAR = QCar.car;

  // INNER JOIN
  List<Tuple> tuples = query.select(USER.id, USER.name, CAR.name.as("carName"))
   .from(USER)
   .innerJoin(CAR).on(CAR.userId.eq(USER.id))
   .where(USER.enabled.eq(true))
   .fetch()
   ;

  tuples.stream().forEach(tuple -> {
   log.info("userId={}, name={}, carName={}", tuple.get(USER.id), tuple.get(USER.name), tuple.get(CAR.name.as("carName")));
  });
 }
执行测试,输出日志如下:
Hibernate:
    select
        u1_0.id,
        u1_0.name,
        c1_0.name
    from
        t_user u1_0
    join
        t_car c1_0
            on c1_0.user_id=u1_0.id
    where
        u1_0.enabled=?
TRACE 16652 --- [           main] org.hibernate.orm.jdbc.bind              : binding parameter (1:BOOLEAN) <- [true]
 INFO 16652 --- [           main] c.s.demo.test.DemoApplicationTests       : userId=1, name=刘备, carName=宝马
 INFO 16652 --- [           main] c.s.demo.test.DemoApplicationTests       : userId=1, name=刘备, carName=奔驰
 INFO 16652 --- [           main] c.s.demo.test.DemoApplicationTests       : userId=2, name=张飞, carName=五菱
 INFO 16652 --- [           main] c.s.demo.test.DemoApplicationTests       : userId=2, name=张飞, carName=宝马
 INFO 16652 --- [           main] c.s.demo.test.DemoApplicationTests       : userId=3, name=关羽, carName=五菱
 INFO 16652 --- [           main] c.s.demo.test.DemoApplicationTests       : userId=3, name=关羽, carName=宝马
GROUP 查询
GROUP 聚合查询。
 // 注入 EntityManager
 @PersistenceContext
 EntityManager entityManager;

 @Test
 @Transactional
 @Rollback(false)
 public void test() throws Exception {

  // 通过 EntityManager 创建 JPAQueryFactory 实例
  var query = new JPAQueryFactory(entityManager);

  QCar CAR = QCar.car;

  // GROUP
  List<Tuple> tuples = query.select(CAR.name, CAR.name.count())
      .from(CAR)
      .groupBy(CAR.name)
      .fetch()
      ;

  tuples.stream().forEach(tuple -> {
   log.info("carName={}, count={}", tuple.get(CAR.name), tuple.get(CAR.name.count()));
  });
 }
执行测试,输出日志如下:
Hibernate:
    select
        c1_0.name,
        count(c1_0.name)
    from
        t_car c1_0
    group by
        c1_0.name
 INFO 8104 --- [           main] c.s.demo.test.DemoApplicationTests       : carName=宝马, count=3
 INFO 8104 --- [           main] c.s.demo.test.DemoApplicationTests       : carName=奔驰, count=1
 INFO 8104 --- [           main] c.s.demo.test.DemoApplicationTests       : carName=五菱, count=2
子查询
结果列子查询,以及条件语句中的子查询。
 // 注入 EntityManager
 @PersistenceContext
 EntityManager entityManager;

 @Test
 @Transactional
 @Rollback(false)
 public void test() throws Exception {

  // 通过 EntityManager 创建 JPAQueryFactory 实例
  var query = new JPAQueryFactory(entityManager);

  QUser USER = QUser.user;
  QCar CAR = QCar.car;

  // 结果列子查询
  List<Tuple> tuples = query.select(CAR.id, CAR.name,
      JPAExpressions.select(USER.name).from(USER).where(USER.id.eq(CAR.userId)))
     .from(CAR)
     .fetch()
     ;
  log.info("tuples={}", tuples);

  // 条件子查询
  List<User> users = query.selectFrom(USER)
      .where(USER.id.in(JPAExpressions.select(CAR.userId).from(CAR).where(CAR.name.eq("宝马"))))
      .fetch();
  log.info("users={}", users);
 }
执行测试,输出日志如下:
Hibernate:
    select
        c1_0.id,
        c1_0.name,
        (select
            u1_0.name
        from
            t_user u1_0
        where
            u1_0.id=c1_0.user_id)
    from
        t_car c1_0
 INFO 18848 --- [           main] c.s.demo.test.DemoApplicationTests       : tuples=[[1, 宝马, 刘备], [2, 奔驰, 刘备], [3, 五菱, 张飞], [4, 宝马, 张飞], [5, 五菱, 关羽], [6, 宝马, 关羽]]
Hibernate:
    select
        u1_0.id,
        u1_0.create_at,
        u1_0.enabled,
        u1_0.name
    from
        t_user u1_0
    where
        u1_0.id in (select
            c1_0.user_id
        from
            t_car c1_0
        where
            c1_0.name=?)
TRACE 18848 --- [           main] org.hibernate.orm.jdbc.bind              : binding parameter (1:VARCHAR) <- [宝马]
 INFO 18848 --- [           main] c.s.demo.test.DemoApplicationTests       : users=[User [id=1, name=刘备, enabled=true, createAt=2023-12-10T16:01:55], User [id=2, name=张飞, enabled=true, createAt=2023-12-10T16:01:55], User [id=3, name=关羽, enabled=true, createAt=2023-12-10T16:01:55]]
结果集封装
把结果集封装 Map,POJO 等。
 // 注入 EntityManager
 @PersistenceContext
 EntityManager entityManager;

 @Test
 @Transactional
 @Rollback(false)
 public void test() throws Exception {

  // 通过 EntityManager 创建 JPAQueryFactory 实例
  var query = new JPAQueryFactory(entityManager);

  QUser USER = QUser.user;
  QCar CAR = QCar.car;

  // 结果集封装为 Map
  List<Map<Expression<?>, ?>> ret = query.select(Projections.map(USER.id, USER.name, CAR.name)).from(USER)
      .innerJoin(CAR).on(CAR.userId.eq(USER.id))
      .fetch()
      ;

  ret.stream().forEach(item -> {
   log.info("userId={}, name={}, carName={}", item.get(USER.id), item.get(USER.name), item.get(CAR.name));
  });


  // 通过字段,封装为 Bean
  List<User> users = query.select(Projections.fields(User.class, USER.id, USER.name)).from(USER)
    .where(USER.id.in(1, 2))
    .fetch()
    ;
  log.info("users={}", users);

  // 通过构造函数,封装为 Bean
  User user = query.select(Projections.constructor(User.class, USER.id, USER.name, USER.enabled, USER.createAt)).from(USER)
     .fetchFirst(); // fetchFirst 只检索结果集中的第一条记录
  log.info("user={}", user);
 }
执行测试,输出如下:
Hibernate:
    select
        u1_0.id,
        u1_0.name,
        c1_0.name
    from
        t_user u1_0
    join
        t_car c1_0
            on c1_0.user_id=u1_0.id
 INFO 17724 --- [           main] c.s.demo.test.DemoApplicationTests       : userId=1, name=刘备, carName=宝马
 INFO 17724 --- [           main] c.s.demo.test.DemoApplicationTests       : userId=1, name=刘备, carName=奔驰
 INFO 17724 --- [           main] c.s.demo.test.DemoApplicationTests       : userId=2, name=张飞, carName=五菱
 INFO 17724 --- [           main] c.s.demo.test.DemoApplicationTests       : userId=2, name=张飞, carName=宝马
 INFO 17724 --- [           main] c.s.demo.test.DemoApplicationTests       : userId=3, name=关羽, carName=五菱
 INFO 17724 --- [           main] c.s.demo.test.DemoApplicationTests       : userId=3, name=关羽, carName=宝马
Hibernate:
    select
        u1_0.id,
        u1_0.name
    from
        t_user u1_0
    where
        u1_0.id in (?, ?)
TRACE 17724 --- [           main] org.hibernate.orm.jdbc.bind              : binding parameter (1:INTEGER) <- [1]
TRACE 17724 --- [           main] org.hibernate.orm.jdbc.bind              : binding parameter (2:INTEGER) <- [2]
 INFO 17724 --- [           main] c.s.demo.test.DemoApplicationTests       : users=[User [id=1, name=刘备, enabled=null, createAt=null], User [id=2, name=张飞, enabled=null, createAt=null]]
Hibernate:
    select
        u1_0.id,
        u1_0.name,
        u1_0.enabled,
        u1_0.create_at
    from
        t_user u1_0
    limit
        ?
TRACE 17724 --- [           main] org.hibernate.orm.jdbc.bind              : binding parameter (1:INTEGER) <- [1]
 INFO 17724 --- [           main] c.s.demo.test.DemoApplicationTests       : user=User [id=1, name=刘备, enabled=true, createAt=2023-12-10T16:01:55]
更新数据
QueryDSL 提供了更新数据的 API。
 // 注入 EntityManager
 @PersistenceContext
 EntityManager entityManager;

 @Test
 @Transactional
 @Rollback(false)
 public void test() throws Exception {

  // 通过 EntityManager 创建 JPAQueryFactory 实例
  var query = new JPAQueryFactory(entityManager);

  QUser USER = QUser.user;
  QCar CAR = QCar.car;

  // 更新字段
  long ret = query.update(USER)
     .set(USER.name, "刘皇叔")
     .set(USER.enabled, false)
     .where(USER.id.eq(1))
     .execute()
     ;

  log.info("ret={}", ret);


  // 子查询
  ret = query.update(USER)
    .set(USER.name, JPAExpressions.select(CAR.name).from(CAR).where(CAR.id.eq(1)))
    .set(USER.enabled, true)
    .where(USER.id.eq(8))
    .execute()
    ;
  log.info("ret={}", ret);

  // 自增
  ret = query.update(USER)
    .set(USER.id, USER.id.add(-1))
    .set(USER.enabled, true)
    .where(USER.id.eq(9))
    .execute()
    ;
 }
执行测试,输出如下:
Hibernate:
    update
        t_user
    set
        name=?,
        enabled=?
    where
        id=?
TRACE 13392 --- [           main] org.hibernate.orm.jdbc.bind              : binding parameter (1:VARCHAR) <- [刘皇叔]
TRACE 13392 --- [           main] org.hibernate.orm.jdbc.bind              : binding parameter (2:BOOLEAN) <- [false]
TRACE 13392 --- [           main] org.hibernate.orm.jdbc.bind              : binding parameter (3:INTEGER) <- [1]
 INFO 13392 --- [           main] c.s.demo.test.DemoApplicationTests       : ret=1
Hibernate:
    update
        t_user
    set
        name=(select
            c1_0.name
        from
            t_car c1_0
        where
            c1_0.id=?),
        enabled=?
    where
        id=?
TRACE 13392 --- [           main] org.hibernate.orm.jdbc.bind              : binding parameter (1:INTEGER) <- [1]
TRACE 13392 --- [           main] org.hibernate.orm.jdbc.bind              : binding parameter (2:BOOLEAN) <- [true]
TRACE 13392 --- [           main] org.hibernate.orm.jdbc.bind              : binding parameter (3:INTEGER) <- [8]
 INFO 13392 --- [           main] c.s.demo.test.DemoApplicationTests       : ret=0
Hibernate:
    update
        t_user
    set
        id=(id+?),
        enabled=?
    where
        id=?
TRACE 13392 --- [           main] org.hibernate.orm.jdbc.bind              : binding parameter (1:INTEGER) <- [-1]
TRACE 13392 --- [           main] org.hibernate.orm.jdbc.bind              : binding parameter (2:BOOLEAN) <- [true]
TRACE 13392 --- [           main] org.hibernate.orm.jdbc.bind              : binding parameter (3:INTEGER) <- [9]
注意,本例中的 UPDATE 语句是不合理的(例如,ID 自增),这么写纯粹是为了演示 QueryDSL 的更新功能。
最后
QueryDSL 的用法总结:通过 EntityManager 创建 JPAQueryFactory 实例。然后使用查询类完成一系列的 CRUD 操作。
上述示例代码,基本上足够日常开发,但是如果业务中涉及的查询确实比较复杂,那么你可以考虑使用 Spring 6 中的 JdbcClient 来进行查询。
总结
本文介绍了如何在 Spring Boot 中整合 QueryDSL,以及 QueryDSL 的日常使用示例。
QueryDSL 是一款开发效率、灵活性、表达能力都非常高的 ORM。不用像 MyBatis 那样需要在 XML 中定义 SQL,再在 Mapper 接口中定义查询方法。
