OAuth 2.0 资源服务器 Opaque Token
| 本站(springdoc.cn)中的内容来源于 spring.io ,原始版权归属于 spring.io。由 springdoc.cn 进行翻译,整理。可供个人学习、研究,未经许可,不得进行任何转载、商用或与之相关的行为。 商标声明:Spring 是 Pivotal Software, Inc. 在美国以及其他国家的商标。 |
内省(Introspection)的最小依赖
正如 JWT的最小依赖 中所描述的那样,大部分的资源服务器支持被收集在 spring-security-oauth2-resource-server 中。然而,除非提供一个自定义的 OpaqueTokenIntrospector,否则资源服务器将退回到 NimbusOpaqueTokenIntrospector。这意味着 spring-security-oauth2-resource-server 和 oauth2-oidc-sdk 都是必要的,这样才能有一个支持 Bearer Token 的最小资源服务器。请参考 spring-security-oauth2-resource-server,以确定 oauth2-oidc-sdk 的正确版本。
自省(Introspection)的最小配置
通常情况下,不透明的令牌可以通过授权服务器托管的 OAuth 2.0自省端点 进行验证。当有撤销需求时,这可能很方便。
在使用 Spring Boot 时,将一个应用程序配置为使用自省的资源服务器包括两个基本步骤。首先,包括所需的依赖,其次,指出自省端点的细节。
指定授权服务器
要指定自省端点的位置,只需:
spring:
  security:
    oauth2:
      resourceserver:
        opaque-token:
          introspection-uri: https://idp.example.com/introspect
          client-id: client
          client-secret: secret
其中 idp.example.com/introspect 是由你的授权服务器托管的自省端点,client-id 和 client-secret 是访问该端点所需的凭证。
资源服务器将使用这些属性来进一步自我配置并随后验证传入的JWT。
| 在使用自省(introspection)时,授权服务器的话就是法律。如果授权服务器回应说令牌是有效的,那么它就是有效的。 |
就这样!
运行时的期望
一旦应用程序启动,资源服务器将尝试处理任何包含 Authorization: Bearer 头的请求。
GET / HTTP/1.1
Authorization: Bearer some-token-value # Resource Server will process this
只要这个方案被指定,资源服务器将试图根据 Bearer Token 规范来处理请求。
给定一个 Opaque Token,资源服务器将:
-
使用所提供的凭证和令牌查询所提供的自省端点。
-
检查响应中的
{ 'active' : true }属性。 -
将每个scope映射到一个前缀为
SCOPE_的授权(authority)。
由此产生的 Authentication#getPrincipal,默认为 Spring Security OAuth2AuthenticatedPrincipal 对象,Authentication#getName 映射到令牌的 sub 属性,如果有的话。
从这里,你可能想跳转到:
Opaque Token 认证(Authentication) 是如何工作的
接下来,让我们看看Spring Security用来支持基于servlet的应用程序中 opaque token Authentication 的架构组件,就像我们刚才看到的那个。
OpaqueTokenAuthenticationProvider 是一个 AuthenticationProvider 实现,它利用 OpaqueTokenIntrospector 来验证一个 opaque token。
让我们来看看 OpaqueTokenAuthenticationProvider 是如何在 Spring Security 中工作的。图中解释了数字中的 AuthenticationManager 在读取 Bearer Token 时的工作细节。
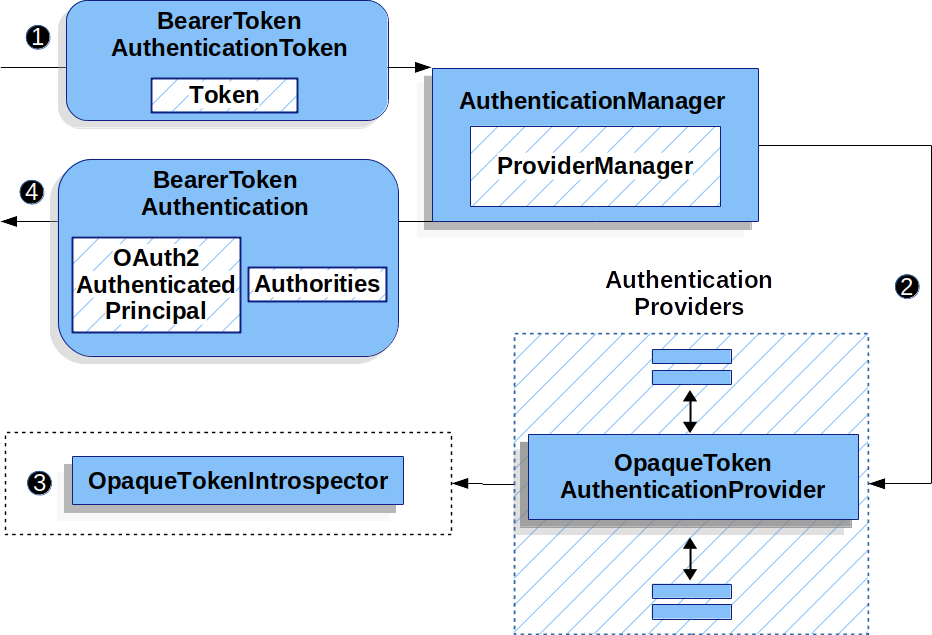
OpaqueTokenAuthenticationProvider Usage![]() 读取 Bearer Token 的 authentication
读取 Bearer Token 的 authentication Filter 将一个 BearerTokenAuthenticationToken 传递给由 ProviderManager 实现的 AuthenticationManager 。
![]()
ProviderManager 被配置为使用一个 OpaqueTokenAuthenticationProvider 类型的 AuthenticationProvider。
![]()
OpaqueTokenAuthenticationProvider 使用 OpaqueTokenIntrospector 对 opaque token 进行内省并添加授予的权限。当认证成功时,返回的 Authentication 是 BearerTokenAuthentication 类型的,其委托人(principal)是由配置的 OpaqueTokenIntrospector 返回的 OAuth2AuthenticatedPrincipal。最终,返回的 BearerTokenAuthentication 将被 authentication Filter 设置在 SecurityContextHolder 上。
查询认证后(Post-Authentication)的属性
一旦令牌被认证,BearerTokenAuthentication 的实例就会被设置在 SecurityContext 中。
这意味着在你的配置中使用 @EnableWebMvc 时,它可以在 @Controller 方法中使用。
-
Java
-
Kotlin
@GetMapping("/foo")
public String foo(BearerTokenAuthentication authentication) {
    return authentication.getTokenAttributes().get("sub") + " is the subject";
}
@GetMapping("/foo")
fun foo(authentication: BearerTokenAuthentication): String {
return authentication.tokenAttributes["sub"].toString() + " is the subject"
}由于 BearerTokenAuthentication 持有 OAuth2AuthenticatedPrincipal,这也意味着它也可以用于控制器方法。
-
Java
-
Kotlin
@GetMapping("/foo")
public String foo(@AuthenticationPrincipal OAuth2AuthenticatedPrincipal principal) {
    return principal.getAttribute("sub") + " is the subject";
}
@GetMapping("/foo")
fun foo(@AuthenticationPrincipal principal: OAuth2AuthenticatedPrincipal): String {
return principal.getAttribute<Any>("sub").toString() + " is the subject"
}通过SpEL查询属性
当然,这也意味着属性可以通过SpEL访问。
例如,如果使用 @EnableGlobalMethodSecurity,这样你就可以使用 @PreAuthorize 注解。如下:
-
Java
-
Kotlin
@PreAuthorize("principal?.attributes['sub'] == 'foo'")
public String forFoosEyesOnly() {
    return "foo";
}
@PreAuthorize("principal?.attributes['sub'] == 'foo'")
fun forFoosEyesOnly(): String {
return "foo"
}覆盖或取代启动自动配置
有两个 @Bean 是Spring Boot 代表资源服务器生成的。
第一个是 SecurityFilterChain,它将应用程序配置为资源服务器。当使用Opaque Token 时,这个 SecurityFilterChain 看起来像:
-
Java
-
Kotlin
@Bean
public SecurityFilterChain filterChain(HttpSecurity http) throws Exception {
    http
        .authorizeHttpRequests(authorize -> authorize
            .anyRequest().authenticated()
        )
        .oauth2ResourceServer(OAuth2ResourceServerConfigurer::opaqueToken);
    return http.build();
}
@Bean
open fun filterChain(http: HttpSecurity): SecurityFilterChain {
http {
authorizeRequests {
authorize(anyRequest, authenticated)
}
oauth2ResourceServer {
opaqueToken { }
}
}
return http.build()
}如果应用程序没有公开 SecurityFilterChain Bean,那么Spring Boot就会公开上述默认bean。
替换它就像在应用程序中公暴露bean一样简单:
-
Java
-
Kotlin
@Configuration
@EnableWebSecurity
public class MyCustomSecurityConfiguration {
    @Bean
    public SecurityFilterChain filterChain(HttpSecurity http) throws Exception {
        http
            .authorizeHttpRequests(authorize -> authorize
                .requestMatchers("/messages/**").hasAuthority("SCOPE_message:read")
                .anyRequest().authenticated()
            )
            .oauth2ResourceServer(oauth2 -> oauth2
                .opaqueToken(opaqueToken -> opaqueToken
                    .introspector(myIntrospector())
                )
            );
        return http.build();
    }
}
@Configuration
@EnableWebSecurity
class MyCustomSecurityConfiguration {
@Bean
open fun filterChain(http: HttpSecurity): SecurityFilterChain {
http {
authorizeRequests {
authorize("/messages/**", hasAuthority("SCOPE_message:read"))
authorize(anyRequest, authenticated)
}
oauth2ResourceServer {
opaqueToken {
introspector = myIntrospector()
}
}
}
return http.build()
}
}以上要求任何以 /messages/ 开头的URL的范围为 message:read。
oauth2ResourceServer DSL上的方法也将覆盖或取代自动配置。
例如,Spring Boot创建的第二个 @Bean 是一个 OpaqueTokenIntrospector,它 将String令牌解码为 OAuth2AuthenticatedPrincipal 的验证实例。
-
Java
-
Kotlin
@Bean
public OpaqueTokenIntrospector introspector() {
    return new NimbusOpaqueTokenIntrospector(introspectionUri, clientId, clientSecret);
}
@Bean
fun introspector(): OpaqueTokenIntrospector {
return NimbusOpaqueTokenIntrospector(introspectionUri, clientId, clientSecret)
}如果应用程序没有暴露OpaqueTokenIntrospector Bean,那么Spring Boot将暴露上述默认的一个。
而它的配置可以用 introspectionUri() 和 introspectionClientCredentials() 来重写,或者用 introspector() 来替换。
如果应用程序没有暴露一个 OpaqueTokenAuthenticationConverter Bean,那么 spring-security 将构建 BearerTokenAuthentication。
或者,如果你根本没有使用 Spring Boot,那么所有这些组件-- filter chain、OpaqueTokenIntrospector 和 OpaqueTokenAuthenticationConverter 都可以用XML指定。
过滤链(filter chain)是这样指定的:
-
Java
<http>
    <intercept-uri pattern="/**" access="authenticated"/>
    <oauth2-resource-server>
        <opaque-token introspector-ref="opaqueTokenIntrospector"
                authentication-converter-ref="opaqueTokenAuthenticationConverter"/>
    </oauth2-resource-server>
</http>
而 OpaqueTokenIntrospector 像这样:
-
Java
<bean id="opaqueTokenIntrospector"
        class="org.springframework.security.oauth2.server.resource.introspection.NimbusOpaqueTokenIntrospector">
    <constructor-arg value="${spring.security.oauth2.resourceserver.opaquetoken.introspection_uri}"/>
    <constructor-arg value="${spring.security.oauth2.resourceserver.opaquetoken.client_id}"/>
    <constructor-arg value="${spring.security.oauth2.resourceserver.opaquetoken.client_secret}"/>
</bean>
而 OpaqueTokenAuthenticationConverter 像这样。
-
Java
<bean id="opaqueTokenAuthenticationConverter"
        class="com.example.CustomOpaqueTokenAuthenticationConverter"/>
使用 introspectionUri()
授权服务器的自省Uri可以 作为一个配置属性来配置,也可以在DSL中提供。
-
Java
-
Kotlin
-
Xml
@Configuration
@EnableWebSecurity
public class DirectlyConfiguredIntrospectionUri {
    @Bean
    public SecurityFilterChain filterChain(HttpSecurity http) throws Exception {
        http
            .authorizeHttpRequests(authorize -> authorize
                .anyRequest().authenticated()
            )
            .oauth2ResourceServer(oauth2 -> oauth2
                .opaqueToken(opaqueToken -> opaqueToken
                    .introspectionUri("https://idp.example.com/introspect")
                    .introspectionClientCredentials("client", "secret")
                )
            );
        return http.build();
    }
}
@Configuration
@EnableWebSecurity
class DirectlyConfiguredIntrospectionUri {
@Bean
open fun filterChain(http: HttpSecurity): SecurityFilterChain {
http {
authorizeRequests {
authorize(anyRequest, authenticated)
}
oauth2ResourceServer {
opaqueToken {
introspectionUri = "https://idp.example.com/introspect"
introspectionClientCredentials("client", "secret")
}
}
}
return http.build()
}
}<bean id="opaqueTokenIntrospector"
class="org.springframework.security.oauth2.server.resource.introspection.NimbusOpaqueTokenIntrospector">
<constructor-arg value="https://idp.example.com/introspect"/>
<constructor-arg value="client"/>
<constructor-arg value="secret"/>
</bean>使用 inrospectionUri() 优先于任何配置属性。
使用 introspector()
比 introspectionUri() 更强大的是 introspector(),它将完全取代 OpaqueTokenIntrospector 的任何 Boot 自动配置。
-
Java
-
Kotlin
-
Xml
@Configuration
@EnableWebSecurity
public class DirectlyConfiguredIntrospector {
    @Bean
    public SecurityFilterChain filterChain(HttpSecurity http) throws Exception {
        http
            .authorizeHttpRequests(authorize -> authorize
                .anyRequest().authenticated()
            )
            .oauth2ResourceServer(oauth2 -> oauth2
                .opaqueToken(opaqueToken -> opaqueToken
                    .introspector(myCustomIntrospector())
                )
            );
        return http.build();
    }
}
@Configuration
@EnableWebSecurity
class DirectlyConfiguredIntrospector {
@Bean
open fun filterChain(http: HttpSecurity): SecurityFilterChain {
http {
authorizeRequests {
authorize(anyRequest, authenticated)
}
oauth2ResourceServer {
opaqueToken {
introspector = myCustomIntrospector()
}
}
}
return http.build()
}
}<http>
<intercept-uri pattern="/**" access="authenticated"/>
<oauth2-resource-server>
<opaque-token introspector-ref="myCustomIntrospector"/>
</oauth2-resource-server>
</http>当需要更深层次的配置时,如 authority mapping、JWT revocation 或 request timeouts,这很方便。
暴露 OpaqueTokenIntrospector @Bean
或者,暴露一个 OpaqueTokenIntrospector @Bean 的效果与 introspector() 相同。
@Bean
public OpaqueTokenIntrospector introspector() {
    return new NimbusOpaqueTokenIntrospector(introspectionUri, clientId, clientSecret);
}
配置授权(Authorization)
一个OAuth 2.0自省端点通常会返回一个 scope 属性,例如,表明它被授予的范围(或权限)。
{ …, "scope" : "messages contacts"}
当出现这种情况时,资源服务器将试图把这些作用域强制成一个授予权限的列表,在每个作用域前加上 "SCOPE_" 字符串。
这意味着,要用源自 Opaque Token 的作用域来保护一个端点或方法,相应的表达式应该包括这个前缀。
-
Java
-
Kotlin
-
Xml
@Configuration
@EnableWebSecurity
public class MappedAuthorities {
    @Bean
    public SecurityFilterChain filterChain(HttpSecurity http) throws Exception {
        http
            .authorizeHttpRequests(authorizeRequests -> authorizeRequests
                .requestMatchers("/contacts/**").hasAuthority("SCOPE_contacts")
                .requestMatchers("/messages/**").hasAuthority("SCOPE_messages")
                .anyRequest().authenticated()
            )
            .oauth2ResourceServer(OAuth2ResourceServerConfigurer::opaqueToken);
        return http.build();
    }
}
@Configuration
@EnableWebSecurity
class MappedAuthorities {
@Bean
open fun filterChain(http: HttpSecurity): SecurityFilterChain {
http {
authorizeRequests {
authorize("/contacts/**", hasAuthority("SCOPE_contacts"))
authorize("/messages/**", hasAuthority("SCOPE_messages"))
authorize(anyRequest, authenticated)
}
oauth2ResourceServer {
opaqueToken { }
}
}
return http.build()
}
}<http>
<intercept-uri pattern="/contacts/**" access="hasAuthority('SCOPE_contacts')"/>
<intercept-uri pattern="/messages/**" access="hasAuthority('SCOPE_messages')"/>
<oauth2-resource-server>
<opaque-token introspector-ref="opaqueTokenIntrospector"/>
</oauth2-resource-server>
</http>或者类似于方法安全(method security)。
-
Java
-
Kotlin
@PreAuthorize("hasAuthority('SCOPE_messages')")
public List<Message> getMessages(...) {}
@PreAuthorize("hasAuthority('SCOPE_messages')")
fun getMessages(): List<Message?> {}手动提取权限
默认情况下,Opaque Token支持将从自省响应中提取范围要求,并将其解析为单个 GrantedAuthority 实例。
例如,如果自省响应是:
{
    "active" : true,
    "scope" : "message:read message:write"
}
然后,资源服务器将生成一个具有两个授权的 Authentication,一个用于 message:read,另一个用于 message:write。
当然,这可以使用自定义的 OpaqueTokenIntrospector 进行定制,它可以查看属性集并以自己的方式进行转换。
-
Java
-
Kotlin
public class CustomAuthoritiesOpaqueTokenIntrospector implements OpaqueTokenIntrospector {
    private OpaqueTokenIntrospector delegate =
            new NimbusOpaqueTokenIntrospector("https://idp.example.org/introspect", "client", "secret");

    public OAuth2AuthenticatedPrincipal introspect(String token) {
        OAuth2AuthenticatedPrincipal principal = this.delegate.introspect(token);
        return new DefaultOAuth2AuthenticatedPrincipal(
                principal.getName(), principal.getAttributes(), extractAuthorities(principal));
    }

    private Collection<GrantedAuthority> extractAuthorities(OAuth2AuthenticatedPrincipal principal) {
        List<String> scopes = principal.getAttribute(OAuth2IntrospectionClaimNames.SCOPE);
        return scopes.stream()
                .map(SimpleGrantedAuthority::new)
                .collect(Collectors.toList());
    }
}
class CustomAuthoritiesOpaqueTokenIntrospector : OpaqueTokenIntrospector {
private val delegate: OpaqueTokenIntrospector = NimbusOpaqueTokenIntrospector("https://idp.example.org/introspect", "client", "secret")
override fun introspect(token: String): OAuth2AuthenticatedPrincipal {
val principal: OAuth2AuthenticatedPrincipal = delegate.introspect(token)
return DefaultOAuth2AuthenticatedPrincipal(
principal.name, principal.attributes, extractAuthorities(principal))
}
private fun extractAuthorities(principal: OAuth2AuthenticatedPrincipal): Collection<GrantedAuthority> {
val scopes: List<String> = principal.getAttribute(OAuth2IntrospectionClaimNames.SCOPE)
return scopes
.map { SimpleGrantedAuthority(it) }
}
}此后,这个自定义的自省器(introspector)可以通过将其作为一个 @Bean 公开来进行配置。
-
Java
-
Kotlin
@Bean
public OpaqueTokenIntrospector introspector() {
    return new CustomAuthoritiesOpaqueTokenIntrospector();
}
@Bean
fun introspector(): OpaqueTokenIntrospector {
return CustomAuthoritiesOpaqueTokenIntrospector()
}配置超时
默认情况下,资源服务器使用连接和socket超时30秒来协调与授权服务器的关系。
这在某些情况下可能太短了。此外,它没有考虑到更复杂的模式,如back-off和discovery。
为了调整资源服务器与授权服务器的连接方式,NimbusOpaqueTokenIntrospector 接受了一个 RestOperations 的实例。
-
Java
-
Kotlin
@Bean
public OpaqueTokenIntrospector introspector(RestTemplateBuilder builder, OAuth2ResourceServerProperties properties) {
    RestOperations rest = builder
            .basicAuthentication(properties.getOpaquetoken().getClientId(), properties.getOpaquetoken().getClientSecret())
            .setConnectTimeout(Duration.ofSeconds(60))
            .setReadTimeout(Duration.ofSeconds(60))
            .build();

    return new NimbusOpaqueTokenIntrospector(introspectionUri, rest);
}
@Bean
fun introspector(builder: RestTemplateBuilder, properties: OAuth2ResourceServerProperties): OpaqueTokenIntrospector? {
val rest: RestOperations = builder
.basicAuthentication(properties.opaquetoken.clientId, properties.opaquetoken.clientSecret)
.setConnectTimeout(Duration.ofSeconds(60))
.setReadTimeout(Duration.ofSeconds(60))
.build()
return NimbusOpaqueTokenIntrospector(introspectionUri, rest)
}用 JWT 进行自省
一个常见的问题是自省是否与JWT兼容。Spring Security的 Opaque Token 支持被设计为不关心令牌的格式—它很乐意将任何令牌传递给提供的自省端点。
因此,假设你有一个需求,要求你在每次请求时与授权服务器检查,以防JWT被撤销。
即使你使用JWT格式的令牌,你的验证方法是自省,这意味着你要做的是:
spring:
  security:
    oauth2:
      resourceserver:
        opaque-token:
          introspection-uri: https://idp.example.org/introspection
          client-id: client
          client-secret: secret
在这种情况下,产生的 Authentication 将是 BearerTokenAuthentication。相应的 OAuth2AuthenticatedPrincipal 中的任何属性都将是自省端点返回的内容。
但是,让我们说,奇怪的是,自省端点只返回令牌是否激活。现在怎么办?
在这种情况下,你可以创建一个自定义的 OpaqueTokenIntrospector,它仍然命中端点,但随后更新返回的委托人(principal),使其将 JWT claim 作为属性。
-
Java
-
Kotlin
public class JwtOpaqueTokenIntrospector implements OpaqueTokenIntrospector {
    private OpaqueTokenIntrospector delegate =
            new NimbusOpaqueTokenIntrospector("https://idp.example.org/introspect", "client", "secret");
    private JwtDecoder jwtDecoder = new NimbusJwtDecoder(new ParseOnlyJWTProcessor());

    public OAuth2AuthenticatedPrincipal introspect(String token) {
        OAuth2AuthenticatedPrincipal principal = this.delegate.introspect(token);
        try {
            Jwt jwt = this.jwtDecoder.decode(token);
            return new DefaultOAuth2AuthenticatedPrincipal(jwt.getClaims(), NO_AUTHORITIES);
        } catch (JwtException ex) {
            throw new OAuth2IntrospectionException(ex);
        }
    }

    private static class ParseOnlyJWTProcessor extends DefaultJWTProcessor<SecurityContext> {
    	JWTClaimsSet process(SignedJWT jwt, SecurityContext context)
                throws JOSEException {
            return jwt.getJWTClaimsSet();
        }
    }
}
class JwtOpaqueTokenIntrospector : OpaqueTokenIntrospector {
private val delegate: OpaqueTokenIntrospector = NimbusOpaqueTokenIntrospector("https://idp.example.org/introspect", "client", "secret")
private val jwtDecoder: JwtDecoder = NimbusJwtDecoder(ParseOnlyJWTProcessor())
override fun introspect(token: String): OAuth2AuthenticatedPrincipal {
val principal = delegate.introspect(token)
return try {
val jwt: Jwt = jwtDecoder.decode(token)
DefaultOAuth2AuthenticatedPrincipal(jwt.claims, NO_AUTHORITIES)
} catch (ex: JwtException) {
throw OAuth2IntrospectionException(ex.message)
}
}
private class ParseOnlyJWTProcessor : DefaultJWTProcessor<SecurityContext>() {
override fun process(jwt: SignedJWT, context: SecurityContext): JWTClaimsSet {
return jwt.jwtClaimsSet
}
}
}此后,这个自定义的自省器(introspector)可以通过将其作为一个 @Bean 公开来进行配置。
-
Java
-
Kotlin
@Bean
public OpaqueTokenIntrospector introspector() {
    return new JwtOpaqueTokenIntrospector();
}
@Bean
fun introspector(): OpaqueTokenIntrospector {
return JwtOpaqueTokenIntrospector()
}调用 /userinfo 端点
一般来说,资源服务器并不关心底层用户,而是关心被授予的权限。
这就是说,有时将授权声明与用户联系起来是很有价值的。
如果应用程序也使用 spring-security-oauth2-client,并设置了相应的 ClientRegistrationRepository,那么使用自定义的 OpaqueTokenIntrospector 就非常简单。下面这个实现做了三件事。
-
委托给自省端点,以确认令牌的有效性。
-
查找与
/userinfo端点相关的适当的客户注册(client registration)。 -
调用并返回来自
/userinfo端点的响应。
-
Java
-
Kotlin
public class UserInfoOpaqueTokenIntrospector implements OpaqueTokenIntrospector {
    private final OpaqueTokenIntrospector delegate =
            new NimbusOpaqueTokenIntrospector("https://idp.example.org/introspect", "client", "secret");
    private final OAuth2UserService oauth2UserService = new DefaultOAuth2UserService();

    private final ClientRegistrationRepository repository;

    // ... constructor

    @Override
    public OAuth2AuthenticatedPrincipal introspect(String token) {
        OAuth2AuthenticatedPrincipal authorized = this.delegate.introspect(token);
        Instant issuedAt = authorized.getAttribute(ISSUED_AT);
        Instant expiresAt = authorized.getAttribute(EXPIRES_AT);
        ClientRegistration clientRegistration = this.repository.findByRegistrationId("registration-id");
        OAuth2AccessToken token = new OAuth2AccessToken(BEARER, token, issuedAt, expiresAt);
        OAuth2UserRequest oauth2UserRequest = new OAuth2UserRequest(clientRegistration, token);
        return this.oauth2UserService.loadUser(oauth2UserRequest);
    }
}
class UserInfoOpaqueTokenIntrospector : OpaqueTokenIntrospector {
private val delegate: OpaqueTokenIntrospector = NimbusOpaqueTokenIntrospector("https://idp.example.org/introspect", "client", "secret")
private val oauth2UserService = DefaultOAuth2UserService()
private val repository: ClientRegistrationRepository? = null
// ... constructor
override fun introspect(token: String): OAuth2AuthenticatedPrincipal {
val authorized = delegate.introspect(token)
val issuedAt: Instant? = authorized.getAttribute(ISSUED_AT)
val expiresAt: Instant? = authorized.getAttribute(EXPIRES_AT)
val clientRegistration: ClientRegistration = repository!!.findByRegistrationId("registration-id")
val accessToken = OAuth2AccessToken(BEARER, token, issuedAt, expiresAt)
val oauth2UserRequest = OAuth2UserRequest(clientRegistration, accessToken)
return oauth2UserService.loadUser(oauth2UserRequest)
}
}如果你没有使用 spring-security-oauth2-client,这仍然很简单。你只需要用你自己的 WebClient 实例来调用 /userinfo。
-
Java
-
Kotlin
public class UserInfoOpaqueTokenIntrospector implements OpaqueTokenIntrospector {
    private final OpaqueTokenIntrospector delegate =
            new NimbusOpaqueTokenIntrospector("https://idp.example.org/introspect", "client", "secret");
    private final WebClient rest = WebClient.create();

    @Override
    public OAuth2AuthenticatedPrincipal introspect(String token) {
        OAuth2AuthenticatedPrincipal authorized = this.delegate.introspect(token);
        return makeUserInfoRequest(authorized);
    }
}
class UserInfoOpaqueTokenIntrospector : OpaqueTokenIntrospector {
private val delegate: OpaqueTokenIntrospector = NimbusOpaqueTokenIntrospector("https://idp.example.org/introspect", "client", "secret")
private val rest: WebClient = WebClient.create()
override fun introspect(token: String): OAuth2AuthenticatedPrincipal {
val authorized = delegate.introspect(token)
return makeUserInfoRequest(authorized)
}
}无论如何,在创建了你的 OpaqueTokenIntrospector 之后,你应该把它作为一个 @Bean 发布,以覆盖默认值。
-
Java
-
Kotlin
@Bean
OpaqueTokenIntrospector introspector() {
    return new UserInfoOpaqueTokenIntrospector(...);
}
@Bean
fun introspector(): OpaqueTokenIntrospector {
return UserInfoOpaqueTokenIntrospector(...)
}