使用 Spring Doc 为 Spring REST API 生成 OpenAPI 3.0 文档
1、概览
文档是构建 REST API 的重要组成部分。在本教程中,我们将介绍 Spring Doc,它可简化 API 文档的生成和维护,这些文档基于 OpenAPI 3 规范,适用于 Spring Boot 3.x 应用程序。
2、设置 springdoc-openapi
Spring Boot 3.x 要求使用 springdoc-openapi version 2:
<dependency>
    <groupId>org.springdoc</groupId>
    <artifactId>springdoc-openapi-starter-webmvc-ui</artifactId>
    <version>2.1.0</version>
</dependency>
2.1、 OpenAPI 描述的路径
正确设置依赖后,我们就可以运行应用程序,并在 /v3/api-docs 路径访问 OpenAPI 描述,这是默认路径:
http://localhost:8080/v3/api-docs
此外,我们还可以使用 springdoc.api-docs 属性在 application.properties 中自定义描述的路径。例如,我们可以将路径设置为 /api-docs:
springdoc.api-docs.path=/api-docs
然后,我们就可以通过以下网址访问文档描述:
http://localhost:8080/api-docs
OpenAPI 描述定义默认为 JSON 格式。对于 yaml 格式,我们可以从以下网址获取定义:
http://localhost:8080/api-docs.yaml
3、整合 Swagger UI
除了生成 OpenAPI 3 规范之外,我们还可以将 springdoc-openapi 与 Swagger UI 集成,以与我们的 API 规范进行交互并测试端点。
Springdoc-openapi 依赖项中已经包含了 Swagger UI,因此我们可以通过如下路径访问 API 文档:
http://localhost:8080/swagger-ui/index.html
3.1、对 swagger-ui properties 的支持
springdoc-openapi 库还支持 swagger-ui properties。这些属性可作为 Spring Boot 属性使用,前缀为 springdoc.swagger-ui。
例如,我们可以通过更改 application.properties 文件中的 springdoc.swagger-ui.path 属性,自定义 API 文档的路径:
springdoc.swagger-ui.path=/swagger-ui-custom.html
现在我们的 API 文档可以通过 http://localhost:8080/swagger-ui-custom.html 访问。
再比如,我们可以使用 springdoc.swagger-ui.operationsSorter 属性根据 HTTP 方法对 API 路径进行排序:
springdoc.swagger-ui.operationsSorter=method
3.2、示例 API
假设我们的应用程序有一个管理 Book 的 controller:
@RestController
@RequestMapping("/api/book")
public class BookController {

    @Autowired
    private BookRepository repository;

    @GetMapping("/{id}")
    public Book findById(@PathVariable long id) {
        return repository.findById(id)
            .orElseThrow(() -> new BookNotFoundException());
    }

    @GetMapping("/")
    public Collection<Book> findBooks() {
        return repository.getBooks();
    }

    @PutMapping("/{id}")
    @ResponseStatus(HttpStatus.OK)
    public Book updateBook(
      @PathVariable("id") final String id, @RequestBody final Book book) {
        return book;
    }
}
然后,当我们运行应用程序时,就可以在以下位置查看文档:
http://localhost:8080/swagger-ui-custom.html
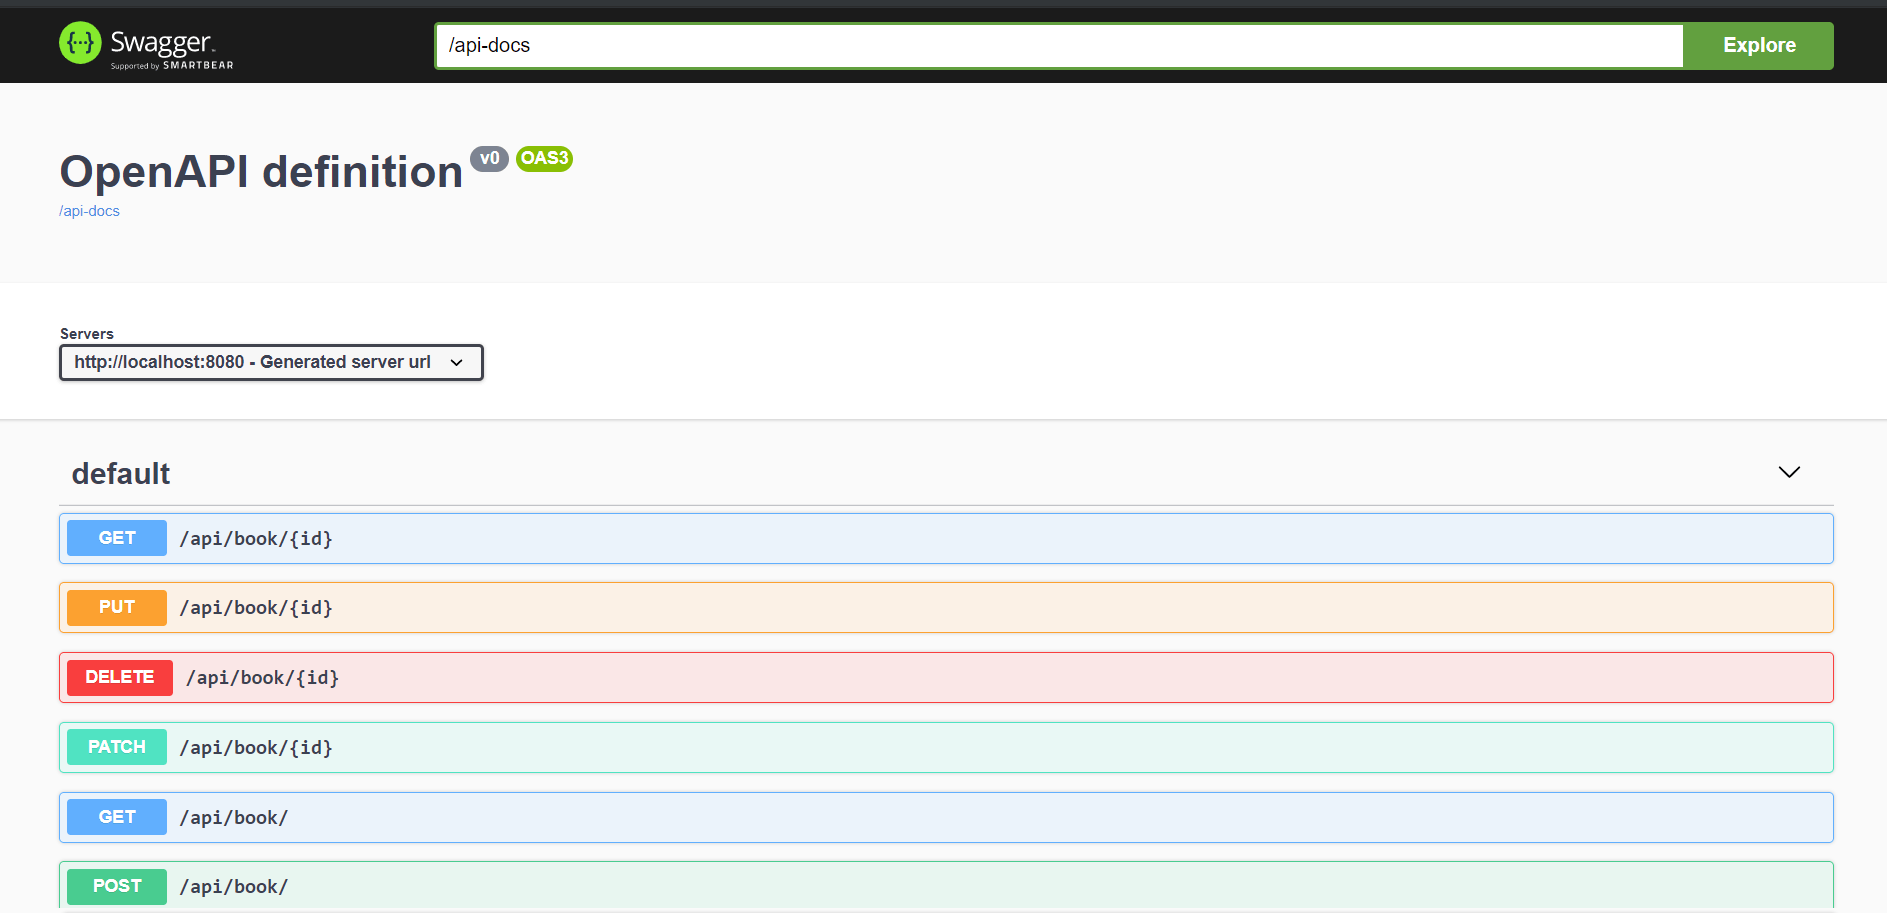
让我们深入到 /api/book 端点,查看其请求和响应的详细信息:

4、整合 springdoc-openapi 与 Spring WebFlux
我们还可以在 Spring WebFlux 应用上轻松整合 springdoc-openapi 和 Swagger UI(springdoc.swagger-ui properties 也可用)。只需要在 pom.xml 文件中添加 springdoc-openapi-webflux-ui 依赖:
<dependency>
    <groupId>org.springdoc</groupId>
    <artifactId>springdoc-openapi-starter-webflux-ui</artifactId>
    <version>2.1.0</version>
</dependency>
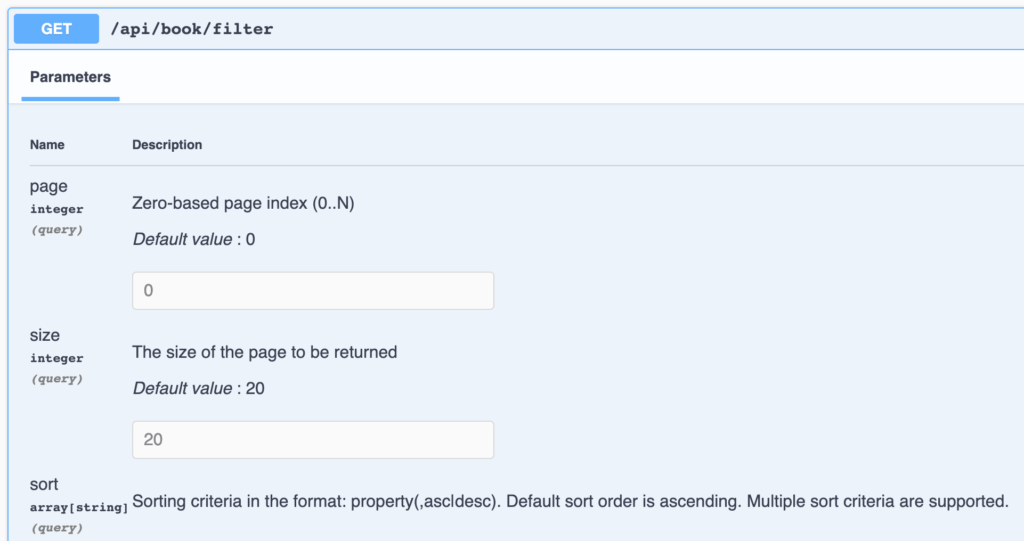
5、显示分页信息
Spring Data JPA 与 Spring MVC 无缝集成。例如,对 Pageable 的支持:
@GetMapping("/filter")
public Page<Book> filterBooks(@ParameterObject Pageable pageable) {
     return repository.getBooks(pageable);
}
自 springdoc-openapi v1.6.0 起,Pageable 支持已开箱即用。page、size 和 sort 查询参数会添加到生成的文档中:
6、使用 springdoc-openapi Maven 插件
springdoc-openapi 库提供了一个 Maven 插件 springdoc-openapi-maven-plugin,可生成 JSON 和 YAML 格式的 OpenAPI 描述。
springdoc-openapi-maven-plugin 插件与 spring-boot-maven 插件配合使用。Maven 会在 integration-test 阶段运行 openapi 插件。
让我们看看如何在 pom.xml 中配置插件:
<plugin>
    <groupId>org.springframework.boot</groupId>
    <artifactId>spring-boot-maven-plugin</artifactId>
    <version>2.3.3.RELEASE</version>
    <executions>
        <execution>
            <id>pre-integration-test</id>
            <goals>
                <goal>start</goal>
            </goals>
        </execution>
        <execution>
            <id>post-integration-test</id>
            <goals>
                <goal>stop</goal>
            </goals>
        </execution>
    </executions>
</plugin>
<plugin>
    <groupId>org.springdoc</groupId>
    <artifactId>springdoc-openapi-maven-plugin</artifactId>
    <version>1.4</version>
    <executions>
        <execution>
            <phase>integration-test</phase>
            <goals>
                <goal>generate</goal>
            </goals>
        </execution>
    </executions>
</plugin>
我们还可以对插件进行配置,以使用自定义值:
<plugin>
    <executions>
        .........
    </executions>
    <configuration>
        <apiDocsUrl>http://localhost:8080/v3/api-docs</apiDocsUrl>
        <outputFileName>openapi.json</outputFileName>
        <outputDir>${project.build.directory}</outputDir>
    </configuration>
</plugin>
插件配置的参数如下:
apiDocsUrl:访问 JSON 格式文档的 URL,默认为http://localhost:8080/v3/api-docsoutputFileName:存储定义的文件名;默认为openapi.jsonoutputDir:文档存储目录的绝对路径;默认为${project.build.directory}
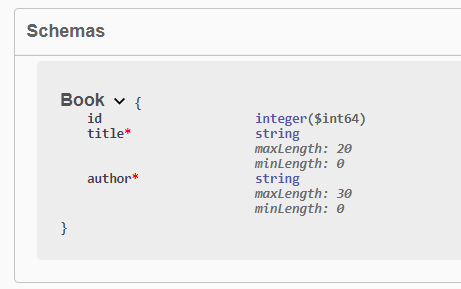
7、使用 JSR-303 Bean Validation 自动生成文档
当我们的 model 包含 JSR-303 Bean 验证注解(如 @NotNull、@NotBlank、@Size、@Min 和 @Max)时,springdoc-openapi 库会使用它们为相应的约束生成额外的 schema 文档。
让我们用图书 Book bean 来举个例子:
public class Book {

    private long id;

    @NotBlank
    @Size(min = 0, max = 20)
    private String title;

    @NotBlank
    @Size(min = 0, max = 30)
    private String author;

}
现在,为 Book Bean 生成的文档信息量更大了:
8、使用 @ControllerAdvice 和 @ResponseStatus 生成文档
在 @RestControllerAdvice 类中的方法上使用 @ResponseStatus 会自动为 response code 生成文档。在这个 @RestControllerAdvice 类中,两个方法都注解了 @ResponseStatus:
@RestControllerAdvice
public class GlobalControllerExceptionHandler {

    @ExceptionHandler(ConversionFailedException.class)
    @ResponseStatus(HttpStatus.BAD_REQUEST)
    public ResponseEntity<String> handleConversion(RuntimeException ex) {
        return new ResponseEntity<>(ex.getMessage(), HttpStatus.BAD_REQUEST);
    }

    @ExceptionHandler(BookNotFoundException.class)
    @ResponseStatus(HttpStatus.NOT_FOUND)
    public ResponseEntity<String> handleBookNotFound(RuntimeException ex) {
        return new ResponseEntity<>(ex.getMessage(), HttpStatus.NOT_FOUND);
    }
}
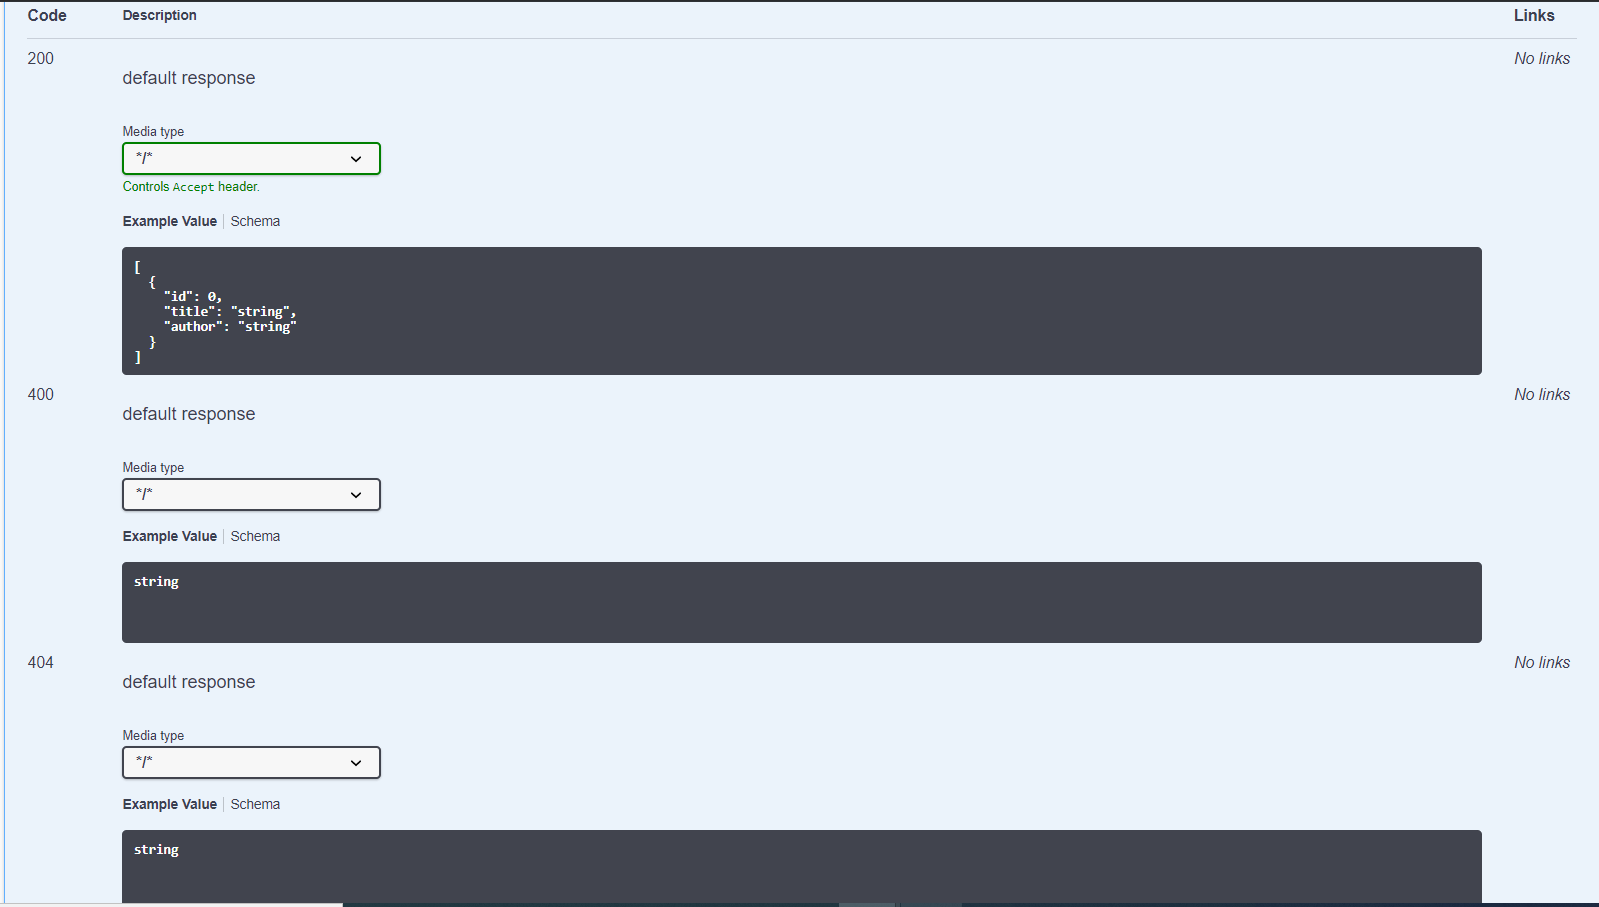
因此,我们现在可以看到 response code 400 和 404 的文档:
9、使用 @Operation 和 @ApiResponses 生成文档
接下来,让我们看看如何使用几个 OpenAPI 专用注解 为我们的 API 添加一些说明。
我们使用 @Operation 和 @ApiResponses 对 controller 的 /api/book/{id} 端点进行注解:
@Operation(summary = "Get a book by its id")
@ApiResponses(value = {
  @ApiResponse(responseCode = "200", description = "Found the book",
    content = { @Content(mediaType = "application/json",
      schema = @Schema(implementation = Book.class)) }),
  @ApiResponse(responseCode = "400", description = "Invalid id supplied",
    content = @Content),
  @ApiResponse(responseCode = "404", description = "Book not found",
    content = @Content) })
@GetMapping("/{id}")
public Book findById(@Parameter(description = "id of book to be searched")
  @PathVariable long id) {
    return repository.findById(id).orElseThrow(() -> new BookNotFoundException());
}
效果如下:
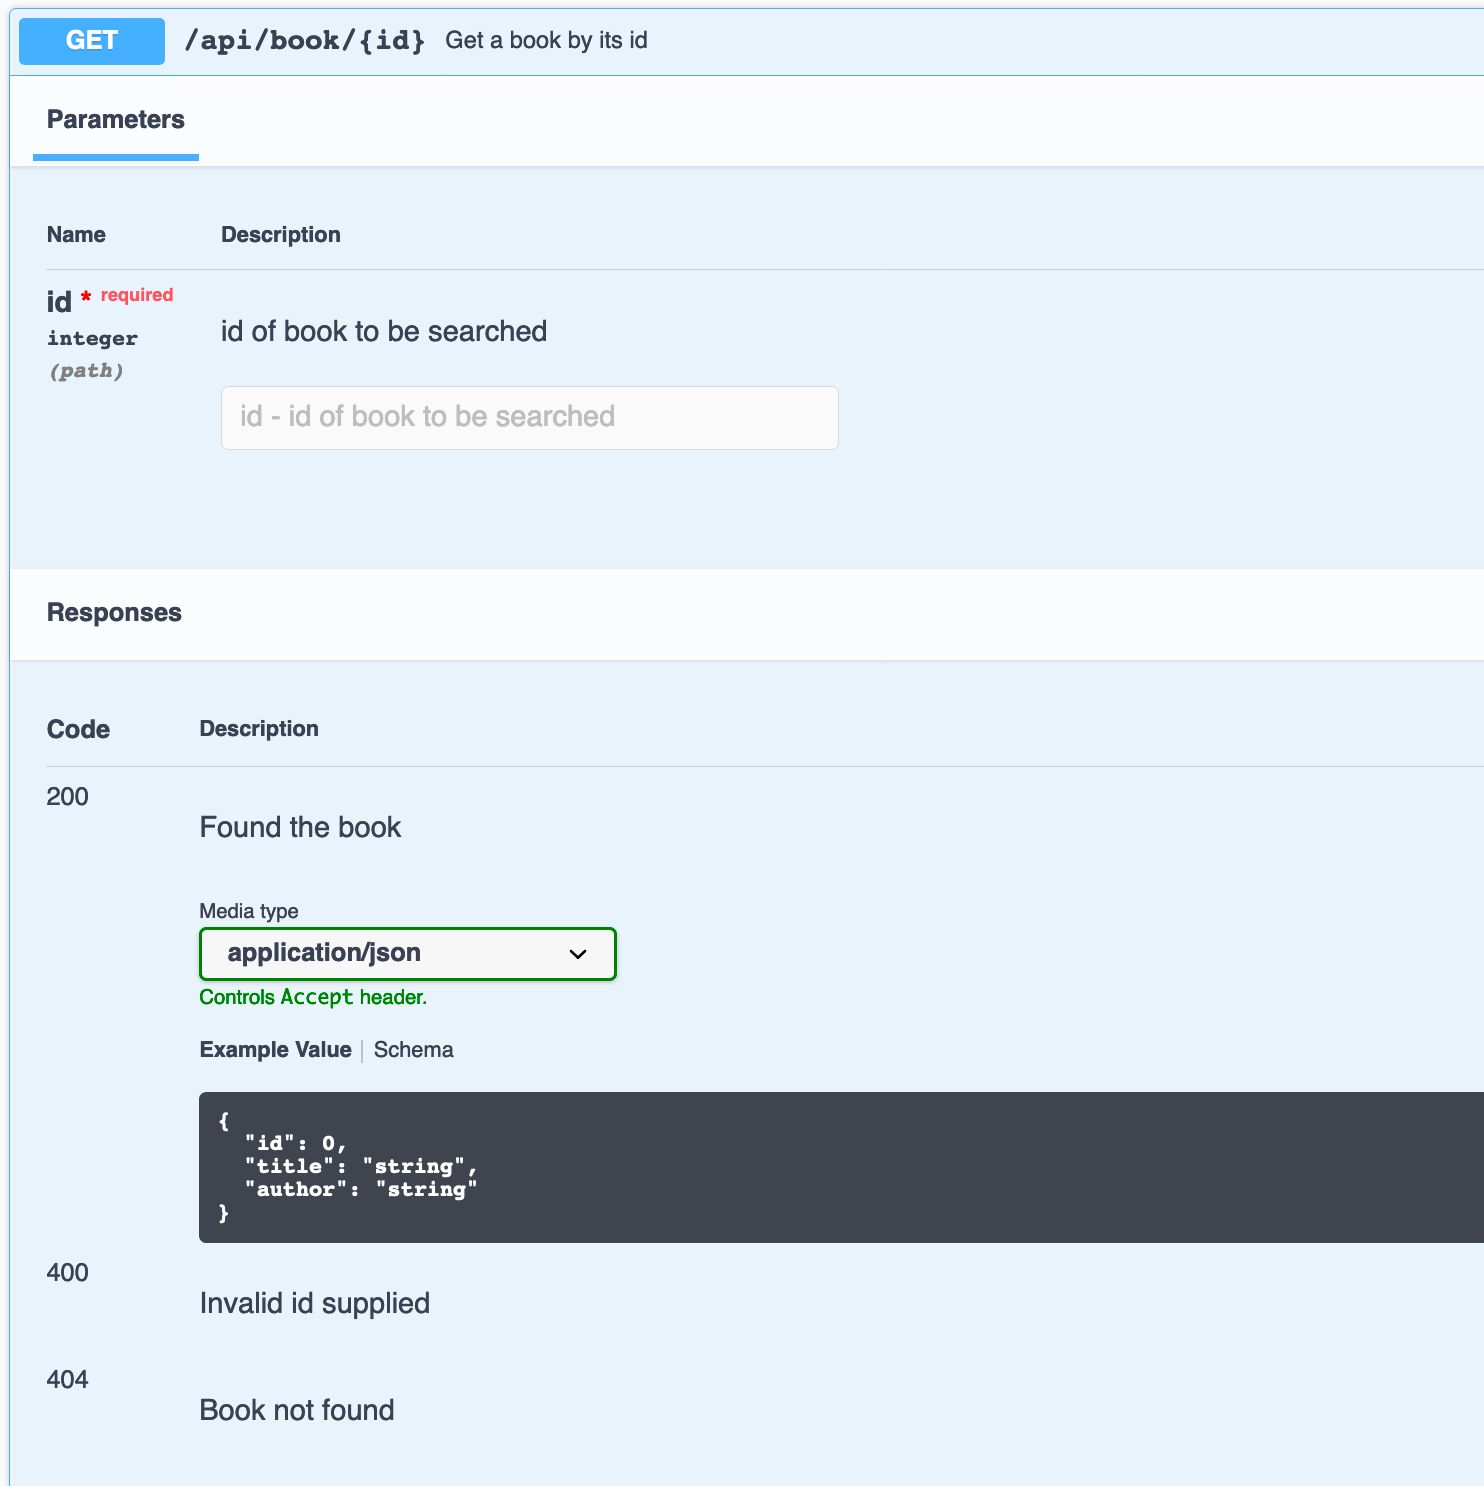
我们可以看到,我们添加到 @Operation 中的文本被置于 API 操作层。同样,在 @ApiResponses 容器注解中添加到各种 @ApiResponse 元素中的说明也在这里可见,从而为我们的 API 响应增添了意义。
我们没有为上述 400 和 404 响应定义任何 schema。由于我们为它们定义了一个空 @Content,因此只显示了它们的描述。
11、对 Kotlin 的支持
Spring Boot 2.x 起,就为 Kotlin 提供了一流的支持。由于我们使用的是 Spring Boot 3.x 版本,因此 SpringDoc 支持用 Kotlin 编写的应用程序。
我们将在 Kotlin 中创建一个简单的 Foo API,以了解其实际效果。
完成初始设置后,我们将添加一个 data class 和一个 controller。我们将把它们添加到 Boot 应用程序的一个子包中,这样当程序运行时,它就会同时加载我们的 FooController 和之前的 BookController:
@Entity
data class Foo(
    @Id
    val id: Long = 0,

    @NotBlank
    @Size(min = 0, max = 50)
    val name: String = ""
)

@RestController
@RequestMapping("/")
class FooController() {
    val fooList: List = listOf(Foo(1, "one"), Foo(2, "two"))

    @Operation(summary = "Get all foos")
    @ApiResponses(value = [
    ApiResponse(responseCode = "200", description = "Found Foos", content = [
            (Content(mediaType = "application/json", array = (
                ArraySchema(schema = Schema(implementation = Foo::class)))))]),
    ApiResponse(responseCode = "400", description = "Bad request", content = [Content()]),
    ApiResponse(responseCode = "404", description = "Did not find any Foos", content = [Content()])]
    )
    @GetMapping("/foo")
    fun getAllFoos(): List = fooList
}
现在,当我们点击 API 文档 URL 时,也会看到 Foo API:

为了增强对 Kotlin 类型的支持,我们可以添加此依赖项:
<dependency>
    <groupId>org.springdoc</groupId>
    <artifactId>springdoc-openapi-starter-common</artifactId
    <version>2.1.0</version>
</dependency>
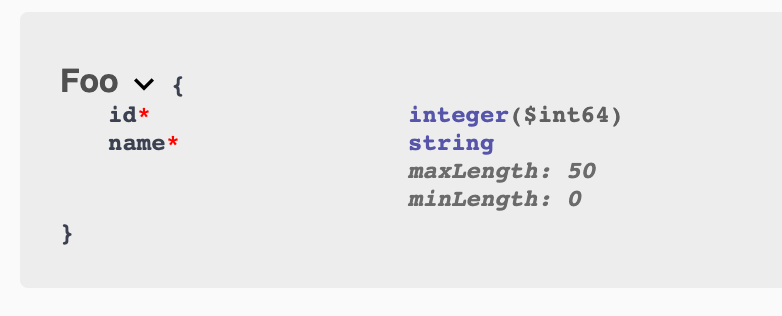
之后,我们的 Foo schema 显示的信息更加详细,就像我们添加 JSR-303 Bean Validation 时一样:
11、总结
在本文中,我们学习了在项目中设置 springdoc-openapi。然后,我们了解了如何将 springdoc-openapi 与 Swagger UI 集成。最后,我们还了解了如何在 Spring Webflux 项目中实现这一功能。
接下来,我们使用 springdoc-openapi Maven 插件为我们的 API 生成 OpenAPI 定义,并了解了如何从 Spring Data 公开分页和排序信息。之后,我们了解了 springdoc-openapi 如何使用 JSR 303 Bean validation 注解和 @ControllerAdvice 类中的 @ResponseStatus 注解自动生成文档。
我们还学习了如何使用一些 OpenAPI 特有的注解为我们的 API 添加说明。最后,我们还了解了 OpenAPI 对 Kotlin 的支持。
Springdoc-openapi 可根据 OpenAPI 3 规范生成 API 文档。此外,它还为我们处理了 Swagger UI 配置,使 API 文档的生成变得相当简单。
参考:https://www.baeldung.com/spring-rest-openapi-documentation
